

With V-Ray 5 Viewport IPR, building up a 3d scene has become a lot faster, as there's hardly a need to test render lights and materials.
Note: IPR(Interactive Production Rendering) in the Viewport works with CPU, GPU or both.
To start, ensure to setup your 3ds Max scene properly first:
1- Before starting to model and/or create lights in a scene,
ensure to have these parameters set up properly and accordingly.

Units Setup
toolbar

Units and System
Unit Setup
Note: This is an excerpt (short extract) of my New Book published with Taylor & Francis/CRC Press, entitled,
V-Ray 5 for 3ds Max 2020: 3D Rendering Workflows
Click on the image below to find out more about my new book.
2-Also, go to the Customize toolbar and choose the Preferences
option.

Preferences option
3-Under Gamma and LUT tab, turn on the Enable Gamma/LUT
Correction, and set it to 2.2.

Gamma and LUT tab
4-Under Files tab, if you happen to be working on a large file
that's taking too long to save, you can increase the Backup Interval (minutes)
to 30 or higher, and choose to Compress on Save.
Compressed Max files are automatically reduced to half or
less of their original size, when saved.

Files Tab
5-Under General tab, increase the Scene Undo Levels to about
500. This will give you the flexibility to undo (Ctrl+Z) up to 500 levels, if
required.

General tab
6-To configure the viewports, simply click on the + text and
choose to Configure Viewports

Configure
Viewports
7-Under the Layout tab, select a suitable viewport layout. Users
can also right click on a specific layout and choose the viewport.
Note: When
creating the sunlight object, it's best to choose a four viewport layout.

Viewport Layout
8-The Display Performance is frequently used to set the
display quality of Textures in the viewport, etc.
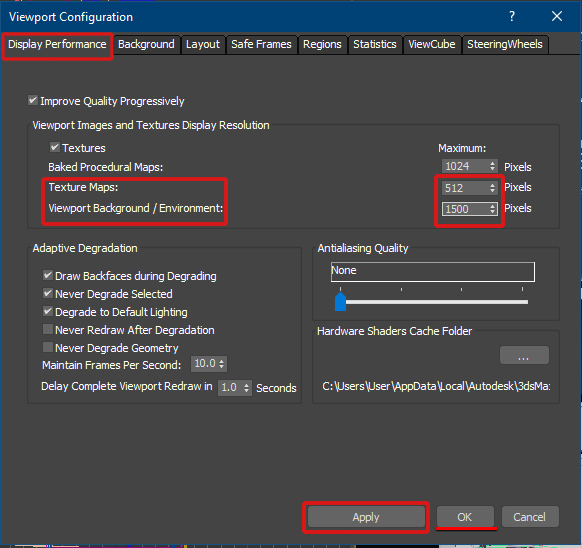
Display Performance
tab
10-Next, open the Render Setup dialog (F10). Under V-Ray tab,
set the Image filter as VRayLanczosFilter.
Under Color mapping parameters, set its Type to Exponential.
This will reduce overly burnt areas in the image, and give a more realistic
look to the render.
Set, the Gamma value to 2.2.
Under Mode, set it to, Color mapping and gamma. This will ensure what is seen in the VFB is consistent with
what is saved into your hard drive.
Note: If you
choose another Color Mode type, your saved renders will look either darker or
brighter from what is seen in your VFB.
Scenes saved in earlier versions of 3ds Max may require
merging in a completely new 3ds Max scene with the above Color Mode type, in
order to override the problem.

Image filter and
Color mapping settings
While building and testing the scene enable the Progressive image Sampler.

Progressive image sampler
And set the Primary Engine as Brute Force, and the Secondary engine as Light cache.
Note: Light Mix and other new V-Ray 5 features only work with Brute Force as a Primary engine.
Note: Light Mix and other new V-Ray 5 features only work with Brute Force as a Primary engine.

Brute force and Light cache
Lights
1-To create the sunlight, ensure to have all four viewports in
display (zoomed out).
Go to the Create panel and select the Lights button.
Under Photometric list, choose the VRay type.

Choose VRay light
2-Next, select the VRaySun button, followed by clicking and
dragging it in the Front viewport to create it.

Create VRaySun
object
3-If prompted with the dialog to automatically add a VRaySky
environment map, click Yes to accept it.

Automatically add
a VRaySky environment map dialog
Also, go to the Modify panel
and change the default Sky model to Improved.

Change the
default Sky model to Improved
V-Ray
Viewport IPR
4-Next, enable the V-Ray Viewport IPR option the camera
viewport.

Enable the V-Ray
Viewport IPR option

IPR rendered in
the viewport , in 1:37 minutes
5-Begin moving the VRaySun object and its target around, until
an appealing dusk shot with shadows is achieved.
The final sun head position was, X: 26841.133mm, Y: 108894.687mm,
Z: 17662.906mm

VRaySun head position
6-It's final target position was, X: 7725.571mm, Y: -14757.275mm,
Z: -681.522mm

VRaySun target
position

Final VRaySun
position in the V-Ray Viewport IPR
VRayLightMix
7-Next, go the Render Setup dialog (F10). Under Render Elements
tab, click to Add the VRayLightMix element.

Add the
VRayLightMix element
Note: By default,
it is set to Group by Instanced lights. This option displays all instanced
lights in the scene as one Layer in the VFB.
If you want the flexibility to manipulate the instanced
lights individually, simply choose the option to Group by Individual lights.

LightMix with instanced lights displayed
individually
V-Ray
Frame Buffer layers
8-Open the V-Ray Frame Buffer dialog and add the Filmic
tonemap Layer.

Add the Filmic
tonemap Layer
9-Under its Properties Type, change it to Linear. You should
also start seeing changes in the Viewport IPR.
Note: You may need to tweak some of its default Properties
as materials are added in the scene.

Filmic tonemap: AMPAS Type
10-Also, add a Lookup Table Layer, and load the LUT file under
the name of, 3DCollective_sRGB_Agfa_Futura_03Hard.cube .
Disable the function to, Convert sRGB Space first and enable
the Save in image option.
Note: This LUT
file worked well for this scene. However, feel free to use another LUT file, if
desired.

Lookup Table Layer
added
11-To add a bit of contrast to the render, select the camera.
In its Modify panel, under Color & Exposure parameters, enable the
Vignetting function.

Vignetting enabled
in the camera

Final result with V-Ray
Viewport IPR
12-To add a bit of haze to the sunlight, open the Environment
dialog (8). Under the Atmosphere rollout parameters, add the
VRayAerialPerspective shader.
Under its General parameters, set the Visibility range (in
meters) to about 2000.0. The Atmosphere height to about 100 and enable the
function to Affect environment rays.
These values worked well for this scene. However, feel free
to try different values, if desired.

VRayAerialPerspective parameters
I hope you have found it useful, and share it.
Also, please check another detailed step-by-step tutorial in the link directly below about, VRay Material Library: Textures, Procedural maps, Shaders and All functionalities:

As mentioned earlier, the above is an excerpt (short extract) of my New Book published with Taylor & Francis/CRC Press, entitled,
V-Ray 5 for 3ds Max 2020: 3D Rendering Workflows
Click on the image below to find out more about my new book.
Ta
J
P.S: Take care and Stay Safe
Video Captions available (CC)
Video Captions available (CC)
Video Captions available (CC)
Video Captions available (CC)
Video Captions available (CC)


 |
| Course 1: VRay 3ds Max Interior Rendering Tutorials |
 |
| 2: Season's Greetings VRay & 3ds Max Tutorial |
 |
| Course 3: Planning Applications for Verified Views |
 | |
| Course 4: 3d People + 3ds Max + VRay + Photoshop |
 |
| Course 5: Exterior Daylight with V-Ray + 3ds Max + Photoshop |
| Course 6: Exterior Night with V-Ray + 3ds Max + Photoshop |
| Course 7: Interior Daylight with V-Ray + 3ds Max + Photoshop |
 |
| Course 8: Interior Night with V-Ray + 3ds Max + Photoshop |


Important Terminologies & Descriptions:
In addition, there is a huge online support for this software, and countless online sites with tips and tutorials.
Finally, there are readily available books, online/college courses, and its full documentation at Adobe.com
A 3d Visualiser works within the realm of 3d visualization, a sector of the Computer Graphics Industry (or CGI) that is primarily concerned with the visual presentation of design concepts and ideas. And a company within the 3d visualisation sector offers to its customers (among many things) 3d Visualization Services.
3d Rendering: Is the process of converting the three dimensional (3D) data seen in a 3d scene into 2D image/s (rasterized).
The rasterization process include, the rendering parameters, the rendering engine, lights, 3d models, textures, shaders, and other effects.
3D renders can be a sequence of animated objects/effects/cameras, or a single frame with a still camera and object/s.
Some of the articles, Videos and Tutorials depicted here will take you through the process of rendering.
Photorealistic Rendering: Is the Process or Art of making a typical Computer Generated Image/render (CGI) look indistinguishable from a real photo.
To achieve this, users often need to possess the skills and the"eye" to appreciate good photography, cameras, composition, lighting, shaders, materials, 3d modelling, rendering and have some post-production skills.
Some of the articles, Videos and Tutorials depicted here will help you achieve truly photorealistic renderings.
Post-Production: Is the process of creating effects or/and results after/post the main process.
This terminology can be used to describe the results (post-production) of main processes such as 3d renderings and/or filming a scene.
The post-production often takes place in applications such as Photoshop, After Effects, Nuke, etc.
Some of the articles, Videos and Tutorials depicted here will take you through the process.
Architectural Rendering, or architectural illustration/Visualization, is the art/process of creating two-dimensional images or animations depicting the attributes of an architectural design, while using state of the art applications such as, Autocad, 3ds max, VRay, Cinema 4d, Blender, Maya, Corona, Photoshop, etc
Some of the articles, Videos and Tutorials depicted here will take you through this amazing process.
Textures: Is a term often used to describe photographed 2d images to be later used in a toggle of a shader or procedural map.
Textures can be used in the Diffuse toggle, Reflect, Glossy effects, Bump, Displacement, etc.
Some of the articles, Videos and Tutorials depicted here will take you through the process of applying textures.
Materials: Is a term often used to describe maps, textures,procedural maps or shaders, depending on the context the term is being used.
Some of the articles, Videos and Tutorials depicted here will take you through the process of applying materials.
Procedural materials: Is a term often used to describe maps with editable/proprietary parameters/functions.
Some of the articles, Videos and Tutorials depicted here will take you through the process of applying procedural materials.
Shaders: Is a term often used to describe complex materials with functions and procedural maps created for a specific purpose.
Some of the articles, Videos and Tutorials depicted here will take you through the process of applying shaders.
Architectural Rendering, or architectural illustration/Visualization, is the art/process of creating two-dimensional images or animations depicting the attributes of an architectural design, while using state of the art applications such as, Autocad, 3ds max, VRay, Cinema 4d, Blender, Maya, Corona, Photoshop, etc
Some of the articles, Videos and Tutorials depicted here will take you through this amazing process.
Studio Lights are fundamental in the process of creating appealing images/renders.
The overall lighting determines not only the brightness and the darkness; but also the tone, mood and the atmosphere of a scene.
Hence the importance to control and manipulate the lights accordingly, in order to fully capture the textures and the vibrancy of your objects.
By distributing the shadows and the highlights accurately, you can achieve truly appealing images/renders.
Some of the articles, Videos and Tutorials depicted here will take you through the process of creating and applying Studio Lights.
Interior design is the art and science of enhancing the interior of a building or/and a space to achieve a more aesthetically pleasing and comfortable environment for those using the space.
An interior designer is someone who plans, researches, coordinates, and manages such projects. Interior design is a multifaceted profession that includes conceptual development, space planning, site inspections, programming, research, communicating with the stakeholders of a project, construction management, and execution of the design.
V-Ray:
Vray is a rendering engine that uses global illumination algorithms,
including path tracing, photon mapping, irradiance maps and directly
computed global illumination.
Furthermore,
it is used as a commercial plug-in for third-party 3D computer graphics
software applications such as 3ds max, Maya, Houdini, Blender, Nuke,
etc, for
visualizations and computer graphics in industries such as media,
entertainment, film and video game production, industrial design,
product design and architecture.
3ds Max: Autodesk
3ds Max, formerly 3D Studio and 3D Studio Max, is a professional 3D
computer graphics program designed to create 3D animations, models,
games and images.
In addition, it has
modelling, animation and movie effects capabilities, frequently used by
video game developers, TV commercial studios and architectural
visualization studios.
3ds Max also features shaders, dynamic simulations, particle systems, plug-ins, and much more, with its own scripting language.
Adobe Photoshop: Photoshop is a powerful raster based graphics program produced by the Adobe Corporation.
It
is widely used for a variety of photo/image editing purposes worldwide.
The program has a huge number of filters, functions, plug-ins, scripts,
etc.In addition, there is a huge online support for this software, and countless online sites with tips and tutorials.
Finally, there are readily available books, online/college courses, and its full documentation at Adobe.com
A 3d Visualiser works within the realm of 3d visualization, a sector of the Computer Graphics Industry (or CGI) that is primarily concerned with the visual presentation of design concepts and ideas. And a company within the 3d visualisation sector offers to its customers (among many things) 3d Visualization Services.
3d Rendering: Is the process of converting the three dimensional (3D) data seen in a 3d scene into 2D image/s (rasterized).
The rasterization process include, the rendering parameters, the rendering engine, lights, 3d models, textures, shaders, and other effects.
3D renders can be a sequence of animated objects/effects/cameras, or a single frame with a still camera and object/s.
Some of the articles, Videos and Tutorials depicted here will take you through the process of rendering.
Photorealistic Rendering: Is the Process or Art of making a typical Computer Generated Image/render (CGI) look indistinguishable from a real photo.
To achieve this, users often need to possess the skills and the"eye" to appreciate good photography, cameras, composition, lighting, shaders, materials, 3d modelling, rendering and have some post-production skills.
Some of the articles, Videos and Tutorials depicted here will help you achieve truly photorealistic renderings.
Post-Production: Is the process of creating effects or/and results after/post the main process.
This terminology can be used to describe the results (post-production) of main processes such as 3d renderings and/or filming a scene.
The post-production often takes place in applications such as Photoshop, After Effects, Nuke, etc.
Some of the articles, Videos and Tutorials depicted here will take you through the process.
Architectural Rendering, or architectural illustration/Visualization, is the art/process of creating two-dimensional images or animations depicting the attributes of an architectural design, while using state of the art applications such as, Autocad, 3ds max, VRay, Cinema 4d, Blender, Maya, Corona, Photoshop, etc
Some of the articles, Videos and Tutorials depicted here will take you through this amazing process.
Textures: Is a term often used to describe photographed 2d images to be later used in a toggle of a shader or procedural map.
Textures can be used in the Diffuse toggle, Reflect, Glossy effects, Bump, Displacement, etc.
Some of the articles, Videos and Tutorials depicted here will take you through the process of applying textures.
Materials: Is a term often used to describe maps, textures,procedural maps or shaders, depending on the context the term is being used.
Some of the articles, Videos and Tutorials depicted here will take you through the process of applying materials.
Procedural materials: Is a term often used to describe maps with editable/proprietary parameters/functions.
Some of the articles, Videos and Tutorials depicted here will take you through the process of applying procedural materials.
Shaders: Is a term often used to describe complex materials with functions and procedural maps created for a specific purpose.
Some of the articles, Videos and Tutorials depicted here will take you through the process of applying shaders.
Architectural Rendering, or architectural illustration/Visualization, is the art/process of creating two-dimensional images or animations depicting the attributes of an architectural design, while using state of the art applications such as, Autocad, 3ds max, VRay, Cinema 4d, Blender, Maya, Corona, Photoshop, etc
Some of the articles, Videos and Tutorials depicted here will take you through this amazing process.
Studio Lights are fundamental in the process of creating appealing images/renders.
The overall lighting determines not only the brightness and the darkness; but also the tone, mood and the atmosphere of a scene.
Hence the importance to control and manipulate the lights accordingly, in order to fully capture the textures and the vibrancy of your objects.
By distributing the shadows and the highlights accurately, you can achieve truly appealing images/renders.
Some of the articles, Videos and Tutorials depicted here will take you through the process of creating and applying Studio Lights.
Interior design is the art and science of enhancing the interior of a building or/and a space to achieve a more aesthetically pleasing and comfortable environment for those using the space.
An interior designer is someone who plans, researches, coordinates, and manages such projects. Interior design is a multifaceted profession that includes conceptual development, space planning, site inspections, programming, research, communicating with the stakeholders of a project, construction management, and execution of the design.
Retail Real State are properties developed/catered for Entertainment and Shopping Purposes.
These include Shopping Centers (or Malls), Clothing Stores, Cinemas, etc.