3d | Unreal Engine | VR | AR | Computer Vision | Verified Views for Planning Applications | Camera Match | Drone Camera Match | Photomontage | Photoshop |Technical Support | High-End 3D Rendering | 3D Tutorials
This is a video tutorial I have recently created for my new YouTube channel.
Architectural Rendering, or architectural illustration, is the art/process of creating two-dimensional images or animations depicting the attributes of an architectural design, while using state of the art applications such as, Autocad, 3ds max, VRay, Cinema 4d, Blender, Maya, Corona, Photoshop, etc
Post-Productionis the process of creating effects or/and results after/post the main process.
This
terminology can be used to describe the results (post-production) of
main processes such as 3d renderings and/or filming a scene.
The post-production often takes place in applications such as Photoshop, After Effects, Nuke, etc.
Some of the articles, Videos and Tutorials depicted here will take you through the process.
In this video tutorial, users are taken through the quick process of transforming a basic render into an appealing one, using post-production techniques in photoshop.
You can watch it in full screen by clicking its button; or by simply going to my new YouTube channel.
I hope you enjoy it.
Download the full course by going to my GumroadpageHEREor clicking the links below:
The 3d Models, Files/Projects, Textures, Videos, Subtitles, and much more are FREE for my Patreon supporters to download.
Or, buy the Full class/course(with 3d models, files/projects, textures, PS, Full Videos, etc), for $10 dollars by clicking on the link below.
You don't need to provide your
postal address details, or have a
PayPal account to make a Paypal transaction (Paypal accepts Cards,
also). Choose the second option below to pay
without a paypal account (Pay by debit or credit card).
The above link will take users to the PayPal page. After the transaction is complete, the
user will be automatically redirected to a Google drive, to access and
download the project files, Textures, and the Video courses.
Also, please Join my Patreon page or Gumroadpage to download Courses; Project files; Watch more Videos and receive Technical Support. Finally, check my New channels below:
Important Terminologies & Descriptions:
3d Rendering: Is the process of converting the three dimensional (3D) data seen in a 3d scene into 2D image/s (rasterized).
The
rasterization process include, the rendering parameters, the rendering
engine, lights, 3d models, textures, shaders, and other effects.
3D renders can be a sequence of animated objects/effects/cameras, or a single frame with a still camera and object/s.
Some of the articles, Videos and Tutorials depicted here will take you through the process of rendering.
Photorealistic Rendering: Is the Process or Art of making a typical Computer Generated Image/render (CGI) look indistinguishable from a real photo.
To
achieve this, users often need to possess the skills and the"eye" to
appreciate good photography, cameras, composition, lighting, shaders,
materials, 3d modelling, rendering and have some post-production
skills.
Some of the articles, Videos and Tutorials depicted here will help you achieve truly photorealistic renderings.
Textures: Is a term often used to describephotographed 2d images to be later used in a toggle of a shader or procedural map.
Textures can be used in the Diffuse toggle, Reflect, Glossy effects, Bump, Displacement, etc.
Some of the articles, Videos and Tutorials depicted here will take you through the process of applying textures.
Materials: Is a term often used to describe maps, textures,procedural maps or shaders, depending on the context the term is being used.
Some of the articles, Videos and Tutorials depicted here will take you through the process of applying materials.
Procedural materials: Is a term often used to describe maps with editable/proprietary parameters/functions.
Some of the articles, Videos and Tutorials depicted here will take you through the process of applying procedural materials.
Shaders: Is a term often used to describe complex materials with functions and procedural maps created for a specific purpose.
Some of the articles, Videos and Tutorials depicted here will take you through the process of applying shaders.
V-Ray: Is a rendering engine that uses global illumination
algorithms, including path tracing, photon mapping, irradiance maps and
directly computed global illumination.
Furthermore, it is used as a commercial plug-in for
third-party 3D computer graphics software applications such as 3ds max, Maya, Houdini, Blender, Nuke, etc, for
visualizations and computer graphics in industries such as media,
entertainment, film and video game production, industrial design, product
design and architecture.
3ds Max: Autodesk 3ds Max, formerly 3D Studio and 3D Studio Max, is a
professional 3D computer graphics program designed to create 3D animations,
models, games and images.
In addition, it has modelling, animation and movie effects
capabilities, frequently used by video game developers, TV commercial studios
and architectural visualization studios.
3ds Max also features shaders, dynamic simulations, particle
systems, plug-ins, and much more, with its own scripting language.
Adobe Photoshop: Photoshop is a powerful raster based graphics program produced by the Adobe Corporation.
It
is widely used for a variety of photo/image editing purposes worldwide.
The program has a huge number of filters, functions, plug-ins, scripts,
etc.
In addition, there is a huge online support for this software, and countless online sites with tips and tutorials.
Finally, there are readily available books, online/college courses, and its full documentation at Adobe.com
A3d Visualiser works
within the realm of 3d visualization, a sector of the Computer Graphics
Industry (or CGI) that is primarily concerned with the visual
presentation of design concepts and ideas. And a company within the 3d
visualisation sector offers to its customers (among many things) 3d
Visualization Services.
Tips & tricks for
architectural Visualisation & Verified Views for Planning Applications: Part 2
This part 2 series will focus mainly on proprietary rendering tools such as batch camera render; and on a fantastic tool/script for Verified Views Methodology/Planning
The following tips and tutorials are mostly related to
3d architectural visualisation.
However,
users from similar industries such as, Architecture and Architectural design may also find the following tutorials/tips useful.
Verified View/s methodology or Accurate Visual Representation (AVR)::Is an accurate Photomontage of a proposed design/building, using the Guidelines for Landscape and Visual Impact Assessment (GLVIA3).
"Verified Views" are distinct from standard artistic photomontages due to a rigorous, data-driven process:
Survey Data: The process involves a professional surveyor recording the exact camera location, height, lens details, GPS data, and specific key points in the physical environment.
Accurate 3D Model Alignment: This survey data is used to accurately align a detailed 3D model of the proposed development within the real-world photograph, ensuring correct scale, perspective, and spatial relationships.
Council Compliance: This methodology ensures the final image is a robust and defensible representation of the proposed development, which is often a key requirement for local authorities when assessing visual impact.
Companies work with architects, developers, and planning consultants to produce the necessary documentation to aid in securing planning approvals.
Photomontage in 3d Visualization:
Is the process of incorporating a 3d object/design/building into a 2d
image/photo, while matching the camera angle/settings, position and the
overall lighting depicted in the 2d photo.
This laborious process often requires the usage of a 2d and a 3d application.
For more information about this entire process, please check the PDF linkbelow I have put together for gobotree.com
To create an accurate Photomontage/Verified View,
the 3d Visualizer/specialist needs a: 3d context model to plot/plan and create the
shots; a photo of the location in question; the survey data; camera
information; a 2d and a 3d application to create the Final Verified
View/s .
Some of the articles, The above Video, and tutorials depicted in this blog will take you through the entire process.
Planning Applications:These
can be used to find out whether a proposed development is likely to be
approved by the planning authority, before substantial costs are
incurred developing a detailed design.
Planning Permissions:Is
the legal process of determining whether proposed developments should
be permitted. Responsibility for planning lies with local planning
authorities (usually the planning department of the district or borough
council). The legislation, policy and guidance that underpins planning
in England can be found on the government's National Planning Practice
Guidance
2025 New updated 3ds Max Script for Verified Views
Play the above Video in Full HD and with Subtitles (CC)
Verified View photography with survey points drawn in by the surveyor
Verified View AVR1 of the proposed new Data Centre, outlined in Red
Verified View AVR3: Fully Rendered Data Centre in the distance
The above video tutorial takes users through the step-by-step process of creating an entire new Verified View Accurately, with one click of a button, using this Amazing New 3ds Max script.
Within less than one second, this amazing new script Automatically and Simultaneouslycreates accurate survey points in the scene, based on the surveyor’s information.
With one simple click, this new 3ds max script, will save users countless hours of work per verified view, or days, if working on multiple camera views.
Creating verified views for planning applications has never been easier, quicker and more accurate.
Key 3ds Max Script features instantly/automatically created simultaneously with one click:
1-Accurately creates and places the survey point coordinates in the 3ds Max scene instantly using/sourcing the data from the surveyor and the photographer’s data spreadsheet.
2- Accurately creates and places the physical camera in the 3ds Max scene instantly using/sourcing the data from the surveyor and the photographer’s data spreadsheet.
3-Accurately creates and places the daylight system in the 3ds Max scene instantly using/sourcing the data from the surveyor and the photographer’s data spreadsheet.
4-Accurately creates, names and places the physical camera in the 3ds Max scene instantly using/sourcing the data from the surveyor and the photographer’s data spreadsheet.
5- Accurately sets up the render Output Size and padlocks it based on the background image size instantly using/sourcing the data from the surveyor and the photographer’s data spreadsheet.
6-Automatically enables the “Show Safe Frames” functionality and inserts the camera viewport background image being directly sourced from the "images" folder.
7-And much more…
*Latest Updates for this 3ds Max Script :
The script now looks at a folder named "images" to directly source the camera viewport background image from. The settings.csv file NO LONGER has the " viewport_background_image" column to enter the directory and file name.
So, users can simply place/replace and rename any viewport background image file in the "images" folder. The folders named "images" and "settings" CANNOT BE RENAMED though.
The Full 3ds Max script comes with the following:
1-The 3ds Max script
2-The "settings" spreadsheet file with the scene's settings data (*.csv)
The 3ds Max script requires two separate spreadsheet files in order to instantly generate the entire scene with accurate survey data points, physical camera, background image, daylight system, etc:
1-One spreadsheet file with survey coordinates
2-Another spreadsheet file with the scene settings.
The spreadsheet file formats need to be *.csv, otherwise the 3ds Max script will generate errors when running.
The folders and file names cannot have spaces between the words. Use underscores instead. Otherwise, the 3ds Max script will generate errors when running.
The surveyor’s coordinate spreadsheet file with survey coordinates needs to be in the same folder as the 3ds Max script.
The spreadsheet file named settings.csv needs to be in separate folder named “settings”. The folder names CANNOT be renamed.
The csv file names can be renamed according to their project names (e.g. V6_scene_settings.csv) .
There can only be one main spreadsheet csv file in each of the folders the 3ds max script will be referencing from.
To download the full 3ds Max script with files, please contact me directly, or visit my Gumroad page HERE:
In architectural visualisation, typing in individual survey point
values in 3ds Max, can be very time consuming; especially when working with
multiple camera views for verified views.
Most verified views come with at least 10 individual survey
points, per camera.
Prior to creating and signing off each camera view with the architects/developers, you need to do the following first:
Get a map/drawing depicting the proposed Distant Views from the architects/developers
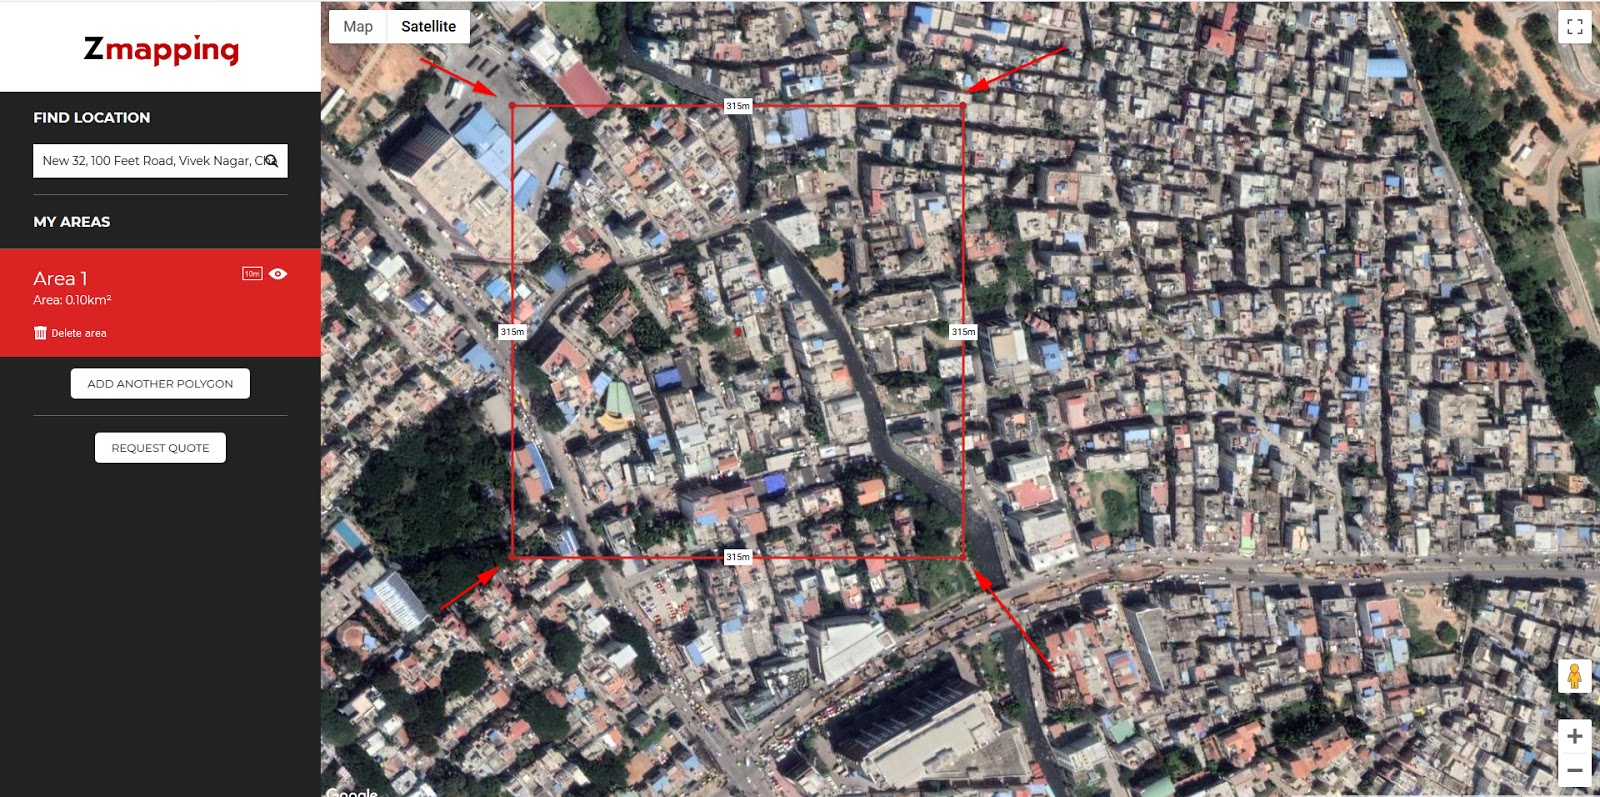
Find a 3d context model covering the above mentioned area/s. Zmapping provides excellent 3d context models for verified views.
To extract the 3d context model, do the following:
b)- In the "Find Location" section, type in the location and click on "Add Polygon" button
c)- Following that, click on "choose a type of polygon" and pick one from the list
d)- Once the type of polygon is chosen, click on "Click here to start plotting"
e)- Click anywhere on the satellite map A square box should appear
f)-Hover over one of the polygon points until you see the finger mouse symbol
g)-Begin moving each of the points (if/when necessary) until you cover the desired area
h)- Once satisfied with your area, click on the "Request quote" button, fill in the details and "Get a quote".
You should receive the context model shortly after.
Once you receive the 3d context model from Zmapping, set up your camera views in 3ds max, to match the above mentioned proposed views, The proposed new 3d building should also be inserted.
Send out the CG (computer Generated) "chalk renders" of the proposed views to the architects/developers, for revision/approval .
Once the camera views have been approved/signed off by the architects/developers, organize a Surveyor and a good Photographer to go on site to survey and photograph the agreed/signed off views.
Prior to sending the Photographerand theSurveyor to the site, you need to do the following first:
a)- Mark up the position/location, and the number of survey points you want on each of the agreed/signed off camera views ( mark up/circle around at least 10 survey points on each of the CG "chalk renders") .
b)- Ensure the Photographer chooses the ideal day/time to take stunning photos
Surveyor's Equipment Required
• Global Positioning System (GPS)
• Total Station (with good reflectorless EDM range)
• Precise Level
Field Survey Methodology
•
It should be noted that some locations will often contain coincidental
reference points and hence the work should be carefully analysed to
prevent excessive back-tracking
•
Camera Locations - To establish the position of a viewpoint, the
surveyor must set up a GPS on it and record enough points to ensure a
high level of accuracy.
•
Reference points - To survey the various reference points, the surveyor
should set up two temporary stations (TBMs) within view of each
reference point and establish their location using the GPS. Once these
co-ordinates have been established, the surveyor will set up a Total
Station on the TBMs and take 3 reflectorless survey shots to the
reference point in question.
Note:
Where GPS positioning is not possible near to the required survey point
– due to poor signal, for instance – the surveyor will set up his TBMs
at the nearest position possible and traverse traditionally to a
position where he can survey the point.
Data Processing & Delivery
GPS
data is processed through Leica Geo-Office to acquire the OSGB36
co-ordinate system information and then processed to produce co-ordinate
information for the surveyed points
Below is an example of a typical survey data spreadsheet,
provided by the Surveyor
The View name or number is often referred to the camera.
The Easting value is the equivalent of the X position in 3ds
Max. The Northing value is the equivalent of Y position in Max.
The Level value is the equivalent of the Z position in Max.
The following script, created by Stefan Johansson (mail@sfjohansson.com), will
help create and position each survey value automatically/accurately in 3ds max,
as instanced point helpers.
The great advantage of having survey points in 3ds max as
instanced helper points is that, their sizes in the camera viewport can be set
to have a Constant Screen Size.
To create the script, simply do the following:
Click on the MAXScript button from the main toolbar and
choose to open a New Script.
Next, copy and paste the following code onto the MAXScript
dialog:
/*
- Both scripts and the csv need to be in the same folder.
- There must be only one csv in the script folder.
- the script will enable the "constant screen size"
-- turn that line into an array of strings using commas as delimiters
lf = filterString l ","
if (lf[1] != undefined ) do
(
newPoint = instance prefabPoint
newPoint.name = lf[1]
x = lf[2] as float
y = lf[3] as float
z = lf[4] as float
newPoint.pos = [x,y,z]
)
)
delete prefabPoint
)
close f
)
Once satisfied, simply name and save the script as a
maxscript file type.
Once saved, close the dialog box.
To run the script, simply click on the MAXScript toolbar and
choose to Run Sript.
All survey points should be created automatically.
If for some weird reason the script isn't working; try opening the spreadsheet file in a notepad program, and save it again out from the notepad program as, a csv file.
It’s worth noting that, the last three or four digits of the
survey values might be slightly off (insignificant value offset).
It is NOT a script error: 3Ds Max has difficulty with
accuracy, when working or displaying numbers/units that are too far away from
0.0.0
Note: I would
like to send a big thank you Stefan
Johansson (mail@sfjohansson.com)for taking the time to create this amazing
script!
Stefan is an avid
programmer and a Unity expert! Unity is a cross-platform game creation system
developed by Unity Technologies.
The subsequent step is to create and position the 3d cameras
according to the values(X Y Z) depicted in cvc file.
In addition, one can also begin camera-matching each view
according to the camera info and the photography provided.
In architectural visualisation/ verified views, it’s common
for users to have an AutoCAD drawing with the survey reference.
Architectural companies often use this drawing (in
conjunction with the cameras and point helpers), to help with the alignment against
the existing context model.
As mentioned earlier,Zmappingprovides excellent context models to align your buildings with.
To align the matched survey and cameras with the context
model, one is required to first save the working scene containing the survey
points, cameras and the AutoCAD drawing (if available).
Next, open the main scene containing the context model,
building and lights.
Following that, open the XRef scene dialog and Add the scene
containing the matched survey data with cameras.
In architectural visualisation, it’s common for the matched
survey points and cameras to be miles away from the 0.0.0 point and the main
scene.
To line up the XRef survey points with the main scene,
create a dummy object and bind it to the XRef scene.
Following that, move and/or rotate the dummy in order to
line up perfectly with the main scene.
The XRef and a dummy were used to ensure the original
surveyed point values remained intact from their original surveyed location (i.e. miles away from 0.0.0 point).
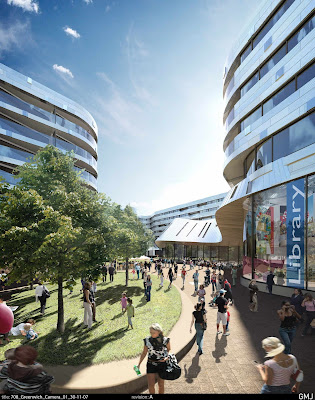
Below are examples of some of many verified view images I have personally produced while at GMJ design ltd
For more information about the overall process, please visit the following websites:
While this amazing script is packed with numerous rendering
tools; we will focus mainly on the ones that architectural visualisation companies
often use to automate daily/vital project tasks that are dimmed time consuming,
tedious, repetitive and chaotic at times.
In architectural visualisation, it’s very common for
companies to structure each project folder in the following manner:
Main Project folder name: Project number & project name
(i.e. 0000001_Wembley Stadium)
Sub-folders structure: In; Out; Scenes; Renders;
Post-Production; Animation; etc.
The one sub-folder that often becomes chaotic /messy is the, “Render”
folder.
This folder is commonly inundated with multiple renders deriving from
constant design options, camera changes, Materials, First draft renders,
multiple render elements, Final renders, Region renders, etc.
The following tutorial will take users through the process of
using the BatchCameraRender script to help organize folders, by automatically
structuring each render sent, into sub-folders with the appropriate name and
date.
Once downloaded and unzipped, simply open your 3ds Max file
and run the Script; by clicking on the Maxscript toolbar and choosing the Run
Script option.
Next, locate and open, to run it.
The following step is to place it on the main toolbar.
To do so, simply click on the Customize toolbar and choose
the Customize User Interface option from its drop down list.
The Customize User Interface dialog should appear. In the
Toolbars tab, under Category, scroll down and choose the Sergo Pogosyan
category from the drop down list.
To make it a toolbar, simply drag and drop its Action (i.e.
Render scene cameras with specified…) on the main toolbar!
With the script on the main toolbar, one can easily access
it whenever necessary.
In order to help depict some of the key features of BatchCameraRender,
we are going to create a 3d camera first.
Next, rename the newly created camera according to its
position and view option (i.e. Camera View A_first floor). This will later help
organize/structure the renders and their sub folders more intuitively.
The subsequent step is to save 3ds max file in the scenes’
project folder. Also, name the scene according to the camera name (i.e. Camera View
A_first floor).
Once the scene is saved, open the BatchCameraRender script
dialog, by clicking on its icon from the main toolbar.
The camera in the scene should automatically be detected in the Camera Manager Settings rollout parameters.
Enable the camera tick box, to begin working on its
parameters (otherwise it will be greyed out) .
To setup the Render Output and the subsequent rendering
folders, scroll down to the Render Output rollout and click on the File toggle.
In the Save Image dialog, name the render output according to the camera name
and save it as a tif file format.
Once the Save button is clicked, note how promptly the
default file paths were automatically changed.
The next step is to use syntaxes to automatically save,
rename and place every rendered frame in their respective folders, along with
their rendered elements.
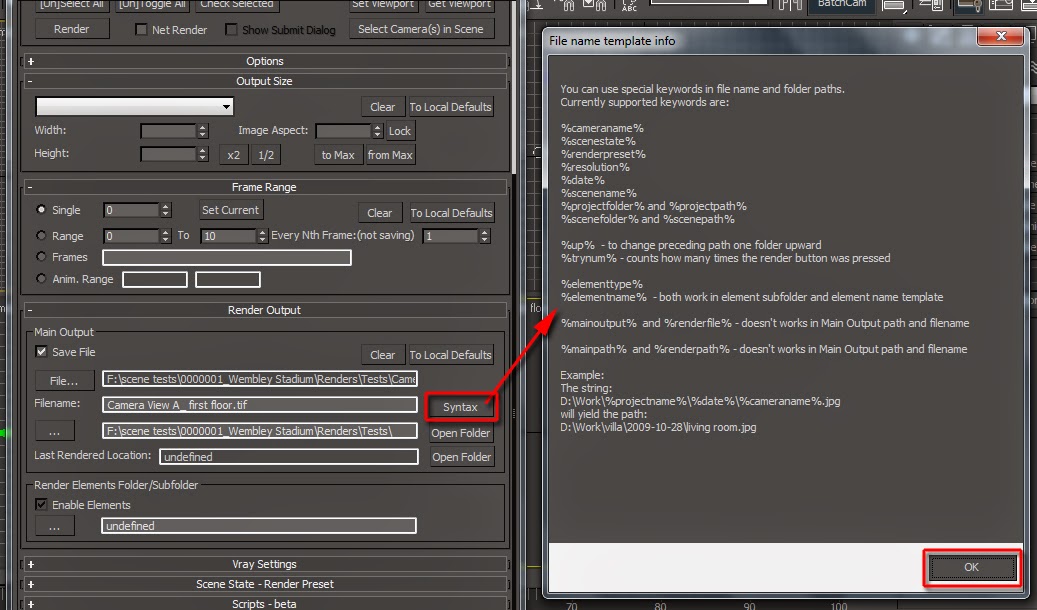
Click on Syntax toggle to open its File name template
info dialog. The dialog depicts all available syntaxes and their functionalities.
Some users screen grab this dialog to keep it as reference.
In architectural visualisation, most users utilize the
following syntaxes: %date% ;
%cameraname% ; %projectname% .
It’s worth noting that, when using syntaxes the backslash key is NOT permitted.
In addition, each syntax starts with a % and finishes with a
% . The next Syntax can be typed in after a space (i.e. one space bar click: %date%
%projectname% %cameraname%.tif ).
Furthermore,
the Save File output syntaxes can only be
typed in the Filename field (Syntax toggle). Once the syntaxes are typed
in, press Enter. Note how the File path above changes automatically.
Tip: Ensure the
file extension is typed in correctly (i.e.: tif, jpg, etc.), otherwise it will
generate errors.
To set the Batch Camera Render to automatically create
sub-folders, simply type in a number or a
name, followed by a backslash (i.e. 1\
). Once entered (press Enter), it automatically changes the File path above.
The backslash key can only be entered in the Open Folder name
field.
If rendering elements, simply go to the Render Elements
folder/Sub-folder group and tick on the enable Elements option. It’s undefined
by default.
Users often copy the syntaxes from the Filename (select &
right click), followed by pasting them in the elements name field.
Note: Any new
changes made to the Batch Camera Render or scene (i.e. syntaxes;
folder/sub-folder creation; Scene states; new cameras in the scene, etc.) need
to be Refreshed; otherwise it will either overwrite/override previous renders
or generate rendering errors.
To refresh the Batch Camera Render new settings/parameters,
simply scroll up to the Camera Manager settings and click Refresh.
The amazing feature about this script is that, once you
set it up with one camera, you can later merge and save it into a new/different
project scene: It will automatically
translate the previous project settings/parameters into a new scene, based on which
project folder the camera was last saved in.
One can simply copy the merged camera settings into a new
one. To do so, simply select the camera from the Camera Manager settings and click on the Copy
button . Next, select a new camera and click Paste.
For a quick test render, set the Output Size parameters by
simply clicking on, From Max, button. This function extracts the current Output
size settings from the 3Ds Max’s Render Setup dialog.
Alternatively, you can simply type in a size, or choose from
the available pull down pre-set.
Also, enable some render elements. If using V-Ray,
the frame buffer needs to be enabled, along with its Split render channels
option.
Note: The V-Ray
frame buffer file path doesn't require being set.
Back in the Batch
Camera Render dialog, click Render to see the results.
Note how the files, folders and sub-folders were
automatically created and named accordingly.
For any subsequent renders or test renders, simply scroll
down to the Render Output rollout, and type in 2\ in the Open Folder name field.
This action will automatically create a new sub-folder under
the name 2.
Note how the File extension above also changed
simultaneously.
Feel free to name the folders and/or sub-folders differently,
if desired
There are also other great features such as Scene State-
Render Preset and Light assignment, which can be explored in the link below:
Also, please Join my Patreon page or Gumroadpage to download Courses; Project files; Watch more Videos and receive Technical Support. Finally, check my New channels below:
Important Terminologies & Descriptions:
3d Rendering: Is the process of converting the three dimensional (3D) data seen in a 3d scene into 2D image/s (rasterized).
The
rasterization process include, the rendering parameters, the rendering
engine, lights, 3d models, textures, shaders, and other effects.
3D renders can be a sequence of animated objects/effects/cameras, or a single frame with a still camera and object/s.
Some of the articles, Videos and Tutorials depicted here will take you through the process of rendering. Photorealistic Rendering: Is the Process or Art of making a typical Computer Generated Image/render (CGI) look indistinguishable from a real photo.
To
achieve this, users often need to possess the skills and the"eye" to
appreciate good photography, cameras, composition, lighting, shaders,
materials, 3d modelling, rendering and have some post-production
skills.
Some of the articles, Videos and Tutorials depicted here will help you achieve truly photorealistic renderings.
Post-Production: Is the process of creating effects or/and results after (post) the main process.
This
terminology can be used to describe the results (post-production) of
main processes such as 3d renderings and/or filming a scene.
The post-production often occurs in applications such as Photoshop, After Effects, Nuke, etc.
Some of the articles, Videos and Tutorials depicted here will take you through the process.
Textures: Is a term often used to describephotographed 2d images to be later used in a toggle of a shader or procedural map.
Textures can be used in the Diffuse toggle, Reflect, Glossy effects, Bump, Displacement, etc.
Some of the articles, Videos and Tutorials depicted here will take you through the process of applying textures.
Materials: Is a term often used to describe maps, textures,procedural maps or shaders, depending on the context the term is being used.
Some of the articles, Videos and Tutorials depicted here will take you through the process of applying materials.
Procedural materials: Is a term often used to describe maps with editable/proprietary parameters/functions.
Some of the articles, Videos and Tutorials depicted here will take you through the process of applying procedural materials.
Shaders: Is a term often used to describe complex materials with functions and procedural maps created for a specific purpose.
Some of the articles, Videos and Tutorials depicted here will take you through the process of applying shaders.
Studio Lights: They are fundamental in the process of creating appealing images/renders.
Lighting determines not only the brightness and darkness, but also the tone, mood and the atmosphere of a scene.
Hence
the importance to control and manipulate the lights accordingly, in
order to fully capture the textures and the vibrancy of your objects.
By distributing the shadows and the highlights accurately, you can achieve truly appealing images/renders.
V-Ray: Is a rendering engine that uses global illumination
algorithms, including path tracing, photon mapping, irradiance maps and
directly computed global illumination.
Furthermore, it is used as a commercial plug-in for
third-party 3D computer graphics software applications such as 3ds max, Maya, Houdini, Blender, Nuke, etc, for
visualizations and computer graphics in industries such as media,
entertainment, film and video game production, industrial design, product
design and architecture.
3ds Max: Autodesk 3ds Max, formerly 3D Studio and 3D Studio Max, is a
professional 3D computer graphics program designed to create 3D animations,
models, games and images.
In addition, it has modelling, animation and movie effects
capabilities, frequently used by video game developers, TV commercial studios
and architectural visualization studios.
3ds Max also features shaders, dynamic simulations, particle
systems, plug-ins, and much more, with its own scripting language.
Adobe Photoshop: Photoshop is a powerful raster based graphics program produced by the Adobe Corporation.
It
is widely used for a variety of photo/image editing purposes worldwide.
The program has a huge number of filters, functions, plug-ins, scripts,
etc.
In addition, there is a huge online support for this software, and countless online sites with tips and tutorials.
Finally, there are readily available books, online/college courses, and its full documentation at Adobe.com
A3d Visualiser works
within the realm of 3d visualization, a sector of the Computer Graphics
Industry (or CGI) that is primarily concerned with the visual
presentation of design concepts and ideas. And a company within the 3d
visualisation sector offers to its customers (among many things) 3d
Visualization Services.