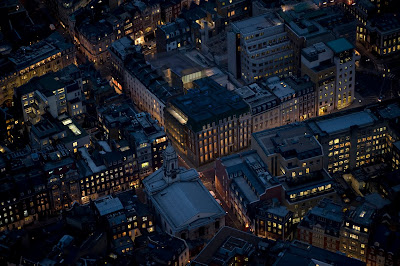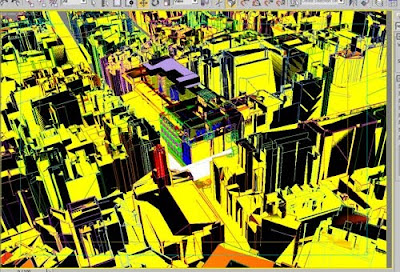

The above image was produced whilst at GMJ Design ltd
Hi All,
After few requests to post a Higher resolution version of the image titled Mental ray_aerial Shot; I had finally found time to upload it. I hope you like it better.
For those who are looking at this image for the 1st time:
This image is part of a project I recently finished whilst at GMJ design.
The render came straight from 3DsMax Design using Mental Ray.
No post effects were required. The scene only consists of one sky light with its colour matching the blue tint of the background photography and numerous self illuminated objects with the following property settings: not visible to the camera; not visible to reflection/refraction and not to receive or cast shadows.
In addition, these objects were scattered across the scene and behind the windows to generate light and colours.
In order for the objects to generate light and colours, I had first applied a simple Arch & Design (mi) base material.
On its self illumination (glow) parameters group, I had set the glow options to illuminate the scene when using FG (final gather), this way it will actually generate light.
Its luminance physical units were increased variably between objects to create variations of light intensity; and colour variations by using a variety of bitmaps (cropped) on the filter color toggle.
It is worth mentioning that when the illuminate the scene when using FG function is enabled, users tend to increase most FG settings in order to achieve a good/smooth rendering results; there’s often no need for it; one should focus mainly on increasing the interpolate over num.
FG points values; this function is often sufficient to correct any artifacts created by the illuminate the scene when using FG function.
It is advisable not to go higher than the value 150 as one may start losing depth in the scene. To create the overall depth, I had used the ambient occlusion on individual objects.
This lighting technique is widely implemented by production companies for exterior night shots.
It is quick to set up and fast to render:
The final 4256x2832 image pixels took less than 1 hour to render. It was previously taking nearly 7 hours with numerous internal photometric physical lights casting diffused shadows.
Moreover, for interior night shots, this technique is recommended to be used with caution, depending on one’s camera angle and/or camera shader being used. This methodology is covered in detail throughout the 2nd edition of my 1st book.
By the way, I have personally topped and tailed this project; I have had help from another visualiser towards the end, in order to meet the tight deadline.
I have put tons of detail on the main site area. The less relevant areas of the entire site didn't require as much attention, so I have emulated some of the surrounding building's detail by extensively using the Height map displacement shader(mental ray),high resolution normal bitmaps; point cloud data etc.
I couldn't convert the geometry into proxies due to the fact that I had to insert lights (i.e. self illuminated objects) inside the buildings.
In future, if you ever get hold of the book and find any of the featured subjects unclear; please don't hesitate to post your query here, so we can all have a discussion on this blog.
Cheers,
Jamie
Video Captions available (CC)
Video Captions available (CC)
Video Captions available (CC)
Checkout below my other Courses with High Resolution Videos, 3d Project files and Textures included.
Also, please Join my Patreon page or Gumroad page to download Courses; Project files; Watch more Videos and receive Technical Support. Finally, check my New channels below:
New Book: 3D Photorealistic Rendering: Interiors & Exteriors with V-Ray and 3ds Max
 |
| Course 1: Exterior Daylight with V-Ray + 3ds Max + Photoshop Course 2: VRay 3ds Max Interior Rendering Tutorials |
 |
| Course 3: Exterior Night with V-Ray + 3ds Max + Photoshop |
 |
| Course 4: Interior Daylight with V-Ray + 3ds Max + Photoshop |
 |
| Course 5: Interior Night with V-Ray + 3ds Max + Photoshop |
 |
| Course 6: Studio Lights with V-Ray + 3ds Max + Photoshop |
|
Also, please Join my Patreon page or Gumroad page to download Courses; Project files; Watch more Videos and receive Technical Support. Finally, check my New channels below:
New Book: 3D Photorealistic Rendering: Interiors & Exteriors with V-Ray and 3ds Max
More tips and Tricks:
Post-production techniques
Tips & tricks for architectural Visualisation: Part 1
Essential tips & tricks for VRay & mental ray
Photorealistic Rendering
Creating Customised IES lights
Realistic materials
Creating a velvet/suede material
FoxRenderfarm
www.arroway-textures.com
Renderpeople
Gobotree


Really nice work man. Thanks for the tips.
ReplyDeleteI would as mentioned use photometric lights, because I have done so for isometric art of a castle and it looked really cool, but needed a few machines to render in a decent amount of time (4096x4096 size).
Next time I will try this method.
Thanks again.
Kostas Yiatilis MacFarlane
www.koyima.com
Hi Kostas,
ReplyDeleteThanks for your comments; I really appreciate it!!!
By the way, I have just visited your website and had a look at your CV: It is fantastic.
In fact, there is a PHD research project starting soon. The lead Professor is Emmanuel Tsekleves. He was looking for someone with your particular skill set. Let me know if you are interested in participating.
Cheers,
Jamie
I wish SimCity was like that! You should definitely submit that rendering to EA Games. The renderings are quite lovely. Who knew Mental Ray can be so powerful? =)
ReplyDeleteHi moonie010,
ReplyDeleteThank you very much for your comments.
Cheers,
Jamie
keep it on man...I love mental ray players!!! :)
ReplyDeleteHi sasa,
ReplyDeleteI can't thank you enough for your kind comments!!!
Cheers,
Jamie
Hi Jamie. You did a great work & we see a perfect result! Am not actually understand, is this all 3d? you says about background image, what it was about?
ReplyDeleteSo if it 3d, i'm thinking that it is a game modelling technique (low poly models with unwrap texturing) or...?
tnx in advance, sorry for my english.
Waiting for your next jobs, you are very talented.
Hi JetCrow,
ReplyDeleteThank you very much for your nice comments!!!!
The background image is the upper part of the render; where I have used its orignal colour as a reference for the fill light effect.
The references are in:
http://forums.3dtotal.com/showthread.php?p=740273#post740273
http://www.3dtotal.com/
Cheers,
Jamie
Thanks Jamie,
ReplyDeletealthough I have your blog in my bookmarks and check in every now and then I didn't check the old articles so didn't read your post. Thanks for the kind words and offer, but I guess it is old news now.
Cheers
Kostas
You are welcome Kostas!!!
ReplyDeleteI am pretty confident that more opportunities like the above mentioned will come by!!!
Regards,
Jamie