Friday, 15 January 2010

3d: Article featured in 3D World Magazine


Hi All,

I have recently contributed to an article about mental ray, in the issue 126 of 3D World magazine (page 53). If, perchance, you manage to see a copy of that particular magazine, have a good read and give me your critical observation, please.

www.myfavoritemagazines.co.uk


www.3dworldmag.com


                                                         Video Captions available (CC)


                                                      Video Captions available (CC)


                                                      Video Captions available (CC)


https://www.patreon.com/user?u=2469908  


More tips and Tricks:

Post-production techniques

Tips & tricks for architectural Visualisation: Part 1

Essential tips & tricks for VRay & mental ray

Photorealistic Rendering

Creating Customised IES lights

Realistic materials

Creating a velvet/suede material 

FoxRenderfarm

www.arroway-textures.com 

Renderpeople

Gobotree

Tuesday, 12 January 2010

3ds max: mental ray_Normal FG process VS Render to texture FG process


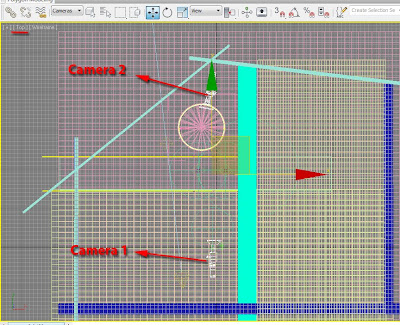
Not long ago someone asked me if there was a function in mental ray that could enable a user to compute the final gather solution of the entire scene, from one still camera.

After scratching my head for few minutes, I came up with a solution:

Rendering to texture (0)- This function forces mental ray to compute the FG solution and render each selected object in the entire scene:

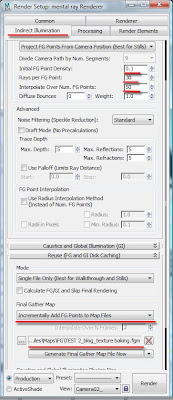
1-Open the render setup dialog box and set the fg to its draft default settings.

2-On reuse (FG and GI disk caching) parameters, under final gather map group, set mental ray to incrementally add FG points to map files and set its file name. Note that the, calculate fg/gi and skip final rendering function, is overridden by the, render to texture process, therefore unchecked for this particular exercise.


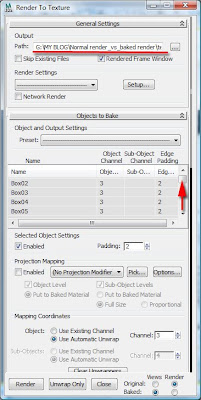
3-In the scene, select all objects (only) and press 0. The render to texture dialog box should appear. Set its output path. On the objects to bake parameters, under name field, you should see a list of all previously selected objects in the scene.


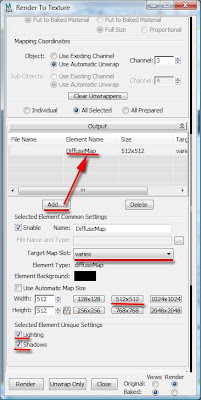
Scroll down to output name field; click add and select the diffusemap element. Note that, we are only choosing these settings in order to force “render to texture” to render and save the FG solution.

4-On target map slot, choose varies.

5-On map size, choose 512x512, followed by enabling lighting and shadows functions, on selected element unique settings group.

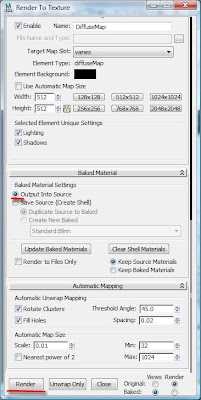
6-On baked material parameters choose the output into source function and Save the Max file (ctrl+s).

7-Set the mental ray’s sampling quality to draft and click render.


8-Choose ok to any of the dialog warnings that may appear. Once the render to texture process is finished, close the Max file without saving.

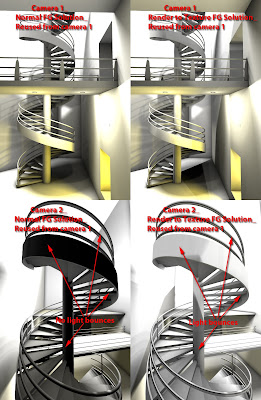
9- Reopen the Max file; set mental ray to read from the previously saved FG solution and render the scene from a variety of different camera angles at high resolution.

It is worth mentioning that this FG solution may give you slightly different results than the conventional (i.e. normal) FG process. These FG variations are no different to the ones often encountered between Net render and local render, or distributed bucket rendering.

Finally, if the Max file crashes during the FG computation, it is worth re computing the render to texture FG process again(i.e. delete the current FG map and re compute); as FG map file may be corrupt. Also, overwrite any previously saved render to texture files.


Please see below the render results with and without the render to texture FG process:

Alternatively, one could also use the distortion (lume) shader to create a 360 degree FG solution however; the FG solution will be based on the original camera position.
For those not familiar with the above methodology, it is covered in detail in the 2nd edition of our book.


I hope you have found this post useful.

Ta


                                                         Video Captions available (CC)


                                                      Video Captions available (CC)


                                                      Video Captions available (CC)


https://www.patreon.com/user?u=2469908  


More tips and Tricks:

Post-production techniques

Tips & tricks for architectural Visualisation: Part 1

Essential tips & tricks for VRay & mental ray

Photorealistic Rendering

Creating Customised IES lights

Realistic materials

3d: mental ray_The usual suspects: Displacement and Proxy errors


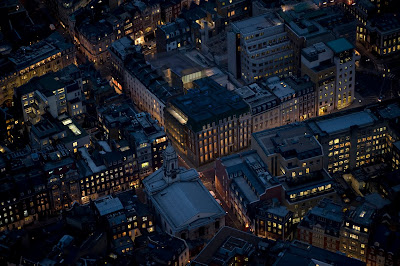
The above image was produced whilst at GMJ Design ltd

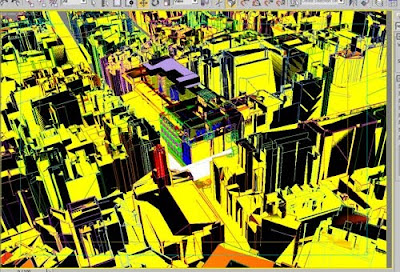
Although we had meticulously covered numerous ways of optimizing the 3D scenes and rendering times in our latest book, the following tips will further help you to address other common memory errors.

With displacement and proxies,the memory is only allocated at render time. So even when your small test renders seem ok and the FG files had been cached, your computer may still run out of memory when rendering the final high resolution image.

Overcoming the problem:

1- Ensure that you have opened the mental ray message window dialog box with all its functions checked, in order to follow the rendering process and detect any problems, whilst paying attention to the buckets being rendered on frame buffer.

2-Proxy errors are often only detectable by looking at the last rendered buckets computed on the frame buffer before the crash, and the last messages from mental ray messages window dialog box.

Normally it should read as follows: “...mip binaryproxy= Loading ...bytes geometry.”

Followed by this message “... progr= scene cache flushed asynchronously ...MB for module job, now: ...MB” and the final mental error message dialog box: “The render was cancelled due to insufficient memory...”.


These errors can be rectified by first changing the ray tracing acceleration to BSP2 type.


Next, ensure that you reduce the amount of copied proxies in your scene. By that, copy instance all similar plants, grass or/and trees in the scene(or other types of geometry) . If there are too many sets of different plants and trees in the scene, then it would be worth attaching them as normal copied meshes first, and later convert them into proxies.


This exercise is to reduce the amount of copied proxies in the scene. The ideal situation would be to have mental ray load up proxies only once (i.e. multiple instanced proxies or one big proxy with different sets of plants, trees etc, originally attached together as one mesh).

Finally, reduce the density of the relevant geometry and increase the page file as previously shown. The process of creating and working with proxies is covered in detail in the 2nd edition of my book with Roger.


3-Displacement errors are easier to detect and tackle. The mental ray message should indicate the “rogue” object/s’ name and mention “...retesellation...”: “...ms from ground (geomObject(mesh00)...”.

followed by “...aborting, not possible to avoid retesellating...”; “...scene cache flushed asynchronously...”.

And the final mental ray error dialog box reading: “The render was cancelled due to insufficient memory...”.


To solve this problem, simply open the renderer tab, on shadows and displacement parameters, under displacement (global settings), change the Max. Subdiv value to 1k or lower. This should be sufficient. Note that, values lower than 256 may result in a very faceted displacement (i.e. not accurate), so it is worth gradually decreasing/test rendering the values without compromising the quality too much.


Note: In addition to the above mentioned,in very extreme and difficult cases of memory loss, one can additionally enable the "use fast rasterizer (rapid motion blur) function, from the "rendering algorithms" parameters.
This rendering method will bypass most mental ray memory issues.

It is worth noting that although very powerful, this rendering algorithm disables some of render elements. To override this, simply render the file output to an EXR file extension type, provided one has the material IDs/Object IDs,etc, originally enabled in 3Ds Max.

If facing difficulties extracting these EXR passes in Photoshop,After Effects,etc;simply switch your 3Ds Max back to standard mental ray rendering algorithm when computing your AO pass, and enable your rendered elements again; with cached FG at a very low res to render the final output in higher res.

I hope you found this post useful.


                                                         Video Captions available (CC)


                                                      Video Captions available (CC)


                                                      Video Captions available (CC)


Post-production techniques

Tips & tricks for architectural Visualisation: Part 1

Essential tips & tricks for VRay & mental ray

Photorealistic Rendering

Creating Customised IES lights

Realistic materials

Creating a velvet/suede material 

FoxRenderfarm

www.arroway-textures.com 

Renderpeople

Gobotree

.