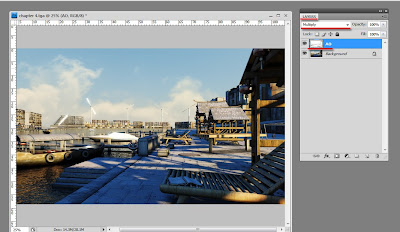
In the latest book, we had covered in detail the usage of ambient occlusion and its settings directly from Max however; we didn’t cover its usage as a post effect in Photoshop or another 2d application:
First open the "material editor" dialog, followed by selecting an empty slot and clicking on its main shader toggle.
Once the mental ray parameters are loaded, click on its surface toggle and choose the "ambient/reflective occlusion (3dsmax)" shader , from the material/map browser dialog. Set its parameters as explained in the book; or alternatively use other values that you may be accustomed to.


Next, open the "light lister" dialog, and turn off the lights in the scene. Note that, this action was taken mainly to ensure that only the “connecting shadows” were apparent on the render and to also avoid other types of light artifacts.
The next step is to prevent the appearance of environment artifacts in the render whilst using the AO shader.
Open the "environment effects" dialog.
Change the background colour to white.
Uncheck the "use map" function and disable the "exposure controls".
Whilst the material editor is still opened, also open the "render set up" dialog and expand the "processing" tab.
Match your image sampling(i.e. 1/16 pixels) quality and the render output size with your final render (i.e. 3000x1662).
Next, drag and drop the "ambient/reflective occlusion (3dsmax)" shader from the material editor onto the material override toggle.
Choose the instance method an ok to close the dialog, followed by rendering the scene. The material override is covered in detail in our latest book.


Once your AO had been rendered and saved, open it in Photoshop with your base render. Place the AO pass layer on top of the base render layer, and use the multiply filter, or another blending filter from the list, that you may find better suited. Also, you may want to use the, add layer mask tool, on the AO pass layer, to control its appearance. Note that this Photoshop tool is also covered in detail in our latest book.
Note:For specific scenes where one may require using opacity maps;masks;etc;it is recomended to use different AO settings on specific objects manually, as opposed to globally(i.e. material override toggle).


The image below is another example of a rendered image; with the AO pass overlaid in Photoshop. I hope you like it.
Note: I had used extensively the "speckle" procedural map from Max, in the "bright" toggle of the "ambient/Reflective Occlusion..." shader parameters.
Furthermore,the "speckle" procedural map was used in conjunction with a variety of settings and/or dirt textures on individual objects.

I hope you have found this post useful.
Finally, I have just published a New Book with Taylor & Francis/CRC Press, entitled,
V-Ray 5 for 3ds Max 2020: 3D Rendering Workflows
Click on the image below to find out more about my new book.
 |
| Course 1: Exterior Daylight with V-Ray + 3ds Max + Photoshop Course 2: VRay 3ds Max Interior Rendering Tutorials |
 |
| Course 3: Exterior Night with V-Ray + 3ds Max + Photoshop |
 |
| Course 4: Interior Daylight with V-Ray + 3ds Max + Photoshop |
 |
| Course 5: Interior Night with V-Ray + 3ds Max + Photoshop |
 |
| Course 6: Studio Lights with V-Ray + 3ds Max + Photoshop |
|
Also, please Join my Patreon page or Gumroad page to download Courses; Project files; Watch more Videos and receive Technical Support. Finally, check my New channels below:
Post-production techniques
Tips & tricks for architectural Visualisation: Part 1
Essential tips & tricks for VRay & mental ray
Photorealistic Rendering
Creating Customised IES lights
Realistic materials
.


Thx for this tutorial!!!
ReplyDeleteGr8 Tutorial , Thanks
ReplyDeleteYou're welcome!
ReplyDeleteRegards
Jamie
Very good tutorial. Thank you very much
ReplyDelete