Not long ago someone asked me if there was a function in mental ray that could enable a user to compute the final gather solution of the entire scene, from one still camera.
After scratching my head for few minutes, I came up with a solution:
Rendering to texture (0)- This function forces mental ray to compute the FG solution and render each selected object in the entire scene:
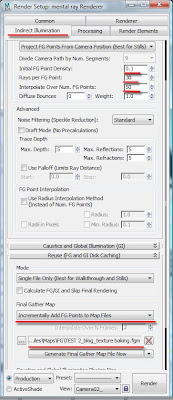
1-Open the render setup dialog box and set the fg to its draft default settings.
2-On reuse (FG and GI disk caching) parameters, under final gather map group, set mental ray to incrementally add FG points to map files and set its file name. Note that the, calculate fg/gi and skip final rendering function, is overridden by the, render to texture process, therefore unchecked for this particular exercise.
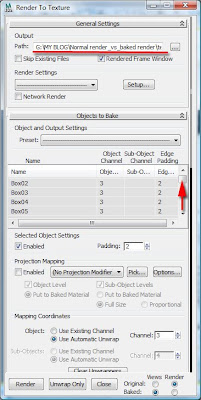
3-In the scene, select all objects (only) and press 0. The render to texture dialog box should appear. Set its output path. On the objects to bake parameters, under name field, you should see a list of all previously selected objects in the scene.
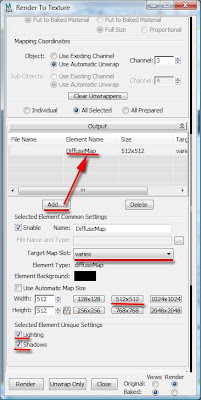
Scroll down to output name field; click add and select the diffusemap element. Note that, we are only choosing these settings in order to force “render to texture” to render and save the FG solution.
4-On target map slot, choose varies.
5-On map size, choose 512x512, followed by enabling lighting and shadows functions, on selected element unique settings group.
6-On baked material parameters choose the output into source function and Save the Max file (ctrl+s).
7-Set the mental ray’s sampling quality to draft and click render.
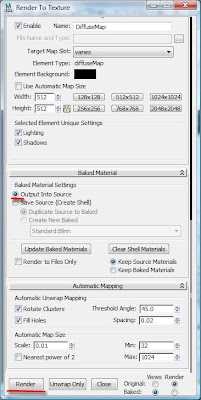
8-Choose ok to any of the dialog warnings that may appear. Once the render to texture process is finished, close the Max file without saving.
9- Reopen the Max file; set mental ray to read from the previously saved FG solution and render the scene from a variety of different camera angles at high resolution.
It is worth mentioning that this FG solution may give you slightly different results than the conventional (i.e. normal) FG process. These FG variations are no different to the ones often encountered between Net render and local render, or distributed bucket rendering.
Finally, if the Max file crashes during the FG computation, it is worth re computing the render to texture FG process again(i.e. delete the current FG map and re compute); as FG map file may be corrupt. Also, overwrite any previously saved render to texture files.
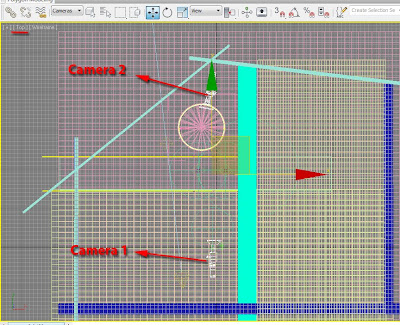
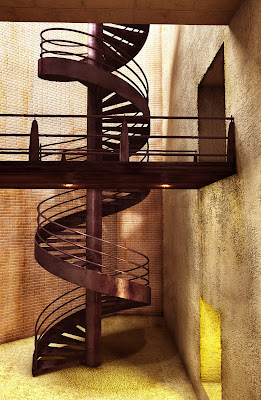
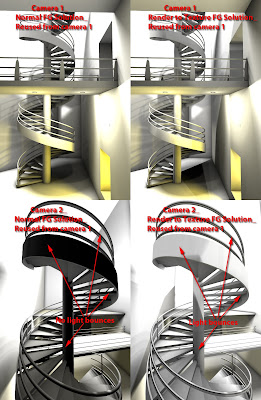
Please see below the render results with and without the render to texture FG process:
Alternatively, one could also use the distortion (lume) shader to create a 360 degree FG solution however; the FG solution will be based on the original camera position.
For those not familiar with the above methodology, it is covered in detail in the 2nd edition of our book.
I hope you have found this post useful.
Ta
Video Captions available (CC)
Video Captions available (CC)
Video Captions available (CC)
Video Captions available (CC)
Checkout below my other Courses with High Resolution Videos, 3d Project files and Textures included.
Also, please Join my Patreon page or Gumroad page to download Courses; Project files; Watch more Videos and receive Technical Support. Finally, check my New channels below:
 |
| Course 1: Exterior Daylight with V-Ray + 3ds Max + Photoshop Course 2: VRay 3ds Max Interior Rendering Tutorials |
 |
| Course 3: Exterior Night with V-Ray + 3ds Max + Photoshop |
 |
| Course 4: Interior Daylight with V-Ray + 3ds Max + Photoshop |
 |
| Course 5: Interior Night with V-Ray + 3ds Max + Photoshop |
 |
| Course 6: Studio Lights with V-Ray + 3ds Max + Photoshop |
|
Also, please Join my Patreon page or Gumroad page to download Courses; Project files; Watch more Videos and receive Technical Support. Finally, check my New channels below:
More tips and Tricks:
Post-production techniques
Tips & tricks for architectural Visualisation: Part 1
Essential tips & tricks for VRay & mental ray
Photorealistic Rendering
Creating Customised IES lights
Realistic materials


HI jamie .. i think this method might be the revolution of rendering with mental ray ! really great thinking of u to figure out this way ! but i think there 's something still missing cuz i try it in a simple scene ( teapot inside a box ) but it sems that the baked FG map is very different from the normal mode it's ok in the bg areas but when it comes to areas of details (where objects meet ) it lacks the whole details in the shadow .. so when i visualise my FG in the render i barely see FG points in corner areas ( where i actually need alot ) .. so any thaughts about that ???? ... anyway thank u so much
ReplyDeleteHi toytoy,
ReplyDeleteI am glad that you saw the potential of this theory!
Your problem can easily be corrected by increasing the “Initial FG point Density” values (i.e. 0.7 or higher); and tweaking with the “interpolate over num.fg.points” if necessary.
I am also assuming that you have your FG diffuse bounces set 1.0 (at least)?!
Increasing the “Initial FG point Density” values may increase the FG process time slightly, but it will definitely correct most artifacts. Since the FG will be cached during this process; one is only required to do it once, at smaller res; to later render it at higher res with the FG cached.
It is also prudent to ensure that even the areas that are not visible to the camera are reasonably lit; to avoid being surprised by certain distant areas of your 3D space being slightly dimmed.:)
Ta
Jamie
Finally, it is worth mentioning that the FG process is an approximation of accuracy; which is similar with most rendering engines.
ReplyDeleteTherefore, depending on the approached/methodology implemented to process it (i.e. FG) the results may differ slightly.
However, for ultimate accuracy using FG one can simply enable the “Brute force” FG process; which essentially bypasses/disables all the FG approximation parameters for fast results, and processes the FG with utmost accuracy.
To enable/trigger the “Brute Force” FG process, simply set the “interpolate over num.fg.points” value to 0.0.
Due to its accuracy, the “Brute Force” FG process” may take hours or sometimes days to render, depending on the complexity of the scene. With GPUs it may take seconds or minutes.
This FG process is very similar to Maxwell rendering engine. In fact,they are now (i.e. Maxwell)implementing approximation parameters(i.e. similar to mental ray) to be faster and more appealing to production houses.
Ta
Jamie
oh when u mentioned (Your problem can easily be corrected by increasing the “Initial FG point Density” values (i.e. 0.7 or higher); and tweaking with the “interpolate over num.fg.points” ) something actually occured to me but i don't know if it's true or not which is : Let's say i make my FG point density = 0.5 and this 0.5 value let's assume it eventually gave me 1000 fg points from a certain camera with normal FG mode . then if i tried to apply ur method ( bake FG to the whole scene )to the same scene with same 0.5 ( FG point density which emitted 1000 point on normal mode) so will it also emitt 1000 fg points and distribute them on the whole scene rather that that area of what the camera sees only ? and that's why my fg setup which was good enough in normal mode wasn't accurate enough in the baking mode ?
ReplyDeletei don't know just a thaught that occuered to me anyway .. i hope u understand what am tryin to say and excuse me 4 my english ..
btw i think the idea of applying the brute force to this method is brilliant ! i know it takes a while to calculate but as long as am doin it for one time only i think i could get away with it .. anyway haven't tested it yet but once i try it on another simple scene i will tell u the results .. but again another amazing idea of u to think it that way ! very strange that someone with ur intelligence doesn't work for mentalimages...!
ReplyDeleteThank u so much
oh i forgot some ! brute Force mode doesn't cach FG map ! so it can't be used with ur method ,right ?
ReplyDeleteHi toytoy,
ReplyDeleteYes, you are quite right about the "Brute Force" FG process: It doesn't cache the FG approximation parameters however, this could well be implemented in the next release of mental ray, if more and more users adopt it. It is often not case but; this could well change with more production houses using GPUs. I had made reference to “Brute Force” earlier simply make a point between an approximation and the ultimate accuracy.
Regarding your query about the FG camera solution not being sufficient for the global FG mode, yes, you were also “correct"...in very simple words.
To achieve an approximation closer to "Brute Force" accuracy, one has set the "Initial FG Point Density" really high (i.e. 5.0 or higher);increase the "Rays per FG Point"(i.e. 150/higher) and reduce the “Interpolate Over Num. FG Points” values.
Mental ray provides users with multiple choices.
Finally, it is worth pointing out that as mentioned in our latest book, the "Rays per FG Point" value of 150.0 should be sufficient for most production projects.
Ta
Jamie
I did notice differences in the two renders and wanted to confirm that the bake procedure wont be as accurate as re-calculating the map? Is this correct?
ReplyDeleteHi Dustin,
ReplyDeleteThanks for your query!!
Yes, there is a slight difference however, as mentioned earlier one can correct this by increasing the "Initial FG Point Density"; the "Rays per FG Point" and by reducing the “Interpolate Over Num. FG Points” values.
Finally, whilst optimising the FG values one can use a very basic white material to override the scenes' materials for fast turnarounds.
Once satisfied with the results, one can then disable the material override and cache the final FG solution at a smaller re.
Ta
Jamie
Hi Jamie,
ReplyDeleteIt was too good. I liked the trick.
I would be pleased if you send me some links about how to bake textures with different passes like diffuse map, specular, bump, etc. by adding different elements from the Render to texture dialog of 3ds max (if possible, using v-ray render)
Hi H******
ReplyDeleteI am delighted that you have liked the technique!!!
As mentioned earlier, the render to texture methodology is covered in detail in our latest book.
Alternatively you can get the information from someone who bought the book already.
I hope you understand my position with my Publisher(i.e. conflict of interest).
Regards,
Jamie