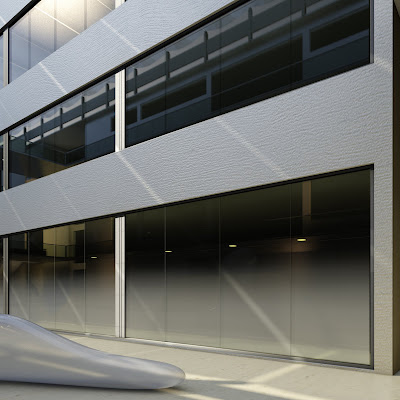
The glass fritting effect is commonly required by numerous clients in the 3D Visualisation sector:
The following exercise will show you an efficient way of emulating it.
First, load up the Arch & design(mi) and choose the Glass (Thin Geometry) template shader from the dropdown list as explained in our latest book.
Note that this particular shader template was chosen because we are emulating a typical office window glass pane (i.e. no refractions).If you wish to change its glass colour appearance, simply change it to greenish on its colour swatch in the refraction group.
The below renders came straight from Max Design 2010.
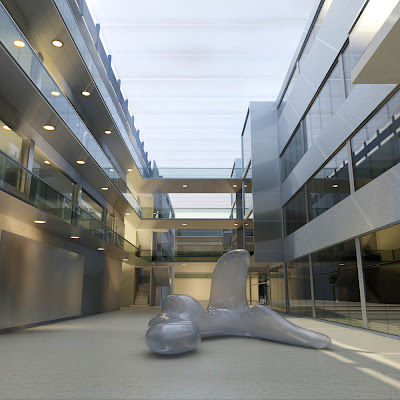
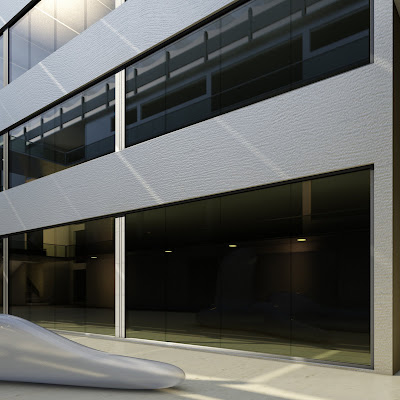
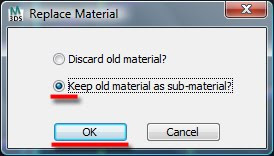
To apply the glass fritting effect, first choose the blend shader from the material/map browser list and select to keep old material as sub-material on the replace material dialog box.
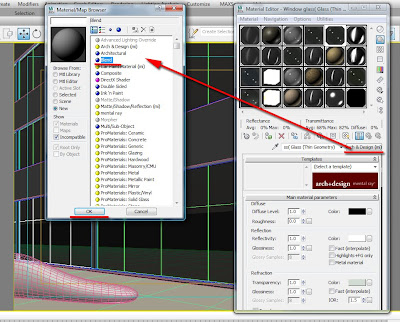
Now we have the blend shader parameters with two shader slots: the original mr glass material on top and the second standard shader below.
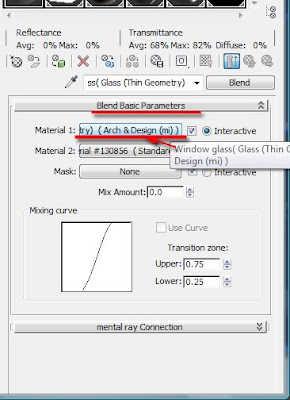
Drag and drop the first top shader onto the second one, to turn both shaders to an Arch & Design (mi).
Choose the copy method from the instance (copy) material dialog box.
Note that the copy method was picked because this shader will be later changed.
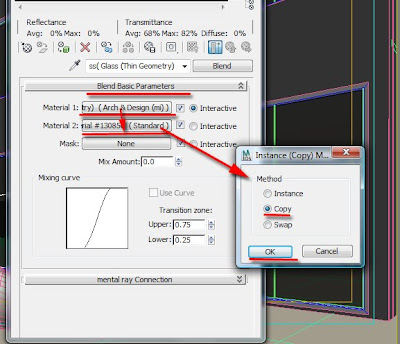
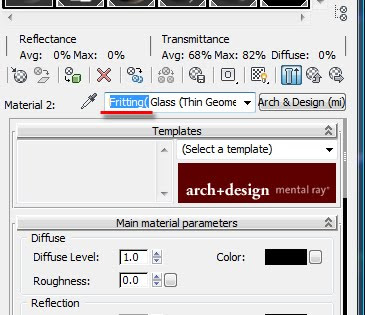
Next, we are going to change the second shader’s parameters to a fritted type glass by first clicking on its toggle to enter its parameters.
Change its current name (retype) to fritting; and change its diffuse level color swatch to whitish to emulate the standard glass fritting colour.
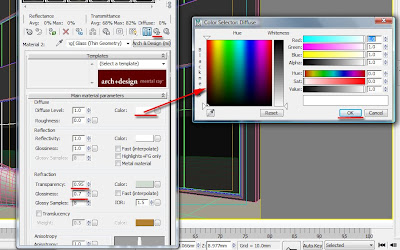
Next, we are going to reduce the glass fritting transparency from 1.0 (fully transparent) to 0.95.
Note that, lower values will result in a less transparent surface (i.e. more opaque).
To blur what is seen behind the glass, we are going to decrease the glossiness from 1.0(no blur) to 0.7.
Note that lower glossiness values will result in greater blurriness(i.e increased render times).
Back on the blend main parameters, we are going to choose/create a mask material to establish where each of the two shaders will start and finish. Often a black and white bitmap works best!
Simply click on the mask toggle and pick the relevant material.
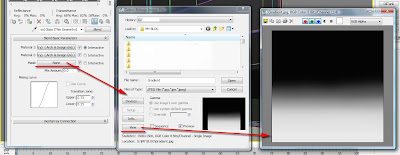
Disable the use real-world scale function.
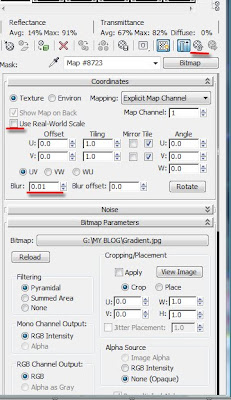
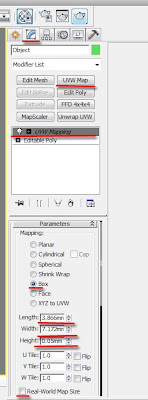
Assign it to the relevant object/s in scene and use the uvw map modifier parameters to adjust it to your requirements.
To reduce reflections on the glass fritting, simply go to the relevant shader and reduce its reflectivity values in the reflection group. If necessary, also tweak with its BRDF parameters.
To blur its reflections, simply reduce its glossiness values in the reflection group. Moreover, one can also change its original fritting colour (i.e. white) to a much darker one, if required!
Finally, the above parameters are covered in detail in our latest book.
Quick overview of Matte/shadow/reflection shader and environment background switcher(mi)
To apply the matte/shadow/reflection shader, simply select it from the material browser list. And assign it to the relevant object.
The camera mapped background function is often used as an instanced material of the environment map toggle (i.e. bitmap, mr physical sky or the environment background switcher).It is worth mentioning that this toggle is designed to accommodate images in a colour range between 0-1(i.e. bitmaps etc) therefore, when using “mr pysical sky” as an instance map in this toggle, one should change the environment physical scale to "unitless"(i.e.90000.0), to compensate for it. Otherwise there will artifacts on the matte/shadow/reflection material.
These errors will be discussed later in this post.


The mask/opacity function allows one to add a black and white/greyscale map to its toggle.
The Bump function allows one to add a bump material to its toggle.
The Bump amount function controls the intensity of the bump display.
The Receive shadows function when on it allows shadows to be cast onto the matte surface
The Ambient /shadow intensity function controls the intensity of the AO appearance on the matte surface (i.e. 0= fully transparent).
The Ambient/shadow colour function controls the prominence of the direct shadows on the matte surface (i.e. white= fully blended; black= not blended/very dark)
The shadow casting lights list function when on it disregards the direct shadows of all other lights not listed on its name field. One can add, replace and delete lights accordingly.
The remaining parameters are self explanatory and very similar to those described in our latest book.
Environment background switcher (mi)
This is a very powerful shader for Photomontages etc however; one may encounter few artifacts when used with the matte/shadow/reflection shader.
To apply it, simply open the material browser by 1st clicking on the main shader toggle and choosing the mental ray shader. Next, choose the Environment background switcher (mi) from the list.
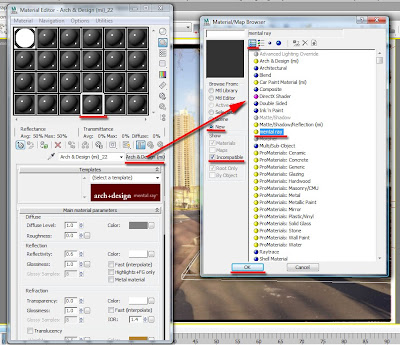


This shader also facilitates the usage of a background image in the environment map toggle whilst the exposure controls are being used but, the exposure physical scale has to be set to unitless In addition to setting its value really high(i.e. 90000.0 or higher).

The background function is often used in conjunction with the environment/background camera map (mi) for environment plates (i.e. mr physical sky,IBL,HDRI, bitmaps, etc)
The Multiplier is often used to increase/decrease the appearance of the image. Note that its appearance has no effect on the FG solution; unlike the environment probe/chrome ball (mi).
The Reverse gamma correction is often used in line with one’s default gamma settings (i.e. 2.2)

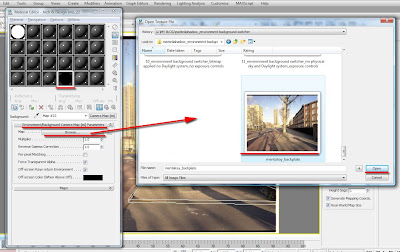
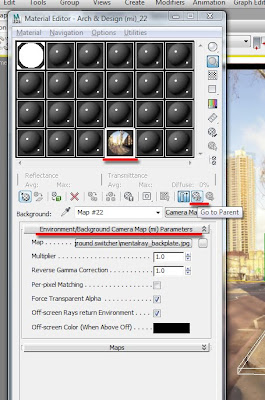
The Environment/reflections function is often used for spherical maps, if available. It is commonly used with environment probe/chrome ball (mi).
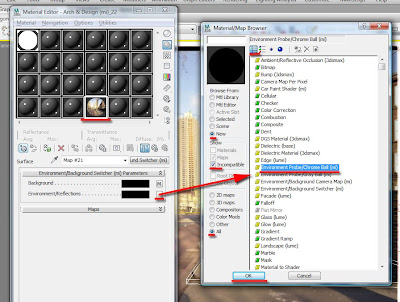
The environment probe/chrome ball (mi) works best with IBL(image base lighting);JPEG;BMP;TIFF;and HDR spherical images captured from a chrome ball;ETC. This shader uses this spherical map information accurately as a reflection map and as FG. The parameters are self explanatory.
Moreover,its FG functionalities are more visible when the skylight head of the Daylight system is disabled.
In addition, a separate skylight object needs to be created with the “use scene environment” function enabled.
Alternatively, if the user is interested in the reflections mainly, then the original “mr physical sky” map of the environment toggle could be used in conjunction with an image file.
Also, one can use the “use custom background“function from the “mr physical sky” map parameters, for background image display purposes only.
Mental ray provides users with multiple choices.
It’s also worth noting that with newly integrated “Color override/ray type Switcher” shader for Max 2011, one could plug this shader to the 'environment map' toggle, for any imaginable complex effect, especially when using IBL files. For more information about this shader, please take a look at my new article for CG Society.
The Multiplier is often used to increase/decrease the appearance of the image(i.e. 2.2 when used with gamma in Max)and its FG contribution. Note that inappropriate values may cause reflection artifacts and over bright FG solutions.
The Reverse gamma correction is often used in line with one’s default gamma settings (i.e. 2.2)
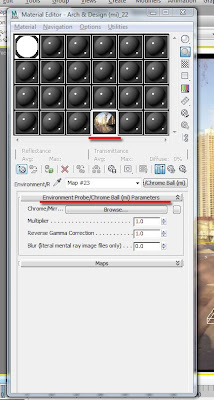
This shader is normally applied to the environment map toggle and instanced to the appropriate background toggles of other relevant materials in the scene (i.e. matte/shadow/reflection shader etc).
Also, one might require adjusting the daylight object's horizon height, as it might be obstructing the environment image.
Daylight object parameters are discussed in detail in our recent book.

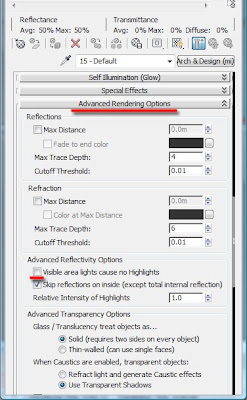
Moreover, if there are no highlights on the environment image, some objects may not reflect glossy highlights.
To override this, simply disable the “visible area lights cause no highlights” function!
In our recent book, Roger and I have not mentioned either of the above shaders however; they are quite powerful.
Below are some of the errors one may encounter whilist using them in real projects:
The Matte/shadow/reflection: Works well with daylight system and exposure controls however, depending on one’s camera angle, the matte surface may render with artifacts.
This often happens when the mr physical sky is solely applied onto the camera mapped background toggle: this function essentially uses the colour of its toggle to multiply the contribution of all "illuminators" and "indirect light" intensity in the scene.
Since the "mr physical sky" has a colour with intensity of thousands, coupled with indirect illumination (FG) being set to 1.0, it would create some overly lit areas (i.e. artifacts).For more detailed information about this subject,please visit Master Zap's blog.

To correct some of these artifacts one would have had to open the object’s properties dialog box and uncheck the receive illumination from final gather function.

Another way to correct this arifact is to reduce the FG multiplier value to about 0.001.
Or change the environment physical scale to unitless (i.e. 900000.0) as previously suggested.
The last option is more practical in real projects than reducing the FG multiplier value.

In other cases if the ambient occlusion is not desired, one should also check the pass through (invisible to FG) function of the relevant object.
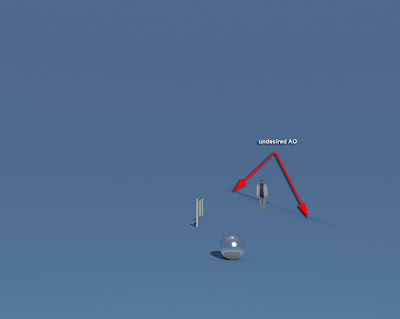


The daylight system object casts very dark shadows due to its default intensity. To bypass this, one should either decrease the daylight intensity multiplier or simply create a new mr area spot light, under the standard lights group. Place it in the same position as the daylight system and change it to directional light type (...to emulate the sun).

In the include /exclude dialog box, select the objects to be effected by the shadows only.
Whilst the mr area spot light is still selected, change its shadow density to about 0.25. Also ensure that the hotspot/Beam circle is big enough to cover all relevant areas of the scene.

Back on the matte/shadow/reflection parameters, add the relevant light/s onto the name field. This will automatically disregard the shadows cast by the daylight system or/and other lights in the scene.


In addition, when using the matte/shadow/reflection in conjunction with the environment background switcher (bitmap applied) and Daylight system/exposure controls; the matte/shadow/reflection surface will not be fully transparent, therefore not recognized by the alpha channel. Note that, this artifact only occurs when a bitmap is being used inside the background toggle of the environment background switcher with the daylight system/exposure.

To correct this artifact, simply enable the "process background and environment maps” function, under the exposure control parameters; in addition to having the environment physical scale enabled.
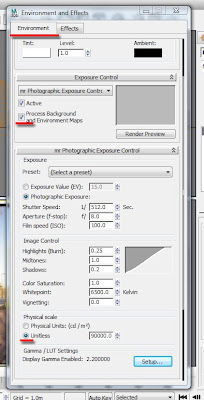
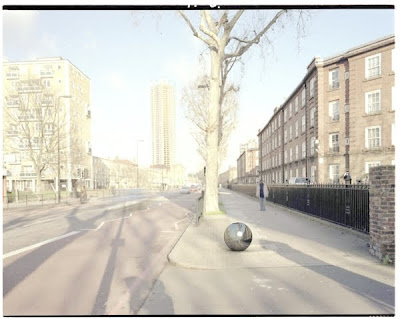
Although the "process background and environment maps” function helped to blend the matte/shadow/reflection material, the overall image had become washed out.
To correct this, simply enable the gamma correction.
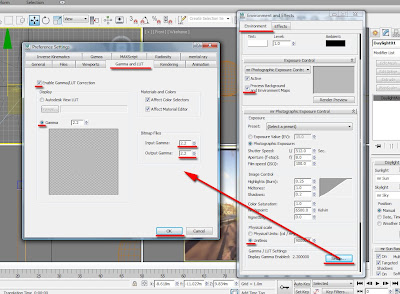
Also,set the environment probe/chrome ball(mi)values to match the gamma corretion settings.
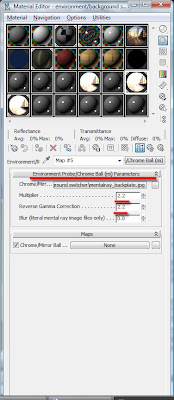
Everything should now blend seemingly.
If your workflow is non linear (i.e. not using gamma etc), then instead of using the gamma correction, simply correct the environment/background switcher (mi) image with the output mono curves.
Working with curves is covered in detail in our latest book.
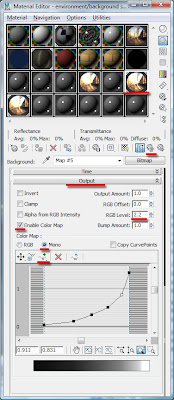

On the example below, the mr physical sky shader was applied to both environment background switcher (mi) and the matte/shadow/reflection shader.

Note: For those not accustomed to using gamma corrections, it is prudent to set it up prior to initiating a project(i.e. same principle applied when setting up the “system units setup"); as it may become almost untenable to apply it half way through the project(i.e. one would require resetting the lights and materials of the entire scene).
I hope you have found this post useful.
Video Captions available (CC)
Video Captions available (CC)
Video Captions available (CC)
Checkout below my other Courses with High Resolution Videos, 3d Project files and Textures included.
Also, please Join my Patreon page or Gumroad page to download Courses; Project files; Watch more Videos and receive Technical Support. Finally, check my New channels below:
More tips and Tricks:
 |
| Course 1: Exterior Daylight with V-Ray + 3ds Max + Photoshop Course 2: VRay 3ds Max Interior Rendering Tutorials |
 |
| Course 3: Exterior Night with V-Ray + 3ds Max + Photoshop |
 |
| Course 4: Interior Daylight with V-Ray + 3ds Max + Photoshop |
 |
| Course 5: Interior Night with V-Ray + 3ds Max + Photoshop |
 |
| Course 6: Studio Lights with V-Ray + 3ds Max + Photoshop |
|
More tips and Tricks:
Post-production techniques
Tips & tricks for architectural Visualisation: Part 1
Essential tips & tricks for VRay & mental ray
Photorealistic Rendering
Creating Customised IES lights
Realistic materials
.


very nice explanation Jamie!
ReplyDeleteGreat resource & tips! Almost sways me from me beloved Vray!
Tarran
Sometimes you just have to let go Tarran!! hehe
ReplyDeleteJamie
Great work Jamie love it! :)
ReplyDeleteHi Dariusz,
ReplyDeleteThank you very much for your comment!!
Jamie
that's very nice tricks.
ReplyDeletei liked it Jamie...
Hi Harshit,
ReplyDeleteThank you very much for your nice comments; I really appreciate it!!
Jamie
Great work as usual, and yes I purchased your book and love it!
ReplyDeleteThe V-Ray visualization team at my office are now reading your book... I will sway them to the dark side. (I am a former V-Ray user)
tnx alot jamie .
ReplyDeleteHi Nzdan & Amid,
ReplyDeleteThank you very much for your feedback here!!!
Ta
Jamie
Hello Jamie,
ReplyDeleteI would like like to follow your tips but I've had problems in the beginning to find "The blend shader" from the material/map.
Although I have a little bit different the material editor window(3ds max 2011)I was looking "The blend shader" on the material/map and I didn't find it.
Is it a problem configuration?
Hi Perdido,
ReplyDeleteTo access the "Blend" shader: In the "Material/Map browser" dialog, extend/open the "Materials" rollout and the "Standard" rollout.
You should be able to find the "Blend" shader from "Standard" rollout list!
I hope it was helpful!!
Ta
J
Hi Jamie,
DeleteThank you for your help. I have found it!
I also tried to follow the rest of the tutorial but I don't have the "Replace Material" option to choose "keep old material as submaterial" and finally I had two standard shader.
Anyway I followed with the exercise but I didn't have a good result.
I have seen your books for 3ds max on amazon.
DeleteI would like to know if you have some book for 3ds max Design 2011 or 2012.
I import the files from revit and I have not had problems with 3ds max design 2011 but with 2012 I always have problems importing the files.
The curtains walls and railings never appear.
What can I do?
Hi Perdido,
ReplyDeleteThanks for your feedback here. I really appreciate it!
The "Replace Material" dialog should always be prompted when adding on top of an existing shader or procedural map. It's pretty standard.
You have either missed one of the steps or there's a bug with your version of Max.
With regards to your query about a new book, I I am currently working on a very exciting new book with 3D Total Publishing entitled:
"Crafting 3D Photorealism: Lighting Workflows in 3ds Max, mental ray and V-Ray ".
Google it!
The interface is for Max 2011 and 2012, but the files can be opened in Max 2010 also.
With regards to your curtain walls in Revit, Roger Cusson would be best equipped to help you out: http://rec-blog.blogspot.co.uk/
TA
J
Hi Jamie!
ReplyDeleteI decided to come to 2011 version because it works better.
Also, I found that there are differents ways to import and apply materials when the files come from Revit.
I have also had problems to apply materials because most of the tutorials are made for Autocad files and I had problems with the layers.
Because of that, I really want to find an appropiate 3ds Max DESIGN tutorial (Non 3ds max) which explains properly when the files come from Revit.
Most of the information and tutorials are for 3ds max and only few for 3ds max Design.I am not sure if I should learn the traditional 3ds max.
Do you know where I can find your book in Manchester? (to see inside).
Also I was wondering if you speak spanish? Because you have Spanish surname.
I was having troubles with matte shadow material, and you cracked my problems right in the nuts. Thanks for that
ReplyDelete