
 |
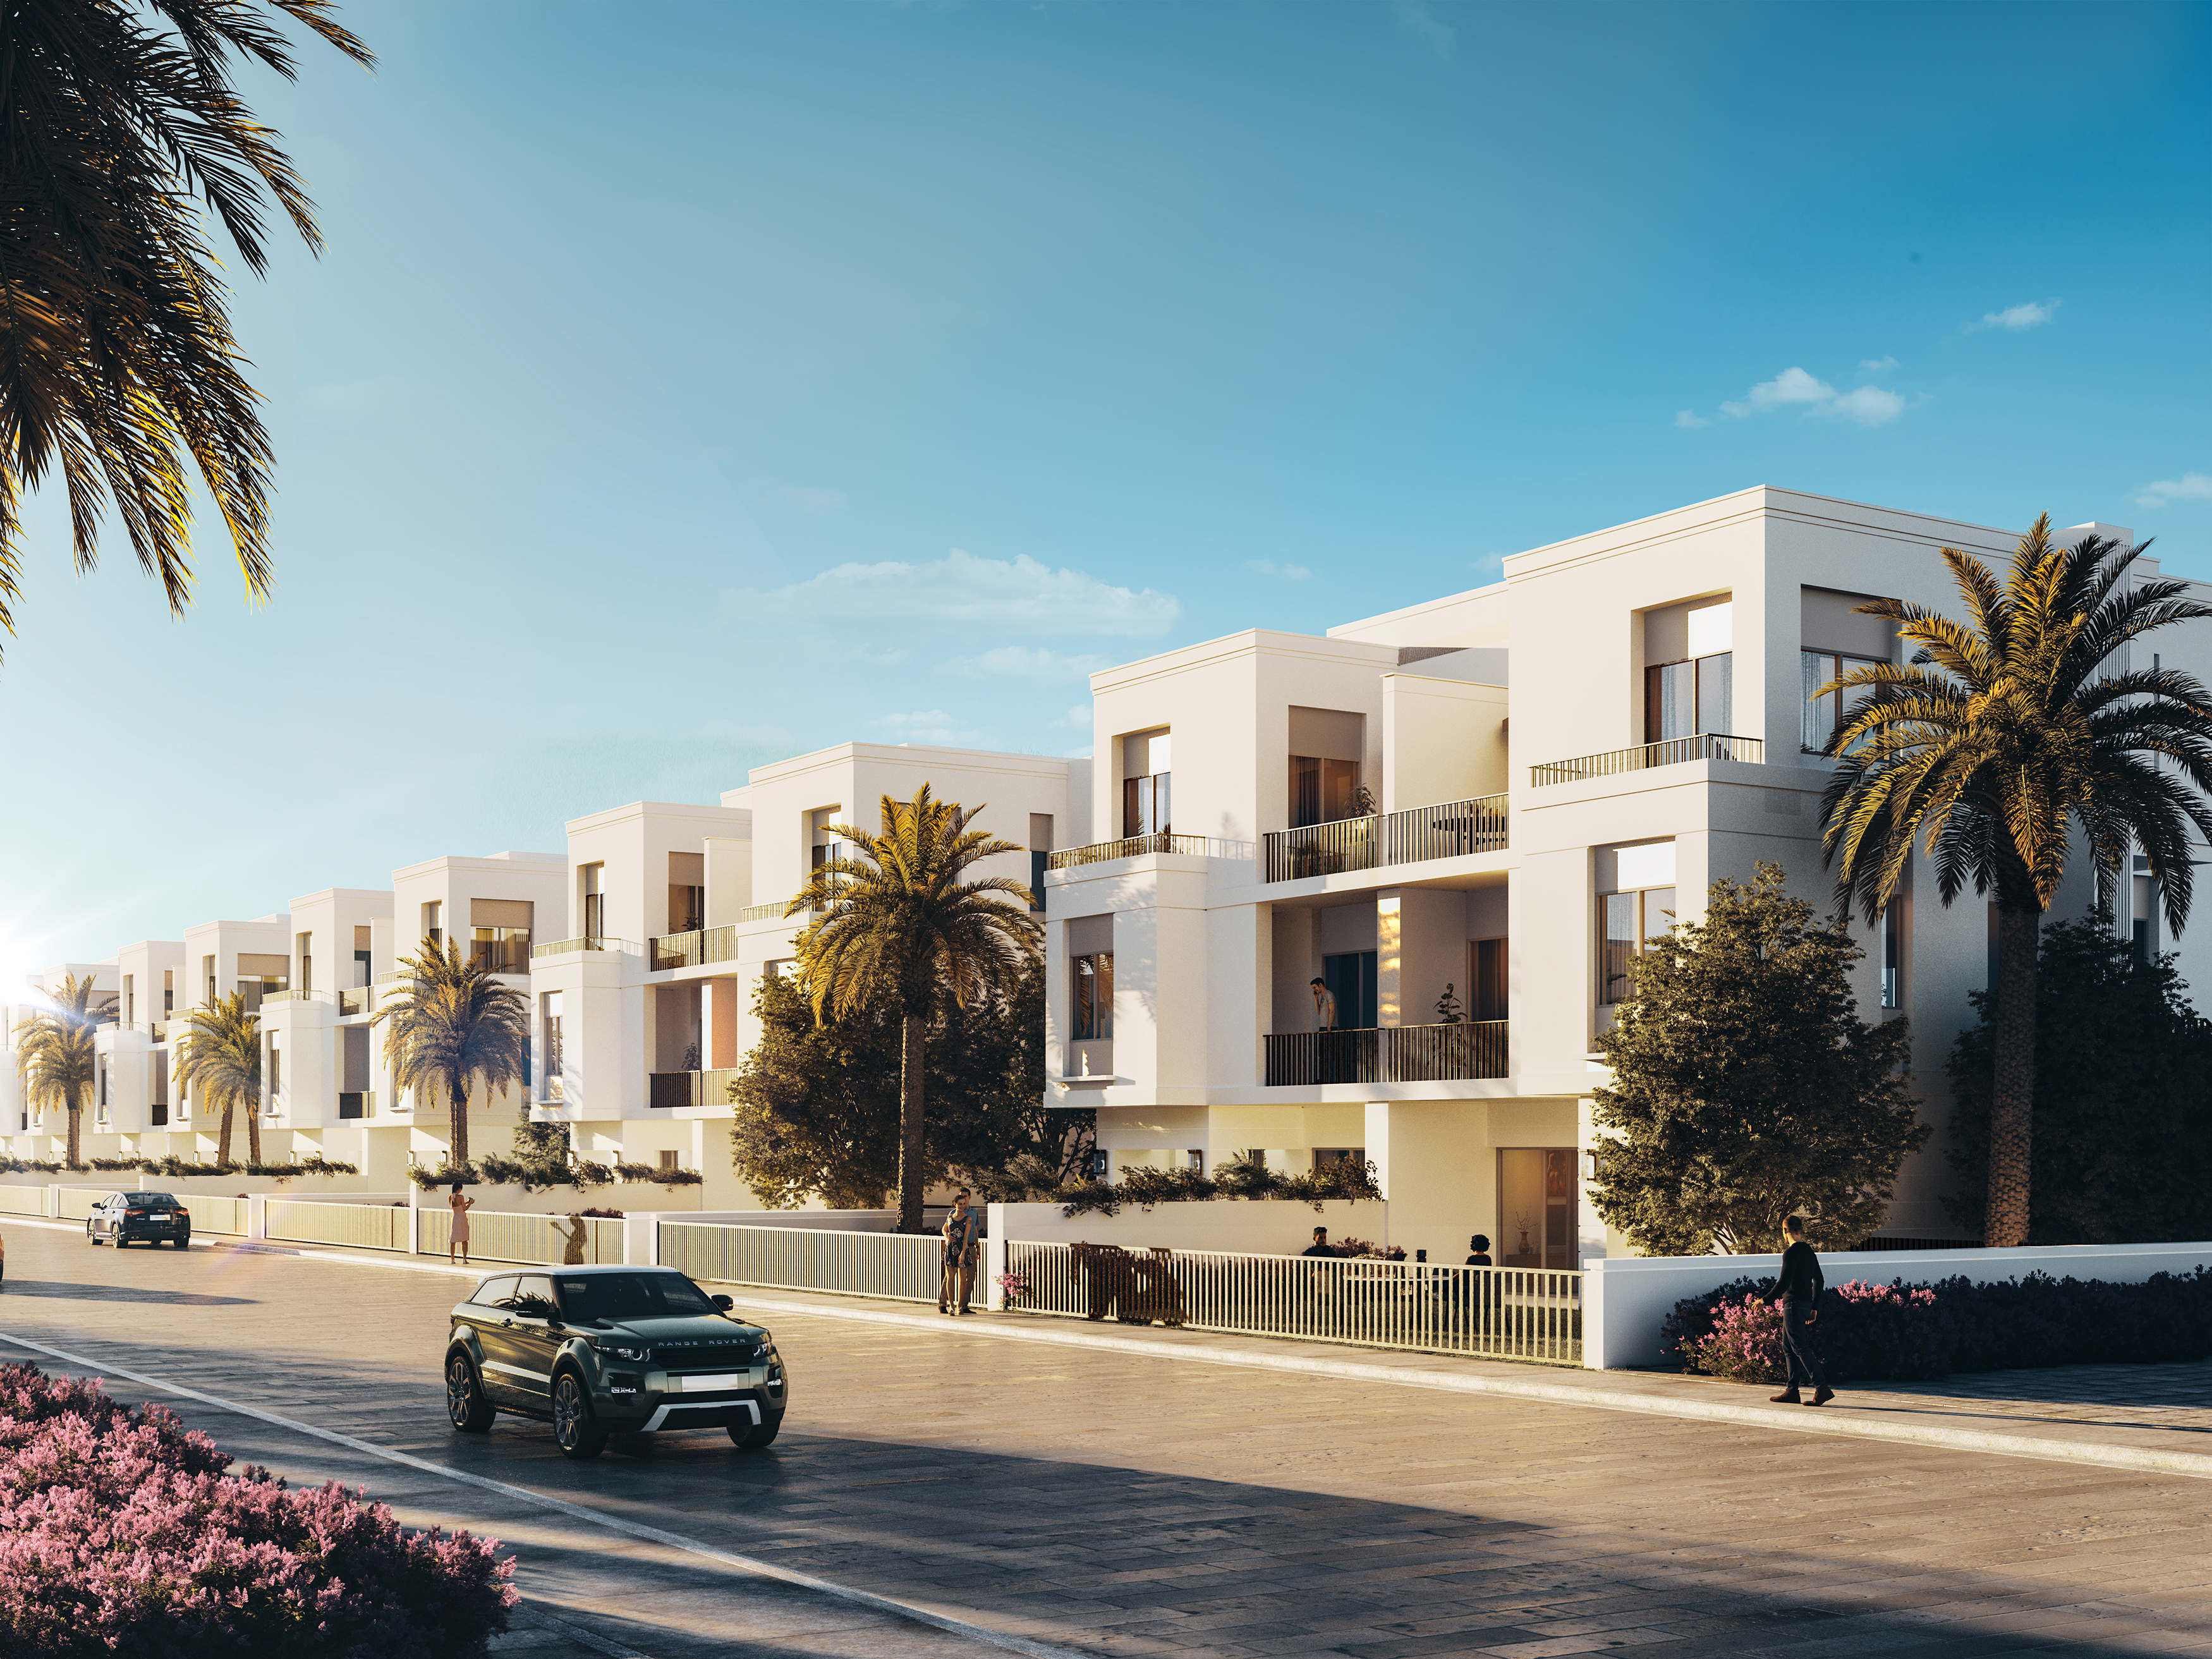
| My recent project for a client, rendered with V-Ray 5 and 3DS Max |
This chapter will start with a quick summary about the V-Ray 5 rendering engine.
Followed by taking users through the process of installing V-Ray 5 accordingly, and setting up the Custom UI and Default Switcher function.
Following that, users will be shown how to load and access the V-Ray Material browser dialog.
Throughout this chapter, users will be taken through every single VRayMtl parameter and functionalities such as, the Diffuse, Roughness, Reflect, Glossiness, Max depth, Fresnel reflections, Metalness, Refract, IOR, Abbe number, Fog color, Fog multiplier, Translucency, Affect shadows, Output, Falloff, BRDF, Coat, Sheen, Bump, and many other V-Ray features.
Finally, users will learn how to use procedural maps such as, VRayBitmap, VRayTriplanarTex, Bitmaps, Bricks, Metals, Carpaint, VRayDisplacementMod, VRayUVWRandomizer, VRayMultiSubTex, VRayPointCloudColor, VRayDirt, VRayAerialPersepective, VRayLightMtl, VRayMtlWrapper, VRayOverrideMtl, VRay2SidedMtl, VRayBlendMtl, Mix, VRayEdgesTex, and much more.
Note: The following is an excerpt from my new book (Chapter 2) with Taylor & Francis/CRC Press, entitled:

VRay 5 is fully integrated with 3Ds Max, and comes equipped with a list of robust and powerful procedural maps and shaders to help achieve complex and striking results.
By default, most V-Ray 5 Material presets are ready to render.
In the discussions that will follow, we will focus primarily on the VRayMtl parameters/ Presets and some its most popular procedural maps.
In order to access the VRayMtl parameters, V-Ray 5 needs to be installed and loaded first.
To load V-Ray, press F10 to open the Render Setup dialog. Alternatively, simply click on its main toolbar button.
In the Render Setup dialog, go to the Common tab

Scroll down and open the Assign Renderer rollout parameters. Click on its Production toggle.

Pick the V-Ray 5 render, in the Choose Renderer dialog. The V-Ray renderer should load automatically.

To begin using the VRayMtl, simply open the Material Editor (M).
For the purpose of this discussion, we will be using the Compact Material Editor version, as opposed to Slate (Node base).


This chapter assumes the standard material was automatically loaded in the Material Editor dialog.
Otherwise, you should probably see the Physical Material instead.

By default, 3ds Max has the Custom UI and Defaults Switcher set to, DesignVIZ.ART, which automatically loads the Physical Materials.
To change this, simply go to the Customize toolbar and choose the Custom UI and Defaults Switcher option.

Currently, you may have the DesignVIZ.ART loaded.

To change it, simply select the Max.vray DefaultUI option, and click to Set.

Note: Next time you open a brand new 3ds Max scene,
the Material Editor should automatically load with V-Ray materials by default.
However, this
action might remove the new V-Ray toolbar, along with the new Asset Browser.
Currently, there's no way to pull back the new V-Ray Asset Browser from the Customize User Interface .
For this reason alone, users will be required to close 3ds Max and uninstall V-Ray 5 first.
Next, open 3ds Max and set the Custom UI and Defaults Switcher to be Max.ray.

Close 3ds Max and reinstall V-Ray 5.
Next time you open 3ds Max, the new V-Ray toolbar should appear automatically, along with the V-Ray materials loaded in the Material Editor dialog.
To continue, let's assume most readers didn't re-install V-Ray 5, and have the Standard Materials automatically loaded in the Material Editor.
To load the VRayMtl, simply click on the Standard toggle, and choose the VRayMtl from the Material/Map Browser list.

If you happen to have the Physical Material loaded, simply click on its toggle to load the VRayMtl

Because V-Ray 5 displays the shaders and lighting more accurately in the material slots, the shader preview may take slightly longer to update.
To avoid this, simply go to the Settings tab.
Under the System rollout parameters, enable the, Native 3ds Max material swatches

For realistic material previews, users can still use the V-Ray Asset Browser toolbar.

This new VRay material library can also be found in: C:\Users\User\Documents\V-Ray Material Library
Alternatively, simply visit the Chaos Group website to download it from there:
https://docs.chaosgroup.com/display/VMAX/V-Ray+Asset+Browser
V-Ray Asset Browser dialog comes with a huge range of ready to render Material Library presets which are fast to display, and provide a full preview of its physical properties.
Most of its physical properties derive from the VRayMtl parameters we will be discussing in this chapter.
The Material Library presets are a massive help to speed up users' workflow.

V-Ray Asset Browser comes with the following functionalities:
Filter case sensitive: When enabled (it turns blue), this button takes into consideration the upper and lower cases of text typed in the search bar.
This text field is often used to quickly search for specific materials.
Filter by meta Data: When enabled, it filters the searches by metadata.
Sort by name: When enabled, it sorts the materials displayed in the dialog alphabetically.
Open ME on apply: When enabled, the Material Editor dialog(M) opens automatically when materials are applied to object/s.
Users need to right click on a specific material slot and choose to, Apply to selected objects .
Use real world scale: When enabled, it automatically enables the real-world scale function of selected VRayBitmaps, when applied via the V-ray Asset Browser dialog.
This function applies to the tiling and other material values.
Always enable this button prior to applying materials to selected objects, or adding materials to scene/material slot.
Note: This function can be found inside the Coordinates rollout of textures applied. It may Not work sometimes (bug), and users will be required to enable it manually.

Use triplanar mapping: When enabled, it adds the VrayTriplanarTex procedural map.
It serves as substitute for UVW maps on objects. It's useful to apply it on objects without UVWs (merged 3d assets , etc).
Always enable this button prior to applying materials to selected objects. Or prior to adding materials to scene/material slot.
As mentioned earlier, users can apply materials from the V-Ray Material Browser dialog, by simply right clicking on a specific material slot, and choosing to Apply to Selected object(s) .
Users can also choose to, Preview the material, Add to scene and Add to favourites.
The option to Add to scene loads the selected material in the material slot.
Some of the V-Ray preset materials come with a VRayBitmap procedural map applied to its diffuse toggle and a TX file assigned to it.


TX file formats are extremely useful for memory cache efficiency, when rendering textures, and reducing aliasing artefacts.
These file formats contain pre-filtered levels of detail of a texture (from low to high resolution).
Each level of detail is loaded according to their proximity to the camera/view.
The high resolution version is automatically loaded for close ups. And the low resolution when further away.
When the VrayTriplanarTex is applied, it automatically goes into the Mapping source toggle.
VRayTriplanarTex will be later discussed in more detail.

To apply each VRay material from the Material Editor, users need to select a material slot, and object/s in the scene. Followed by clicking on the, Assign Material to Selection button.
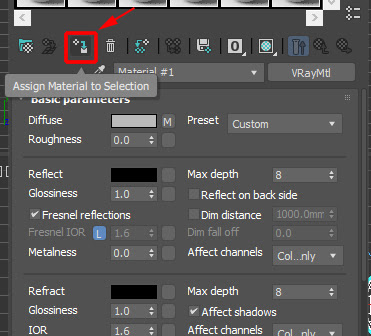
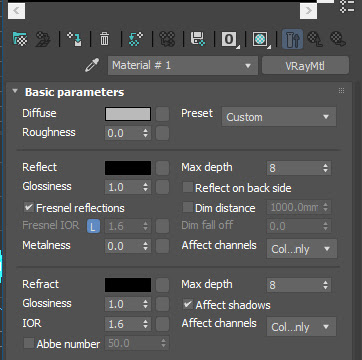
Basic parameters
This chapter is an overview of V-Ray materials and parameters. Not step by step tutorials, as depicted from chapter 6 and onwards.
However, to test some of the parameters described here, please open the 3ds Max file under the name, VRay Materials.max
This 3ds Max scene comes with a V-Ray Frame Buffer file format (vfbl) and a LUT file loaded in its V-Ray Frame Buffer dialog.
The LUT file associated with this chapter is under the name, 3DCollective_sRGB_Agfa_Futura_03Hard.cube

The VRay Frame Buffer file format associated with this chapter is under the name, VRay Materials.vfbl

Diffuse
Diffuse Color - This color swatch enables users to pick and choose a diffuse color, by using the Color Selector dialog.
To access the Color Selector dialog, simply left click on its color swatch and hold down. Once the Color Selector dialog appears, pick a color in the Hue section. Or type in a specific value and adjust its Whiteness slider.
Alternatively, one can sample colors by selecting the, Sample Screen Color picker, and picking a color inside, or outside 3ds max.


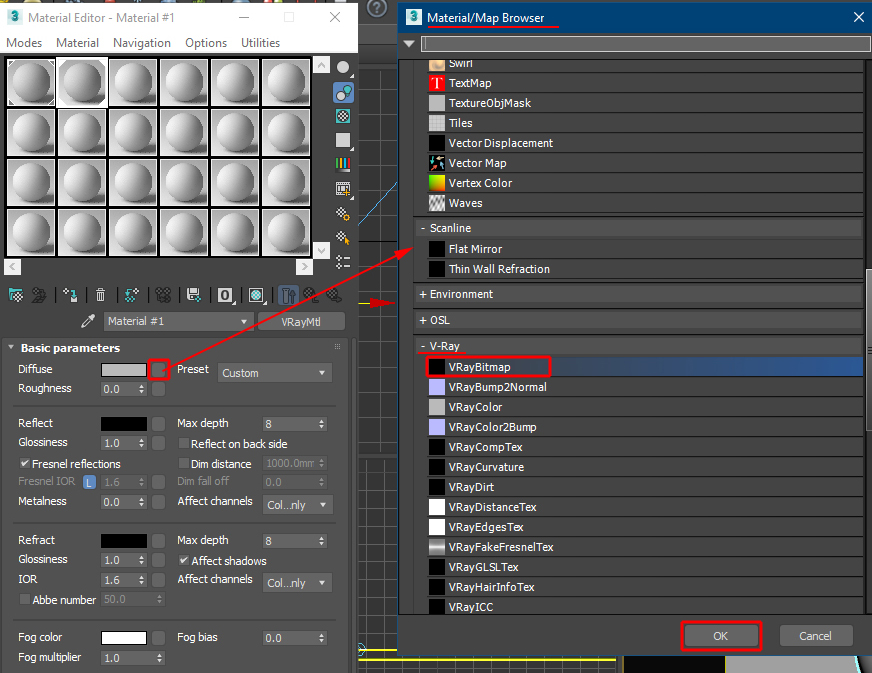
Diffuse toggle- The diffuse toggle allows users to plug a host of standard and V-Ray procedural maps listed in the Material/Map Browser.
The VRayBitmap procedural map is often used to apply textures to its Bitmap toggle, as previously shown. It's worth noting that, reflective surfaces will affect the original diffuse color and/or its texture.
Users often increase the Metalness function value to darken materials, when materials lose too much of their original color because of reflectivity.
Some of the chapters ahead will show other ways to fix this problem.
Roughness toggle- The toggle enables users to plug textures and other procedural maps from the Material/Map Browser list.
This toggle works best with black & white and greyscale textures /procedural maps. Once a texture is applied, it automatically overrides the numerical values.
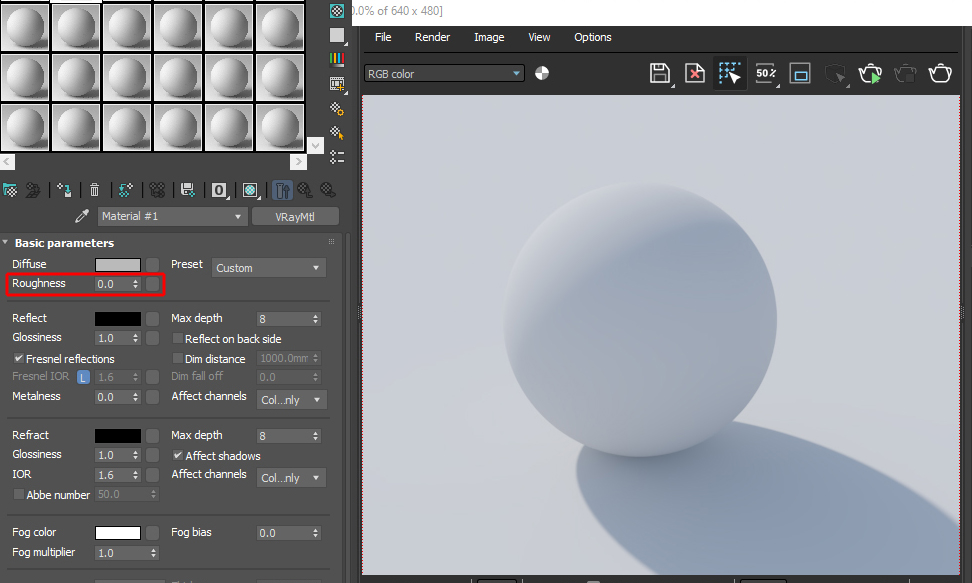
Roughness value- This function determines how coarse a surface appears.

Preset rollout is a downsized version of the V-Ray Asset Browser dialog.
Unlike the V-Ray Asset Browser dialog, the Preset rollout allows users to choose a smaller number of material presets available from the dropdown list.
The preview for each material preset is available from the material slot.

To Maximize the material slot, simply double click on it

Reflect
Reflect Color - This color swatch allows users to pick and choose the Reflect intensity/color, by using the Color Selector dialog.
The default color is black, which's equivalent to no reflections.
Darker colors yield less reflections, and lighter colors (e.g. white) yield the opposite effect.
It's also common for users to set specific colors (e.g. orange/brass color), when creating metalic surfaces such as brass, etc.
Reflect toggle -This toggle enables users to set the reflectivity of the surface, by plugging textures and other procedural maps from the Material/Map Browser list.
It works best with black & white and greyscale textures. Artists often plug a grey texture to this toggle, to realistically emulate a surface reflecting light unevenly.
Once a texture/procedural map is applied to the toggle, it automatically overrides the color swatch values.
Fresnel reflections- When enabled, the reflections and highlights are calculated automatically by the camera/viewing angle of the surface. This function is turned on by default.


At times, having the Reflect toggle with a greyscale texture, in conjunction with, the Fresnel reflections enabled, can yield appealing results. It's just a matter of trying what works best (e.g. with or without Fresnel turned on).
The more contrast the greyscale texture has, the sharper the reflections/glossiness will be.
To achieve the opposite effect (e.g. more diffused results), the greyscale texture needs to have less contrast (e.g. more grey than black areas).

There are also instances when users might be required to Invert the greyscale texture inside the Reflect toggle, in order to achieve specific results.
To do so, simply go inside the Reflect map Coordinates, and scroll down to the Output rollout.
In the Output rollout parameters, enable the Invert function. It works in exact same way as the Invert tool in Photoshop (Ctrl+i)

The Reflect toggle texture can also be mixed/blended with its color swatch to produce specific results. To do so, simply scroll down to the Maps rollout, and reduce the Reflect toggle's numerical values.
Note: This amazing technique can also be used with any function with a toggle.

It is also common practise for users to apply the Falloff procedural map to help control the Fresnel effects, manually .


< Fresnel Falloff Type >


Fresnel reflections- This function is padlocked with Fresnel IOR, and it's set 1.6 by default. To manually change this, simply click on the L (padlock) button.
Its adjacent toggle allows users to plug bitmaps and/or procedural maps to it

Glossiness- This function determines the appearance of glossy highlights and the type of reflections on surfaces. It's value is set to 1.0 by default.
The value of 1.0 yields a sharp/linear highlight with sharp/linear reflections
The appearance of highlights are only noticeable when there is reflectivity on the surface. Otherwise the glossiness values will be redundant.
Lower values yield blurrier reflections and wider highlights.
For perfect highlight results, users should Not reduce the Glossiness values below 0.5.


Glossiness toggle- This toggle allows users to plug a greyscale texture or/and a procedural map to it. Once applied, it automatically overrides its numerical values.
Once a texture/procedural map is applied to the toggle, it automatically overrides the Glossiness values.

Metalness- This function yields a metallic look to surfaces. Values range from 0.0 to 1.0.
The Value of 1.0 darkens the surface and yields a more metallic look.
Users should only enter values 0.0 or 1.0 respectively. Values in-between yield physically inaccurate results.
The Metalness function works best when the Reflect color swatch is set to full white (255)
To match PBR setups from external applications, users often plug the roughness texture to the Glossiness toggle, and enable the Use roughness function under the BRDF rollout parameters .
Note: When enabled, the Use roughness function will automatically switch the Glossiness function to Roughness
Metalness toggle- The toggle enables users to plug a greyscale texture or/and a procedural map to it. Once applied, it automatically overrides its numerical values


Max depth- This function sets the number of times a ray can be reflected, before it stops, and begins using the Exit color.
This function is quite useful for scenes with numerous reflections/ refractions bouncing off each other. Increasing the Max depth value will eradicate any potential black areas (exit color) in the reflections/refractions.
However, it may increase the rendering times.
Max depth value is set to 5, by default.
Reflect on back side- This function works best on glass thickness.
The Refract color determines the opacity of a surface. A full white Refract color (255) makes a surface fully transparent.
To create a typical glass material, simply set its Diffuse color to Black 0, Reflect color 193, Refract color to 255 (white), and the Fog color to 109,57,220 (greenish tint).
Alternatively, simply load a Glass preset from V-Ray Asset Browser dialog.

When the Reflect on back side function is turned on, V-Ray takes into consideration internal and back face reflections of an object, which will subsequently increase the rendering times (inevitably).


Dim distance- When enabled, it restricts the distance of traced rays, by entering the numerical radius. Disabled by default.
Dim fall off- When enabled, it sets the fall off radius of Dim distance. It is automatically enabled when the Dim distance is turned on.
It's greyed out by default.
Affect channels- This function controls how the render channels are being affected by the Reflection. It's set to Color only, by default.
Note: For MultiMatteElement , if you wish to be able to select objects being reflected on this surface, the Affect channels need to be set to All Channels instead.


< Reflect Affect All channels reflected in the Red MultiMatteElement >
Refract
Refract-The color swatch of this function controls the opacity of a surface. Black (e.g. 0.0) being completely opaque, and white(e.g. 255) being fully transparent.
Default color value is 0.0 (fully opaque). When the Refract color value is 0.0 (black), VRayMtl immediately uses the Diffuse base color instead.
Refract toggle- The refract toggle allows users to plug textures and/or procedural maps to it. Greyscale and/or black/white textures work best.
Note: The main opacity of an object should always be controlled via refraction; as opposed to object properties (right click>object properties>Opacity).


Glossiness- This function controls the sharpness of refractions. The value of 1.0 equals to sharp refractions.
The value of 0.0 is equivalent to completely diffused refractions. Users often reduce these values to emulate translucent surfaces.
It's worth noting that, decreasing these values will subsequently increase the rendering times of this surface.


IOR- The Index Of Refraction determines how a light interacts/bends through a transparent surface.
IOR effects are Not visible on completely solid surfaces. Surfaces need to be partially or fully transparent.
An IOR value of 1.0 is equal to no refraction on a transparent surface. The default value is 1.6 .
For a more detailed list of refractive indices, please visit the following website:
https://en.wikipedia.org/wiki/List_of_refractive_indices

< Refraction IOR value of 1.53 >

Abbe number- When enabled, it computes the light wavelength dispersion more accurately and photo realistically . However, the rendering times may skyrocket drastically.
The results are more noticeable when its value is set to a
minimum of 10.
Also, abbe values help reinvigorate a spectrum of true light colors, which become apparent on the rim of objects, and on caustic effects (if enabled).
This function is more visible when there are physical lights interacting with an object. As opposed to HDRI being used as a light source.
Disabled, by default.


Max depth- This function determines the number of times a ray can be refracted, before it stops, and begins using the Exit color.
Max depth value is set to 8, by default. Increasing it will subsequently increase the rendering times of this surface.
Affect shadows-This function allows the light to pass through transparent surfaces (e.g. refractive objects) and cast its transparent shadows. The shadow colors may vary, depending on the surface.
This function is only noticeable on objects that are transparent (Refract color Not completely black).


Refract Affect channels- When the surface is transparent, this specific function allows users to choose the channels to be affected by the refraction, in the rendering channels (e.g. Alpha, MultimatteElement, etc).
Professionals often choose the All channels option, as it helps to insert the background and other elements behind a refractive/transparent surface.


Fog
Fog color-This function enables users to change the color of refractive objects and/or emulate the effect of a more opaque object, depending on its size.
Darker colors make refractive objects look more opaque, and lighter colors yield the opposite effect.


Fog multiplier-This function determines the density/influence of the fog. Default value 0.1.
Fog bias- The function allows users to control the density of objects (refractive surfaces mainly).
Default value is 0.0.


Translucency- This function works in conjunction with refractions to calculate the amount sub-surface scattering on a surface. It's set to None by default.
There are three types of translucent models: Hard wax model, Soft (water) model, and Hybrid model
V-Ray Asset Browser comes with robust presets to emulate hard surfaces such as marble(Hard wax model) , water and Hybrid models such as real translucent plastics, skin, milk, fruit juice, etc.
Scatter coeff-This function determines the amount of scattering inside a surface.
The value of 0.0 scatters rays in all directions. The value of 1.0 does the opposite.
It's set to 0.0 by default.
Fwd/bck coeff- This function controls the scattering direction. The value of 0.0 scatters the rays forward.
The Value of 1.0 scatters the rays backwards
Thickness- This function is often used to limit the propagation of the rays travelling inside a surface.
It's set to 10.000mm by default.
Back-side colour- This function determines the color of the sub-surface scattering effect. It's set to white (255) by default.
Light multiplier- This function controls the strength of translucency.
Self-illumination
This function allows users to choose the Self-illumination color, from its color swatch, or plug a texture or/and a procedural map to its toggle.
To test this material, there's a scene named, Self-illumination.max
Self-illumination color- The self-illumination color swatch is set to black, by default.
Compensate camera exposure- When enabled, this function automatically adjusts the self-illumination intensity to compensate for the exposure of the scene.
GI- This function uses the Global Illumination settings to light up a scene. Otherwise, it will simply illuminate itself without contributing to the GI. Disabled by default.
Multiplier- This function controls the intensity of the self-illumination. Default value is set 1.0.
The self-illumination effect is more apparent in dark/dim scenes.
Note: When using a bitmap/texture in the Self-illumination toggle, ensure its colour swatch is black; otherwise the texture will not be visible in the viewport.


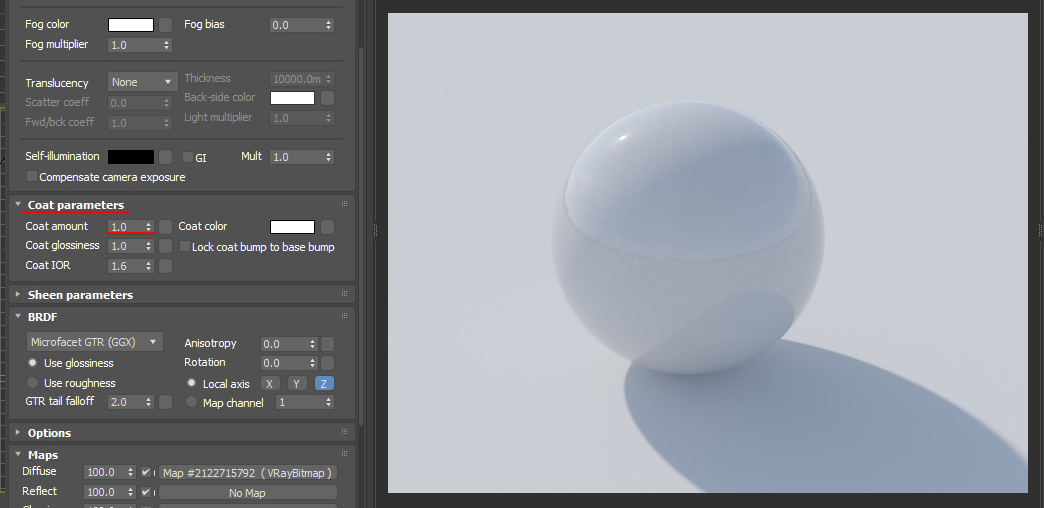
Coat parameters
To test this material parameters, there is a scene under the name, VRay Materials.max
Coat amount- This function controls the blending amount (visibility) of the Coat colour, Coat glossiness , Coat IOR, etc
The value of 0.0 makes the Coat color or its map/layer in the toggle completely invisible.
The value of 1.0 makes the Coat color or its map/layer in the toggle completely visible and blending with the diffuse colour or map/layer in the toggle.
Users can also use its adjacent toggle to plug materials or/and procedural maps.
The Coat amount is set to 0.0 by default
Coat glossiness- This function sets the amount of glossiness and reflectivity of the coat.
Its toggle can be used to plug materials or/and procedural maps.
The default glossiness value is set to 1.0
Coat IOR- This function sets the index of refraction of the Coat.
Users can plug materials or/and procedural maps to its adjacent toggle.
Its default IOR value is set to 1.6
Coat color- This function controls the color of the coat.
Its adjacent toggle can be used to plug materials or/and procedural maps.
The default Coat color is set to white.
Lock coat bump to base bump- When enabled, it reinvigorates the base bump map over the coat bump map (if any).


< Coat color set to black with Coat glossiness/reflectivity set to 0.0 >
Sheen parameters
This function helps to emulate surfaces such as velvet and satin.
Sheen color- This function determines the color of the sheen
Its toggle can be used to plug materials or/and procedural maps.
The default color is black.
Sheen glossiness -This function controls the sharpness to the shine.
Lower values yield a more diffused shine (velvet look), and higher values have the opposite effect.
Default value 0.8
Its adjacent toggle can be used to plug materials or/and procedural maps.


BRDF rollout
For the purpose of illustrating this group parameters, the Aluminium_Anodized_Bronze material was used.

Bidirectional reflectance distribution function ( BRDF) parameters control the appearance of the glossy highlights and the reflections on a surface.
There are currently four types of BRDF
Microfacet GTR (GGX)- GGX is the most recent and flexible BRDF type, and yields better representation of most materials due to its ability to control the shape of the specular lobe.
Phong- This type of BRDF yield a small/sharp glossy highlight
Blinn- The glossy highlights of this type of BRDF are wider and less sharp


Ward-This BRDF produces even wider and more metallic glossy highlights

Use glossiness- This function is enabled by default, and it uses the Reflect Glossiness parameters (in the Basic parameters ) to yield the glossy highlights on a surface
Use roughness-When enabled, this function automatically switches the Reflect Glossiness function to Roughness type(in the Basic parameters ), to emulate a more satin/matte glossy surface.
Anisotropy- This function dictates the direction of the glossy highlights. Users can also plug greyscale texture or/and a procedural map to its toggle. Default value is 0.0.

Rotation-It allows users to manually set the direction (in degrees) of the reflections and highlights.
Users can apply a greyscale texture or/and a procedural map in its toggle. Default value is 0.0.

< BRDF Ward Rotation value set to 90.0 >

Options rollout
Trace reflections- This function enables reflections to be traced, when a surface is reflective. If reflections are not contributing much to a surface, this function can be disabled, to speed the rendering times.
Enabled by default.
Trace refractions- It allows refractions to be traced, when a surface is reflective/refractive. Also, If refractions are not contributing much to a surface, this function can be disabled, to speed the rendering times of the surface.
Enabled by default.


Cutoff- This function sets the trace limit of reflections and refractions. High values reduce the tracing time (with a risk of artifacts), and low values increase the rendering times drastically (with more accuracy).
Default value is 0.01
Env.priority -This function prioritizes the environment being used for reflections and refractions
Default value is 0
Gloss Fresnel- When turned on, it takes into consideration the glossy fresnel to interpolate the reflections and refractions.
Preserve energy- This function controls how the diffuse, reflections and refractions affect each other.
Double-sided- This function is quite useful to correct surfaces with one side, or surfaces which one of its faces requires flipping the normals of ( e.g. black/dark) . Enabled by default.
Use Irradiance map- This function uses the irradiance map computation to calculate its surface, if enabled in the Global Illumination render settings.
Otherwise it will automatically use the brute force (more accurate), if the GI is turned on. Enabled by default.
Fog system units scaling-When turned on, this function makes the fog color dependent of the systems units (it often darkens glass/transparent surfaces).
Effect ID- When turned on, this function allows the reflections/refractions to affect specific material ID numbers (which need to be specified/entered).
Default value is 0
Opacity mode-This function determines how the opacity is sampled.
Maps rollout
For the purpose of illustrating the functionalities of this rollout parameters, the Bricks_A01_m material was used.
Note: The Use real world scale function was not applied.

Most Map toggles displayed under this rollout are directly connected to the textures/procedural maps being used in the V-Ray Basic Parameters.
When a texture/procedural map is being used in a toggle, it automatically overrides the colors and/or values displayed.

The toggles being used have a capital letter M in them; and the toggles not being used are empty (e.g. none).
Users can increase or decrease the contribution of each toggle being used (in percentages) by typing in a value, or use its adjacent spinner.
The default value of each toggle is 100%.
In addition, users can completely disable any toggle being used, by simply disabling its adjacent tick box. When such happens, the toggle with the capital M will automatically become lowercase (e.g. m)

Bump- It allows users to plug a texture and/or a procedural map to its toggle. It works best with greyscale and/or black & White bitmaps.


For the purpose of illustrating the Displace functionalities, a standard VRayMtl was loaded, as previously shown .
Displace- This function physically modifies a geometry according to its mapping coordinates. For accurate results users are recommended to have a detailed geometry (many segments).
Users can plug a texture and/or a procedural map to its toggle. Also, It works best with greyscale and/or black & White bitmaps.
It's worth noting that, this type of displacement is very time-consuming to render.

For relatively fast and accurate results, professionals tend to use the VRayDisplacementMod instead. When using this modifier, the Displace toggle needs to be disabled.
This VRay modifier can be accessed from the Modify list.

Note: The VRayDisplacementMod works best when the UWM Map modifier is applied first. Otherwise the procedural map/texture applied will not tile accordingly.
Also, the 2D mapping (landscape) option is the fastest to render from the three Types.
To apply a greyscale texture or/and a procedural map, simply use the Texmap toggle.

To edit the texture or/and the procedural map, simply drag/drop it into a toggle, and to choose to instance it.
Also, ensure the toggle is disabled, to prevent doubling it up. Following that, enable the Show shaded Material in Viewport button.


Furthermore, when using the VRayDisplacementMod modifier, the texture/procedural map parameters should always be kept at 1.0, in the Material Editor.
All texture/procedural map changes such as tiling, should occur at the Modify level only (e.g. with UVW Mapping; MapScaler; etc).


Opacity-This function only works when textures and/or procedural maps are plugged to its toggle.
For best results, use greyscale and/or black & White textures/procedural maps.

More VRay shaders and procedural maps
While V-Ray has a host of shaders and procedural maps, the following discussion will focus mainly on the mostly used ones, by artists and industry professionals.
VRayBitmap
This procedural map is often used as the basis to plug Bitmaps and other procedural maps.
Its Bitmap toggle is often used to plug textures and file formats such as, JPG,PNG,HDR, EXR, TIFF, TX, etc.
Its Mapping source toggle allows users to plug amazing procedural maps such as, VRayUVWRandomizer, VRayTriplanarTex, VRayMultiSubTex,etc


Bitmap- This toggle allows users to locate and load file formats such as, JPG,PNG, HDR, EXR, TIFF, TX, etc.
Reload- When clicked, this button reloads the bitmap currently loaded
View image- When clicked, this button opens the loaded bitmap inside 3ds Max.
Note: This button doesn't work with file formats such as, TX, etc .
Locate- When clicked, it locates the loaded bitmap, by opening it in a separate folder.
Note: This button doesn't work with file formats such as, TX, etc .
Mapping type- This function determines how the bitmaps are displayed.
The most commonly used mapping types are, 3ds Max standard and Spherical.
3ds Max standard type uses the standard titling style often applied on surfaces.
When enabled, it automatically uses the Coordinates group to tile the loaded bitmap.
Spherical type is often used for HDR maps plugged in the Environment toggle.
Horiz. rotation- This function controls the horizontal rotation of a bitmap.
This function is only available when the mapping type is NOT set to 3ds Max standard.
Vert. rotation- This function controls the vertical rotation of a bitmap.
This function is only available when the mapping type is NOT set to 3ds Max standard.
Mapping source- This function allows users to plug useful procedural maps such as, VRayUVWRandomizer, VRayTriplanarTex, VRayMultiSubTex,etc .
Ground projection- This function only works when applied to the environments map toggle.
When enabled, it helps to ground the lower section of the environment map onto an imaginary plane that will receive shadows.
This function is particularly useful for 3d scenes with environment maps and floating objects without a physical ground (geometry) to cast shadows onto.
Position- This function controls the position coordinates of the projected environment map.
Overall mult- This function determines the overall intensity/brightness of the loaded material in the material editor preview and while rendering.
Render mult- This function determines the overall intensity/brightness of the loaded material, only while rendering.
Filter mult- This function controls the blurriness of the loaded image. Higher values yield blurrier results and faster rendering of the blurred image.
Interpolation- This function controls the rendering interpolation of textures (Bilinear, Bicubic, Biquadratic ).
Filtering- This function controls the filtering method (Isotropic, Elliptical, Sharp Isotropic )
Crop/Place-When enabled, this function allows users to Crop or Place the loaded texture.
U and V- These two functions allows users to control the U/V tiling of the loaded material.
Width and Height- These two functions allows users to control the Width/Height of the loaded material.
The remaining parameters are self explanatory, and can be found on: http://docs.chaosgroup.com/
VRayUVWRandomizer
This exquisite procedural map allows users to randomize the position, rotation and scale of bitmaps.
It can only be plugged from the Mapping source toggle of the VRayBitmap and VRayTriplanarTex texture nodes
Once VRayUVWRandomizer is loaded, the bitmap tiling is overridden/controlled by its Coordinate parameters.


To test the functionalities of this procedural map, please open the file under the name, VRayUVWRandomizer.max
By name- When enabled, this function randomizes (color index) bitmaps by its name.
By face ID- When enabled, this function randomizes (color index) bitmaps by the face IDs of an object.
By render ID- When enabled, this function randomizes bitmaps(color index) of object's face ID.
By element- When enabled, this function randomizes bitmaps (color index) by the element IDs of an object.
By instance ID- When enabled, this function randomizes bitmaps(color index) by the face IDs of an object.
By object ID- When enabled, this function randomizes bitmaps (color index) by the face IDs of an object.
Stochastic tiling- When enabled, this function automatically changes the UV mapping tile.
Seed- This function allows users to change the pattern randomisation by entering different values.
By particle ID- When enabled, this function randomizes bitmaps (color index) by the face IDs of particles.
By node handle- When enabled, this function randomizes bitmaps (color index) by the face IDs of an object.
Variance- This group controls the offset , rotation and scale variations.
U offset (horizontal)- This function controls the horizontal position of your bitmap. Always enter values that are different from the V offset (vertical) values.
V offset (vertical)- This function controls the vertical position of your bitmap. Always enter values that are different from the U offset (horizontal) values.
UV rotation- This function controls the rotation of your bitmap in U or V axis.
U scale % (horizontal)- This function controls the horizontal scale of your bitmap.
V scale % (vertical)- This function controls the vertical scale of your bitmap in percentages.
Steps- This function controls the variation intervals. Entering values higher than 1 can really make a difference on the overall look of a bitmap.
Always enter different step values in U and V directions.


VRayMultiSubTex
This unique procedural map allows users to randomize bitmaps and colors, based on material IDs, faces, elements, etc.
VRayMultiSubTex is best used with multiple bitmaps to emulate randomized materials across one surface.
To apply it, simply click on the diffuse toggle and choose the VRayMultiSubTex from the Material/Map Browser dialog, under V-Ray rollout.
20 Total IDs are loaded by default. However, for the purpose of this exercise it was set for a Total of 15 IDs instead.
Note: VRayMultiSubTex colors are NOT visible in the viewport (only in the render).


To test the functionalities of this procedural map, please open the file under the name, VRayMultiSubTex .max
Get ID from-This function determines the type of ID to get from.
It is set to, Face material ID, by default.
Random by Face material ID is also quite popular to randomly distribute Bitmaps and/or colors across a one surface.
To set face and material IDs simply select a specific object with multiple faces, and add the Editable Poly modifier to it.
Under its Selection rollout, enable the Element type and select one element in the viewport.

Users can choose to manually enter a specific material ID number for each selected element, by scrolling down to its Polygon:Material IDs rollout parameters, and typing in any number in the Set ID name field.

Alternatively, simply add the MaterialByElement modifier to automatically add ID numbers to each separate element randomly.
Users can also set the total count of ID numbers on the entire surface, by entering a number in the ID Count .
This ID count number should always match with the Total IDs number in the VRayMultiSubTex

To check which ID numbers were randomly assigned to each element, simply add another Editable Poly modifier on top of the MaterialByElement, and select each element to see the ID numbers randomly assigned (between 1 to 15) .

These ID numbers work in conjunction with the ID numbers displayed in the VRayMultiSubTex.

Or the bitmap/procedural map ID number being used in the toggle (if any).
To choose a material ID number, simply click and hold.

To assign object IDs, simply select an object in the scene, and right click on it. Choose the Object Properties option in the quad menu.

In the General tab, under G-Buffer group, type in a specific number that matches one of the MaterialByElement object ID numbers (if the Object ID option is being used).

Random Hue-This function only becomes available if any of the Radom ID modes are chosen from the list(Random by Node Handle, Random by Face material ID, Random by Object ID, etc).
It randomises the hue colors, procedural maps and bitmaps being used under Default color list.
Default value 0.0
Sat- Only available if any of the Radom ID modes are chosen from the list(Random by Node Handle, Random by Face material ID, Random by Object ID, etc).
It randomises the saturation colors, procedural maps and bitmaps being used under Default color list.
Default value 0.0
Gamma- It becomes available if any of the Radom ID modes are chosen from the list(Random by Node Handle, Random by Face material ID, Random by Object ID, etc).
It randomises the gamma colors, procedural maps and bitmaps being used under Default color list.
Default value 0.0
Total IDs- This function sets the total number of IDs being used/ displayed under the Default color list.
Default value 20
Delete unused-When clicked, it deletes disabled slots under the Default color list.
Seed-This function randomizes patterns, if the Random by name option is chosen from the list.
Entering different numbers will yield different pattern results.
Loop through textures- This function is useful when the number of Face material IDs or Object IDs in the scene exceed the Total IDs number specified in the list.
It automatically applies one of the listed colors or/and textures specified in the list .
Blend color and texture- When enabled, this function automatically blends the current color displayed in the swatch with loaded bitmap/procedural map plugged in the toggle.
The default value of 100 uses 100% of the loaded bitmap/procedural map plugged in the toggle (if any is being used).
Otherwise no blending will occur with default color swatch only.
The value of 50 uses 50% the loaded bitmap/procedural map plugged in the toggle, and 50% of the color swatch.
Default color- This is the default base color or/and procedural map whose IDS are not matched. It works mainly with Object Id and Face material ID options.


Note: Different wood board textures from the folder, wood-boards-spruce_0053-01_1460mm-by-20mm, were used in each of the 15 toggles to achieve the final result.

VRayTriplanarTex
VRayTriplanarTex procedural map is extremely useful to apply on objects without the appropriate UVW map.
It works by projecting one or more bitmaps along the axis of a surface.
To apply it, simply click on an existing VRayBitmap already being used .
In the material/Map Browser, choose the VRayTriplanarTex procedural map from the list.


Note: Currently, VRayTriplanarTex procedural map is being used in the diffuse toggle.
However, if other toggles are also being used (for reflections, bump, etc), this procedural map needs to be applied to them also (with the same parameter values).
Texture mode- This function controls how the texture/s will be projected.
The option to use, Same texture on all axis, projects one texture (bitmap) on all axis of a surface.
The option to use, different texture on each axis, projects different textures on each axis
Texture- This toggle allows users to load textures and/or procedural maps
Texture Y- This toggle only becomes available if the Texture mode is set to, Different texture on each axis.
Note: These values are more noticeable when separate objects in the scene have the same VRayTriplanarTex applied (e.g. group of objects or different objects attached).
It allows users to load textures and/or procedural maps on Y axis.
Texture Z- This toggle only becomes available if the Texture mode is set to, Different texture on each axis.
It allows users to load textures and/or procedural maps on Z axis.
Note: These values are more noticeable when separate objects in the scene have the same VRayTriplanarTex applied (e.g. group of objects or different objects attached).
Size-This function controls the size of the texture. Higher values tile the texture further.
Note: When the Texture mode is set to, Different texture on each axis, the Size values need to be increased considerably in order for textures to be visible in the render.
Blend-This function is only useful when the Texture mode is set to, Different texture on each axis.
It allows users to set the amount of blend/blur between texture borders.
Frame offset- This function allows users to move the texture in X, Y and Z axis.
Note: These values are more noticeable when separate objects in the scene have the same VRayTriplanarTex applied (e.g. group of objects or different objects attached).
Texture rotation-The function control the rotation of textures.
Space-This function determines the projection space of the texture.
Note: This function is more noticeable when separate objects have the same VRayTriplanarTex applied (e.g. group of objects or different objects attached).
It's set to local object by default.
Users can also set the space type to, Reference to another node, and select a specific object in the scene. The selected object is often moved and/or rotated to see major changes the Material editor dialog.
The world space is used by default.
Frame offset values are more apparent in the render.
Random: texture offset, rotation, frame rotation, axis, mode-
When enabled, this function randomly applies values to the parameters discussed earlier.
Mapping source- This function's toggle allows users to plug the VRayUVWRandomizer to it.


Note: A variety of different materials from V-Ray Asset Browser were used to achieve this result.
To achieve similar results , simply use multiple materials/textures of your choice.


Note: Objects with angled faces will yield undesirable results.
In the best case scenario, only one of the angled faces will display a different material.
To correct this problem (bug), go to the Editable Poly or Mesh modifier, and specify the face/s ID numbers you want a different material applied to.
Use some of the steps shown previously.
Hold down the Ctrl key to select multiple faces, if required.
Do not use the MaterialByElement modifier.
Back in the Material Editor dialog (M), click on the Diffuse toggle and choose the VRayMultiSubTex procedural map.

In the VRayMultiSubTex Parameters, set the Get ID from as, Face material ID. This will recognise the ID faces previously numbered accordingly.
Under Total IDs, set the total number of IDs you want.
In the Default color toggle, apply the VRayColor2Bump to add detail to the surface.
Set its Material ID number to coincide with the face number previously set. And add the VRayTriplanarTex procedural map, as previously shown.
Under VRayTriplanar Parameters, set the Texture mode as, Different texture on each axis
Copy the same texture or a different one into the X, Y and Z toggles.
Set its Size. And set the Space as, Local object.
Also, set its Material ID number to coincide with the face number previously set .
Repeat the same steps for the remaining Total IDS listed in the VRayMultiSubTex Parameters. Use different Id numbers, and set the Frame offset in X with deferent values.

VRayPointCloudColor
VRayPointCloudColor procedural map allows users to accurately render point cloud objects in 3ds Max without the renders having to look self illuminated.
Note: This procedural map is only available via the Diffuse toggle.
To use a specific bitmap, apply the VRayBitmap procedural map first, and load the VRayPointCloudColor via the Mapping source toggle.
VRayPointCloudColor doesn't have any parameters.

VRayDirt
This amazing procedural map allows users to emulate dirt or ambient occlusion effects around the crevices of objects.
Note: VRayDirt is less apparent on spherical surfaces .
Users can apply VRayDirt directly to the Diffuse toggle of a material.
Or Via the Render Elements (VRayExtraTex>VRayDirt).
Either way, VRayDirt increases the rendering times slightly.
To apply it via the Diffuse toggle of a material, simply click on the existing VRayBitamp or Bitmap, and choose VRayDirt from the Material Map/Browser dialog.


To apply VRayDirt via render element, simply go to the Render Setup dialog, and open the Render Element Tab.
Under Render Elements group, click to Add, and choose the VRayExtraTex procedural map from its dialog.
Once loaded, click on its Texture toggle and load the VRayDirt from the Material/Map Browser dialog.


To edit its parameters, drag the VRayDirt from VrayExtraTex toggle onto an empty material slot.
Choose the Instance Method.


It's quicker to preview and adjust the VRayDirt parameters as a material override (under V-Ray global switches) tab.
Once satisfied with the results, you can copy/paste the final parameters onto the diffuse toggle, and disable the override.


Note: Enabling the Streaks ambient function will NOT yield streaks. One of the Bias axis need to have a value applied (e.g. 30).
It's common practise for users to focus mainly on the Z axis to create streaks in a vertical direction.


< VRayDirt Streaks in VFB Render Elements list>
Radius- This function sets the radius of the VRayDirt.
Default value, 100mm.
Occluded color- This function controls the color of the VRayDirt.
Default color, black (0).
Unoccluded color- This function controls the main color/shade of objects.
When VRayDirt is used in the Diffuse toggle, users often have procedural maps plugged to this toggle (e.g. VRayMtl, VRayBitmap, etc)
Distribution- This function narrows the spread of the VRayDirt.
The smaller the value the wider the VRayDirt.
Default value, 1.0
Falloff- This function controls the amount of gradient on the VRayDirt.
High values reduce the spread of the gradient. Keep the default value (0.0) to have a wide gradient.
Default value, 0.0
Subdivs-This function controls the quality of the VRayDirt. High values yield smother results (less grainy) at a cost of longer rendering times.
The default value is often OK.
Default value, 3
Bias- This function sets the direction of the VRayDirt. Z axis sets the direction of the VRayDirt vertically.
The default value of 0.0 (in X, Y and Z), sets the ambient occlusion in all directions.
Affect alpha-When turned on, the alpha values of the Occluded and Unoccluded colors/toggles are applied.
Enabling this function doubles the rendering times.
Disabled by default.
Ignore for GI- When enabled (by default), this function omits the VRayDirt preview during the pre-calculation process of the render.
By default, VRayDirt is only visible during the rendering time. Not pre-calculation.
Enabled by default.
Consider same object only- By default (disabled) VRayDirt is spread to nearby objects.
When this function is enabled, the ambient occlusion will no longer affect adjacent objects.
Disabled by default.
Double sided- When turned on, this function affects crevices and edges of objects .
It often creates undesirable results.
Disabled by default.
Work with transparency- When turned on, this function takes into consideration transparent objects in the scene, including mapped opacity.
Disabled by default.
Environment occlusion- This function takes into consideration the Environment contribution on unoccluded areas.
Disabled by default.
Mode- This function controls how the VRayDirt will be used (Ambient Occlusion, Reflection occlusion, Inner occlusion, ambient + inner occlusion)
Set to Ambient Occlusion mode by default.
Streaks ambient- When enabled, this function adds streaks to the ambient occlusion.
Streaks are only visible when the bias value is set in one direction(positive values) or the other (negative values).
VRayDirt will be projected in both directions without streaks, if the Bias values are set to 0.0(in X,Y, Z).
It's common practise for users to focus mainly on Z axis to create streaks in one direction.
The value of 30 seems to work well in most scenes.
Disabled by default.
Streaks inner-This function only becomes available when the Inner occlusion mode is set.
When enabled, it adds streaks to crevices.
Disabled by default.
Streak size- This function controls the width of each streak. The bigger the value, the more the streaks will overlap horizontally.
Default value, 50.0
Note: When sending the final high resolution renders, it's best Not to use VRayDirt as render element in your main scene.
This will reduce the rendering times substantially.
Instead, create a separate scene with a basic VRayMtl as an override material, and use multiple passes of VRayDirt as render elements (e.g. with streaks, without streaks, etc).
These VRaydirt render passes/elements can be later used in post-production by overlaying them (Multiply blending mode) against the main render, in Photoshop, AfterEffects, Nuke, etc.
Reflection glossiness- This function becomes available if the Mode is set to, Reflection occlusion (Phong, Blinn, Ward).
It controls the direction of the rays traced for Reflection Occlusion.
Affect reflection elements- This function becomes available if the Mode is set to, Reflection occlusion (Phong, Blinn, Ward).
When turned on, the ambient reflection affects the reflection in the render element.
Exclude- This toggle allows users to choose object/s to exclude from VRayDirt.
VRayAerialPerspective
This truly amazing procedural map works in conjunction with the VRySun and VRaySky to emulate perspective atmospheric effects such as fog or haze.
Unlike the VRayEnvironmentFog, it's much faster to render and does not cast volumetric shadows.
To apply it, simply open the environment dialog by pressing 8 on your keyboard, or by going to the Rendering toolbar and choosing the Environment option from the list.
Next, in the Environment and Effects dialog, under Atmosphere group, click the Add toggle and choose the VRayAerialPerspective.


Visibility range (in meters)- This function controls the fog/haze proximity to the camera.
Low values bring the fog/haze closer to the camera. And High Values do the opposite.
Default value, 6000.0 (far away).


Atmosphere height (in meters)-This function controls the height of the fog/haze
Low values reduce the height of the fog/haze. And High Values do the opposite.
Default value, 6000.0


Inscattered light intensity- This function controls how much light passes through the fog/haze.
Values lower than 1.0 reduce the brightness/shadows in the scene. Values higher than 1.0 yield the opposite effect.
Default value, 1.0
Affect Environment rays- When enabled, this function blends the fog/haze with the horizon (sky).
Disabled by default.


Affect background- This function adds the fog/haze to the background.
When disabled the background is darker (assuming the Filter color is white).
Enabled by default.


Filter color- This function controls the color of the fog/haze.
Default color, white
Primary visibility- This function enables the visibility of the fog/haze.
Enabled by default.


VRayLightMtl
This shader is primarily used to add self-illumination to objects. And can easily be accessed through the Material/Map Browser dialog, under the V-Ray rollout list.


< VRayLightMtl parameters>
VRayLightMtl works in exact same way as the VRay Self-Illumination function. In addition, it comes with features such as:
Opacity-This function allows users to plug textures and/or procedural maps to its toggle.
As with most opacity toggles, it works best when a greyscale and/or black & White texture/procedural map is used.
Emit light on back side- This function allows the light to be emitted from a side of an object that isn't emitting light.
Disabled, by default.
Compensate camera exposure- This function is quite useful for scenes where the exposure controls are causing the self illumination to be slightly dimmed. Turning this function on, will essentially make the self illumination more visible, by compensating for the exposure.
Disabled, by default.
Multiply color by opacity- When turned on, it increases the color of the light material, based on the texture/procedural map applied to the Opacity toggle.
Disabled, by default.
Displace-This function is only available when the Direct illumination is disabled. Users can plug a texture/procedural map to it.
Displacement works best with greyscale and black & white materials.
Direct illumination- When turned on, it emits light in the same manner as a VRay Mesh light. As such, it can be time consuming to render.

< VRayLightMtl Color value set to 50 with the Direct illumination enabled>
VRayMtlWrapper
This shader only works if the Global Illumination (GI) and/or the Caustics are enabled in rendering parameters.
It's mainly used to allow certain materials to receive or generate GI and Caustics.
To access it, simply select an existing material slot and click on the main shader toggle. Followed by choosing the VRMtlWrapper shader, from the Material/Map Browser list.

The Replace Material dialog should be prompted. Choose to Keep old material as sub-material.

It's parameters should load up automatically.

Base material- The sub-material is kept in this toggle.
Generate GI-This function enables users to increase or decrease the quantity of GI being generated by the Base material.
Receive GI-The function allows users to increase or decrease the amount of GI being received by the Base material. Its value is set 1.0, by default.
This feature is widely used to make shadows/indirectly lit areas darker, or brighter.

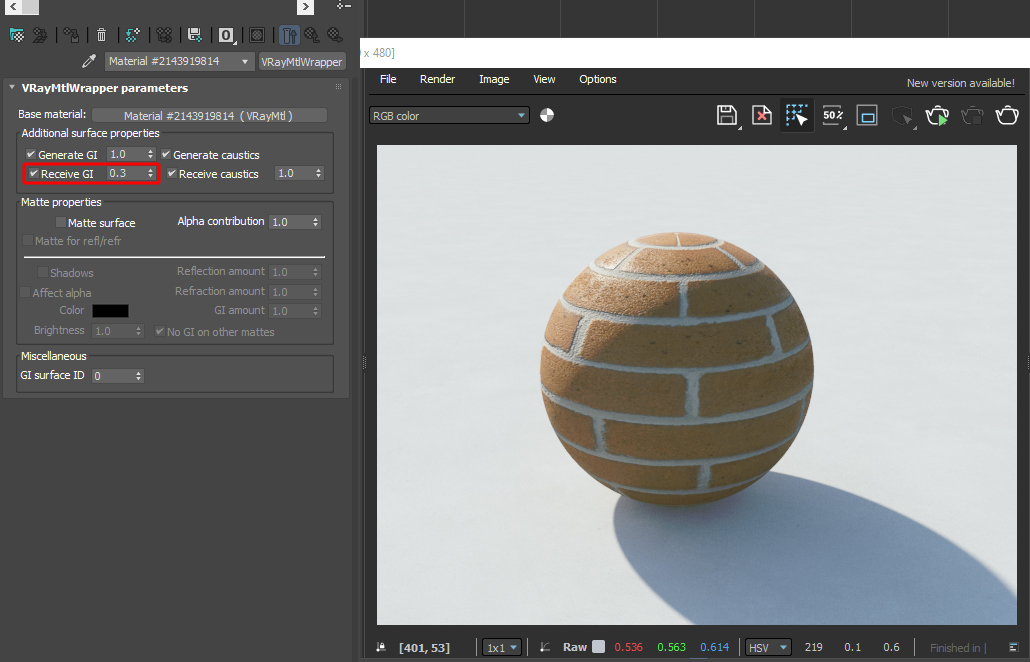
Generate caustics- When turned on, it allows caustics to be generated. Enabled by default.
Receive caustics- Users can increase or decrease the amount of caustics being received by the object. Its value is set 1.0, by default.
VRayOverrideMtl
This shader is mostly used as an override, to correct GI "color bleeding" artifacts, reflections, refractions and shadows.
It can easily be accessed by clicking on the main shader toggle, followed by choosing the, VRayOverrideMtl, from the Material/Map Browser dialog.
Following that, in the Replace Material dialog, choose to, Keep old material as sub-material.
The VRayOverrideMtl should load up automatically thereafter.


Base material- This is the toggle where the base sub-material is kept in.
GI- The toggle allows users to plug a material, to be used as a new source of GI reflectance. This toggle is very useful to override GI "color bleeding" effects on nearby objects.
Reflect mtl- This function can be used to override its material appearance, when "seen" on other reflective objects.
Refract mtl- This toggle works in a similar way to Reflect mtl. It can be used to change how the refractions are seen by other reflective surfaces.
Shadow myl- The toggle allows users to override the shadow appearance when cast onto its surface.
The examples below depict how the "color bleeding" and the reflection colors were easily changed/corrected, by simply plugging different shaders (white VRayMtl) in both, GI and Reflect mtl toggles.


VRay2SidedMtl
This material is mostly used to emulate translucent objects. Its properties are more apparent when there's a strong light hitting its surface internally or/and externally (lamp shades or plant leaves) .
To access this shader, simply click on the main VRayMtl toggle, and choose the VRay2SidedMtl shader, from the Material/Map Browser list.
Following that, choose to keep old material as sub-material , in the Replace Material dialog.


Front- This toggle allows users to set up the Front material surface. Often more opaque and with a slight difference in color (preferably).
Back material- The material for this toggle is frequently setup to be less opaque (e.g. more refractive/transparent) and with a slight difference in color (generally the light color-yellowish) .
In addition, being a more refractive material, users normally enable its refraction to, Affect shadows.
Translucency- This function allows users to control the transition between the two surfaces ( Front and Back material) with the Color Selector, or a procedural map through its toggle.
If the toggle is being used, the numerical values allow users blend the toggle content, with the color selector values.
To create a translucent lamp shade, simply go inside the Front material toggle and make it more transparent, in the Refract color swatch.
Also, rename it as White Material

Next, copy (drag and drop) the Front material toggle into the Back material toggle.
Rename the Back material as Yellow Material and change its diffuse color swatch.

Note: In order to see the light through a translucent object, ensure its Multiplier is high enough, invisible to the camera and set it to cast shadows.


There are times when you may want the physical light to be visible in the camera.
The results may not be desirable, by default.

To correct this, always go the Front material toggle, and change its Refract Glossiness value to 0.5.
These settings have already been discussed in detail.


VRayBlendMtl
To help highlight the functionalities of this shader, the Aluminium_Anodized_Bronze material was used as the base material.
This material was previously loaded from the V-Ray Asset Browser dialog.
VRayBlendMtl is very useful to create unique and exquisite materials, by blending multiple shaders together.
However, because of its complexity, it may take slightly longer to compute.
Materials can be blended through a toggle, or the color selector dialog.
To load it, simply click on the main shader toggle and pick the VRayBlendMtl, from the Material/Map Browser dialog list. And choose to keep old material as sub-material, in the Replace Material dialog.


Base material- This toggle is used as a the base sub-material
Coat materials- This function has nine listed toggles, that can be used to mix shaders with the Blend amount.
To demonstrate this functionality, the material, Metal_Pattern_K_bmp_5cm was loaded from the V-Ray Asset Browser dialog.
When a VRayMaterial is loaded in its toggle it automatically blends with the Base material.

Blend amount- The function consists of nine listed toggles, with color swatches and numerical values to set the blend amount.
When a procedural map/bitmap is plugged into its toggle, it automatically overrides the color swatch.
Black & white or greyscale bitmaps work best.
The adjacent numerical values only work when there's a procedural map/bitmap inside the toggle.


This bitmap is available in the resource files

< Blend amount Bitmap set to 30.0 >
VRayCarPaintMtl
As the name suggests, this shader emulates the physical properties of a metallic car pain finish.
Depending on System Unit Setup being used, a UVW Map modifier might be required in order for the flake layer to be visible.
To access it, simply click on the main shader toggle and choose the VRayCarPaintMtl from the Material/Map Browser dialog.
The shader should load up automatically.


< VRayCarPaintMtl shader loaded >
Base color-This function determines the main color of VRayCarPaintMtl


Base reflection- This function controls the amount of reflectivity, with its numerical values. Default value, 0.5.


Base glossiness- This function's numerical values determine the amount of glossiness on the surface. Default value, 0.6.

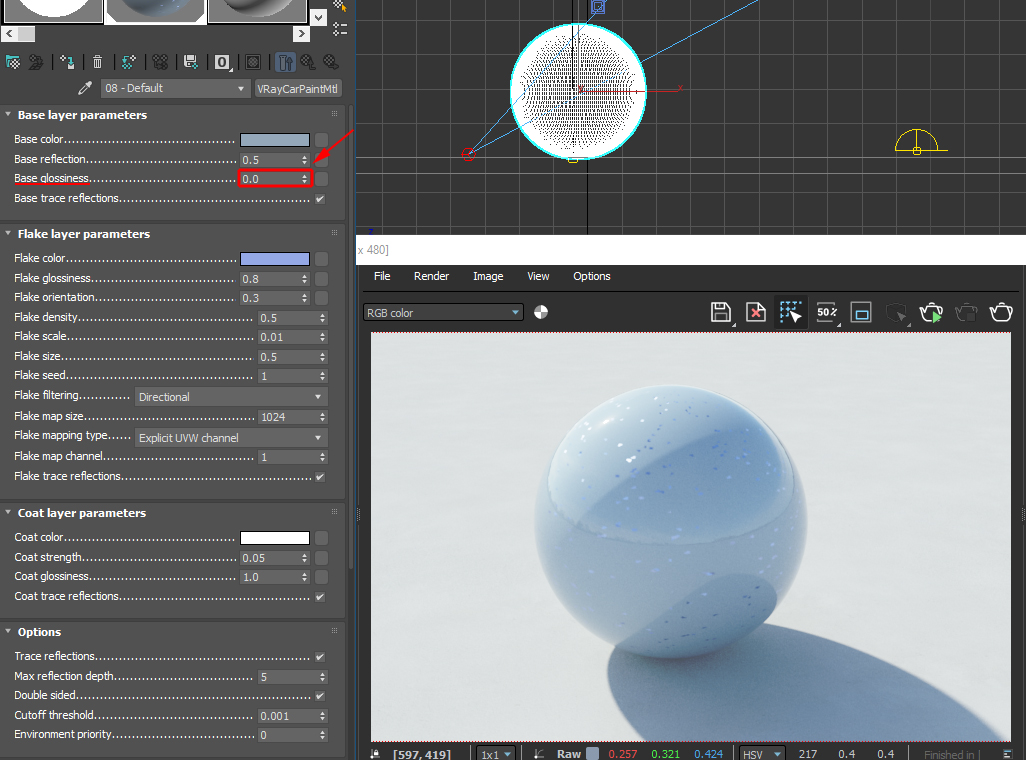
Base trace reflections- If enabled, this option allows the reflections to be traced. Enabled by default.


< VRayCarPaintMtl base trace reflections: disabled>
Flake color- This colour swatch enables users to choose the flake color, through the Color Selector dialog.
Default color, blue.
Flake glossiness- Its numerical values allow the users to control the amount of glossiness on the flake. Default value, 0.8
Flake orientation- This function's numerical values control the orientation of the flake. This option is widely used to randomise the flake rotation.
Default value: 0.3
Flake density- This function controls the density/number of flakes seen on the surface. Default value, 0.5
Flake scale-This option controls the structure of the flakes. Default value, 0.01

< Flake scale set to 0.001>

Flake size-This function determines the distance and size of the flakes. Default value, 0.5
Flake seed- This option enables users to change the flake pattern. Default value, 1
Maps -The list of toggles seen under the Maps rollout allow users to plug procedural maps in them. The procedural maps can be used at 100% value, or blended, by reducing the numerical values.


VRayEdgesTex
To test the functionality of this procedural map, please open the file under the name of, VRayEdgesTex.max
This procedural map is widely used on top of a material or color, to create edges/wirelines around the surface. It can be plugged through the diffuse toggle; or as a render element, to be composed in post.
Also, it can also be used to emulate chamfered edges on corners/edges of surfaces, through the Bump toggle.
The render below depicts a metal box prior to using the VRayEdgesTex in its Bump toggle.

Note: The following steps assume you already have an existing bitmap/procedural map plugged into the Bump toggle.
To add the VRayEdgesTex procedural map to the Bump toggle, simply scroll down to the Maps rollout and click on the Bump toggle.
Inside the Bump toggle, click on the VRayBitmap toggle to open the Material/Map Browser dialog.
In the Material/Map Browser dialog, under the V-Ray rollout, choose the Mix procedural map from its list.


The Mix procedural map will help keep the prominence of both, VRayEdgesTex and the original bump bitmap (Color #1).
Color # and #2- These toggles allow users to plug procedural maps and/or Bitmaps to it.
Alternatively, users can simply use their color swatches.
Mix Amount- This function controls the amount of blend between Color #1 and Color #2.
With the default value set to 0.0, Color #1 will be 100% visible.
Users can also plug procedural maps and/or bitmaps to control the Mix Amount.
Greyscale and black & white bitmaps work best in the Mix Amount toggle.
Mixing curve- This group overrides the Mix amount values when the Use Curve function is enabled.
The Upper and Lower values control the Transition zone/gradient.
To load the VRayEdgesTex, click on the Color #2 toggle, and choose the VRayEdgesTex procedural map from the Material/Map Browser dialog.


< VRayEdgesTex procedural map loaded>
Color- This color swatch sets the direction of the Bump, when used in the bump toggle.
White color produces an outward bump.
Black color produces an inward bump.
When applied in the diffuse toggle, it serves as the wireframe color (White) wrapped around the geometry.
Hidden edges- When enabled in the diffuse toggle, this function displays hidden wireframe edges of a geometry.
Disabled, by default.
Show subtriangles -When enabled in the Diffuse toggle, this function displays the sub triangles of a geometry (in wireframe mode).
Disabled, by default.
World width- When enabled in the Diffuse toggle, it displays the wireframe thickness based on your scene's system units.
Disabled, by default.
Pixel width- When applied to the Diffuse toggle, this function controls the wireframe thickness, in pixel units.
Enabled and set to 1.0, by default.
Round corners- This group controls the bevel/chamfer size on objects, when applied to the Bump toggle.
Radius- This function controls the size of the bevel/chamfer.
Set to 1mm, by default.
Consider same object only- When enabled, this function will apply the bevel/chamfer effect on the objects applied only.
Enabled, by default.
Corners- This function allows users to choose the type of corners to apply the Rounded corners to.
It is set to affect convex and concave, by default.
Depending on the size of the object or the scenes' Unit Setup, one can setup appropriate Radius value.

Because we are currently using the VRayEdgesTex mixed with the main Bump bitmap, we need to increase the Mix amount value, in order for the Round corners to be visible in the render.
To do so, click on the Go to Parent button, to go back to the Mix main parameters.
Increase the Mix Amount value to about 18.0
These values were achieved after few region renders to see what worked best.

This chapter has introduced users to some of the most popular V-Ray shaders and procedural maps. Followed by guiding users through the process of accessing and using them.
Some functionalities and parameters were discussed in more detail than others, by relevance.
Finally, new procedural maps will be introduced and discussed in more detail throughout the book.
For more information about other V-Ray shaders and procedural maps, please visit:
http://docs.chaosgroup.com/


 |
| 1: Season's Greetings VRay & 3ds Max Tutorial |
 |
| 2: Planning Applications for Verified Views |
 |
| 3: 3d People + 3ds Max + VRay + Photoshop |
| 4:Interior Daylight with V-Ray + 3ds Max + Photoshop |
 |
| 5: Interior Night with V-Ray + 3ds Max + Photoshop |


