Play Video with Custom Captions/Subtitles
Setting up the alpha channels in 3ds
Max
To ensure background images/photos can be fully integrated with
your render in post; it's crucial to enable transparent/refractive material options
such as the, Color+alpha , in the Refraction Affect channels function.
This function allows background images to be seen through
transparency/translucency, in post. Users are also able to manipulate colours through this function (using the Alpha and/or the VRay MultiMatte render element).
Note: If you're using a later version of V-Ray/3ds Max, you need to enable the option to Affect, All Channels, instead.
This option can also be used in the, Reflect, group, under the Affect channels drop-down list. Again, users are also able to manipulate colours through this function (using the Alpha and/or the VRayMultiMatte render element).
Note: Please check out my YouTube channel link below, to see how to use the VRay MultiMatte render element: https://youtu.be/hAklNIqgmSI
Following that, add render elements such as the Alpha render
element , and click render.
Choosing the correct background image
Depending on the camera angle, finding the correct high
resolution background image/photo can be time consuming and challenging at times.
Especially when working on tight deadlines.
Gobotree has been
utterly influential in helping me find the correct background image for any
project I've been part of.
It's also worth mentioning that, this website has a huge
photo library of cut outs, trees, grass, shrubs, people, etc.
To access the Gobotree website, simply Google, gobotree,
or go to, http://www.gobotree.com/
To pick a specific image/photo, simply start by clicking on
the, Categories button, and choosing from its dropdown list.
For instance, to select the, London category, one would have
been required to choose and click three
times: Categories, cities, London
To narrow down searches even further, users can continue
adding Categories along the search box.
Also, each search category can be deleted individually from
the Categories search box
Depending on the type of account a user holds, one can
download low res or high resolution images/photos.
All images/photos require unzipping, as they download as a zip/winrar
file format.
In Photoshop, open the downloaded gobotree photo/image
background.
The current render and Photoshop composition look OK.
However, adding a background image/photo will make the white areas of the
environment more interesting, and realistic.
To do so, start by blocking out the environment areas, with
a group folder and an adjacent layer mask.
To create a group folder, simply click on the Create a new
group button.
Next, go to the Channels palette, hold down the Ctrl key,
and click on the Alpha channel to enable its selection.
Following that, click on the, Add layer mask button, to
create it. A layer mask should appear.
This group folder and
its layer mask will allow users to move,
rotate, and edit/adjust layers within the group folder mask.
Start by renaming this group folder as, =Background Image=, and moving the background image/photo into it, with
the move tool (V).
Notice how the background image/photo is accurately confined
within the boundaries of the group folder's mask .
The subsequent step is to move, scale and edit the
background image/photo to fit the environment more realistically.
Begin by converting the background image/photo into a smart
object first.
To do so, simply right click and choose the, Convert to smart
Object option.
Smart object layers are widely used to help retain the
quality of the original high resolution layer when scaled down; and to record some of the actions/filters
applied to the layer.
Next, move the, =Background Image= group folder on top of the, =Adjustments= group folder; by simply, left clicking
+holding down + m
The =Background Image=
group folder should look brighter as result of moving it up from
underneath the, =Adjustments= group
folder.
Following that, one can scale down the background
image/photo by simply pressing, Ctrl+t.
To scale proportionally, one can hold own the Shift key
while the transform tool is enabled, followed by moving its corner point handles.
To distort the background image/photo in order to match the
vanishing lines; simply right click on transform tool while enabled, followed
by choosing to Distort.
The next step is to fill the left window (currently white)
with a background image/photo.
To do so, first duplicate the current background image/photo being used on the current windows; by right clicking and choosing to, Duplicate Layer.
The subsequent step is to use some of the previous steps to
move and transform the image/photo, to fit the left window.
<Move and transform the image/photo to fit the left
window>
Colour correct and adjust the Levels
of the background image photo
The overall render and composition is increasingly
more realistic, and interesting with the background image/photo.
The final step is to colour correct and adjust the Levels of
the background image/photo.
Start by adding the, Levels adjustment layer
Increase the levels slightly by moving the right and mid
points to left (e.g. 0.0; 2.21; 192)
Notice how the background image/photo is almost integrated
with the overall render.
<Increase the Levels>
To colour correct and
match the blue tones seen on the window areas, simply add a Photo Filter
adjustment layer.
Choose the Cooling Filter (82) from the Filter dropdown
list; and increase its Density to about 37%.
Also, to help blend the adjustment layer, pick the Soft Light blending mode, under the Layer
palette.
Adding a Glow effect to the windows
To create an atmospheric mood, users often add a
bit of glow bursting through the glass windows.
To do so, simply
start by creating a new layer above the, =Background Image= group layer. It is necessary for this layer to be on top,
because its effect needs to spill beyond the glass windows (beyond the layer mask).
While the newly created layer is still selected, hold down
the Ctrl key and left click on the mask of the =Background Image= group layer.
This action should enable a selection around the windows.
Next, enable the
Paint Bucket Tool (P) while the selection is still on, and the layer is
selected. Followed by left clicking on the selection, to paint/fill the layer with
a white paint.
Press Ctrl+d to deselect; and convert the new layer to into
a smart object.
While the layer is still selected, click the Filter tab and
choose the Gaussian Blur, from the dropdown list.
To help the "glow" effect appear more realistic, choose
the Overlay blending mode, and reduce its Opacity to about 50%, if desired.
After few tweaks, the before and after results looked as the
following:
Before
After
One can also add reflection passes to the window glass
For more detailed info on how to use render elements in
post, please check the following tutorial:
I hope you've found this tutorial useful
Also, please Join my my Gumroad page to download other Courses;Interior design with Project files; Watch more Videos and receive Technical Support. Finally, check my New channels below:
Video Captions available (CC)
Video Captions available (CC)
Video Captions available (CC)
Video Captions available (CC)
Video Captions available (CC)
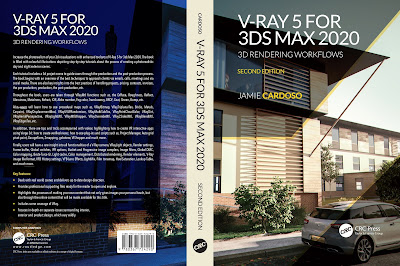
Finally, I have just published a New Book with Taylor & Francis/CRC Press, entitled,
V-Ray 5 for 3ds Max 2020: 3D Rendering Workflows
Click on the image below to find out more about my new book.
Checkout below my other Courses with High Resolution Videos, 3d Project files and Textures included.
 |
| Course 1: Exterior Daylight with V-Ray + 3ds Max + Photoshop |
 |
| Course 2: Exterior Night with V-Ray + 3ds Max + Photoshop Course 3: VRay 3ds Max Interior Rendering Tutorials |
 |
| Course 4: Interior Daylight with V-Ray + 3ds Max + Photoshop |
 |
| Course 5: Interior Night with V-Ray + 3ds Max + Photoshop |
Important Terminologies & Descriptions:
3d Rendering: In a nutshell, is the process of converting the three dimensional (3D) data seen in a 3d scene into 2D image/s (rasterized).
3D renders can be a sequence of animated objects/effects/cameras, or a single frame with a still camera and object/s.
Some of the articles, Videos and Tutorials depicted here will take you through the process of rendering.
Photorealistic Rendering: Is the Process or Art of making a typical Computer Generated Image/render (CGI) look indistinguishable from a real photo.
To achieve this, users often need to possess the skills and the"eye" to appreciate good photography, cameras, composition, lighting, shaders, materials, 3d modelling, rendering and have some post-production skills.
Some of the articles, Videos and Tutorials depicted here will help you achieve truly photorealistic renderings.
Post-Production: Is the process of creating effects or/and results after (post) the main process.
This terminology can be used to describe the results (post-production) of main processes such as 3d renderings and/or filming a scene.
The post-production often occurs in applications such as Photoshop, After Effects, Nuke, etc.
Some of the articles, Videos and Tutorials depicted here will take you through the process.
Textures: Is a term often used to describe photographed 2d images to be later used in a toggle of a shader or procedural map.
Textures can be used in the Diffuse toggle, Reflect, Glossy effects, Bump, Displacement, etc.
Some of the articles, Videos and Tutorials depicted here will take you through the process of applying textures.
Materials: Is a term often used to describe maps, textures,procedural maps or shaders, depending on the context the term is being used.
Some of the articles, Videos and Tutorials depicted here will take you through the process of applying materials.
Procedural materials: Is a term often used to describe maps with editable/proprietary parameters/functions.
Some of the articles, Videos and Tutorials depicted here will take you through the process of applying procedural materials.
Shaders: Is a term often used to describe complex materials with functions and procedural maps created for a specific purpose.
Some of the articles, Videos and Tutorials depicted here will take you through the process of applying shaders.
Studio Lights: They are fundamental in the process of creating appealing images/renders.
Lighting determines not only the brightness and darkness, but also the tone, mood and the atmosphere of a scene.
Hence the importance to control and manipulate the lights accordingly, in order to fully capture the textures and the vibrancy of your objects.
By distributing the shadows and the highlights accurately, you can achieve truly appealing images/renders.
Architectural Rendering, or architectural illustration, is the art/process of creating two-dimensional images or animations depicting the attributes of an architectural design, while using state of the art applications such as, Autocad, 3ds max, VRay, Cinema 4d, Blender, Maya, Corona, Photoshop, etc
In addition, there is a huge online support for this software, and countless online sites with tips and tutorials.
Finally, there are readily available books, online/college courses, and its full documentation at Adobe.com
Verified View/s: Is an accurate Photomontage of a proposed design/building, using the Guidelines for Landscape and Visual Impact Assessment (GLVIA3).
Photomontage in 3d Visualization: Is the process of incorporating a 3d object/design/building into a 2d image/photo, while matching the camera angle/settings, position and the overall lighting depicted in the 2d photo.
This laborious process often requires the usage of a 2d and a 3d application.
To create an accurate Photomontage/Verified View, the 3d Visualizer/specialist needs a: 3d context model to plot/plan the shots; a photo of the location in question; the survey data; camera information; a 2d and a 3d application to create the Final Verified View/s .
Some of the articles, Videos and Tutorials depicted here will take you through the process.
Planning Applications: These can be used to find out whether a proposed development is likely to be approved by the planning authority, before substantial costs are incurred developing a detailed design.
Planning Permissions: Is the legal process of determining whether proposed developments should be permitted. Responsibility for planning lies with local planning authorities (usually the planning department of the district or borough council). The legislation, policy and guidance that underpins planning in England can be found on the government's National Planning Practice Guidance
3d Rendering: In a nutshell, is the process of converting the three dimensional (3D) data seen in a 3d scene into 2D image/s (rasterized).
3D renders can be a sequence of animated objects/effects/cameras, or a single frame with a still camera and object/s.
Some of the articles, Videos and Tutorials depicted here will take you through the process of rendering.
Photorealistic Rendering: Is the Process or Art of making a typical Computer Generated Image/render (CGI) look indistinguishable from a real photo.
To achieve this, users often need to possess the skills and the"eye" to appreciate good photography, cameras, composition, lighting, shaders, materials, 3d modelling, rendering and have some post-production skills.
Some of the articles, Videos and Tutorials depicted here will help you achieve truly photorealistic renderings.
Post-Production: Is the process of creating effects or/and results after (post) the main process.
This terminology can be used to describe the results (post-production) of main processes such as 3d renderings and/or filming a scene.
The post-production often occurs in applications such as Photoshop, After Effects, Nuke, etc.
Some of the articles, Videos and Tutorials depicted here will take you through the process.
Textures: Is a term often used to describe photographed 2d images to be later used in a toggle of a shader or procedural map.
Textures can be used in the Diffuse toggle, Reflect, Glossy effects, Bump, Displacement, etc.
Some of the articles, Videos and Tutorials depicted here will take you through the process of applying textures.
Materials: Is a term often used to describe maps, textures,procedural maps or shaders, depending on the context the term is being used.
Some of the articles, Videos and Tutorials depicted here will take you through the process of applying materials.
Procedural materials: Is a term often used to describe maps with editable/proprietary parameters/functions.
Some of the articles, Videos and Tutorials depicted here will take you through the process of applying procedural materials.
Shaders: Is a term often used to describe complex materials with functions and procedural maps created for a specific purpose.
Some of the articles, Videos and Tutorials depicted here will take you through the process of applying shaders.
Studio Lights: They are fundamental in the process of creating appealing images/renders.
Lighting determines not only the brightness and darkness, but also the tone, mood and the atmosphere of a scene.
Hence the importance to control and manipulate the lights accordingly, in order to fully capture the textures and the vibrancy of your objects.
By distributing the shadows and the highlights accurately, you can achieve truly appealing images/renders.
Architectural Rendering, or architectural illustration, is the art/process of creating two-dimensional images or animations depicting the attributes of an architectural design, while using state of the art applications such as, Autocad, 3ds max, VRay, Cinema 4d, Blender, Maya, Corona, Photoshop, etc
V-Ray: Is a rendering engine that uses global illumination
algorithms, including path tracing, photon mapping, irradiance maps and
directly computed global illumination.
Furthermore, it is used as a commercial plug-in for
third-party 3D computer graphics software applications such as 3ds max, Maya, Houdini, Blender, Nuke, etc, for
visualizations and computer graphics in industries such as media,
entertainment, film and video game production, industrial design, product
design and architecture.
3ds Max: Autodesk 3ds Max, formerly 3D Studio and 3D Studio Max, is a
professional 3D computer graphics program designed to create 3D animations,
models, games and images.
In addition, it has modelling, animation and movie effects
capabilities, frequently used by video game developers, TV commercial studios
and architectural visualization studios.
3ds Max also features shaders, dynamic simulations, particle
systems, plug-ins, and much more, with its own scripting language.
Adobe Photoshop: Photoshop is a powerful raster based graphics program produced by the Adobe Corporation.
It
is widely used for a variety of photo/image editing purposes worldwide.
The program has a huge number of filters, functions, plug-ins, scripts,
etc.In addition, there is a huge online support for this software, and countless online sites with tips and tutorials.
Finally, there are readily available books, online/college courses, and its full documentation at Adobe.com
Verified View/s: Is an accurate Photomontage of a proposed design/building, using the Guidelines for Landscape and Visual Impact Assessment (GLVIA3).
Photomontage in 3d Visualization: Is the process of incorporating a 3d object/design/building into a 2d image/photo, while matching the camera angle/settings, position and the overall lighting depicted in the 2d photo.
This laborious process often requires the usage of a 2d and a 3d application.
To create an accurate Photomontage/Verified View, the 3d Visualizer/specialist needs a: 3d context model to plot/plan the shots; a photo of the location in question; the survey data; camera information; a 2d and a 3d application to create the Final Verified View/s .
Some of the articles, Videos and Tutorials depicted here will take you through the process.
Planning Applications: These can be used to find out whether a proposed development is likely to be approved by the planning authority, before substantial costs are incurred developing a detailed design.
Planning Permissions: Is the legal process of determining whether proposed developments should be permitted. Responsibility for planning lies with local planning authorities (usually the planning department of the district or borough council). The legislation, policy and guidance that underpins planning in England can be found on the government's National Planning Practice Guidance
Architectural Visualisation Tips & Tricks
FoxRenderfarm
www.arroway-textures.com
Renderpeople
Gobotree


