

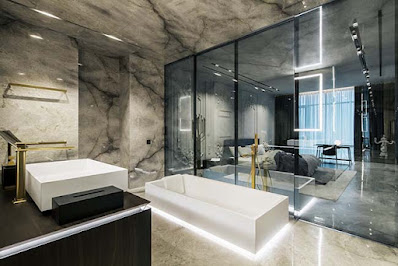
The above image is part of a project I have finished recently.
It was produced with 3Ds Max and V-Ray. However, I have also got the same version in mental ray.
The real focus was mainly on the workflow…as opposed to the rendering engine or platform used.
In fact please click this link HERE to see some of my most recent renders produced while using a variety of rendering engines and platforms.
Most Projects should start from the pre-production phase. However, this specific project took little or no time for me to jump right into the production phase, followed by Post-Production process.
The Pre-Production process was fairly quick due to the fact that, the client had already supplied me with a photo reference and all the necessary information to achieve acceptable results.
Had I not been given the photo-reference by the client, I would have had to go through the entire process of Pre-Production, which consists of: sourcing for striking photos (Flikr, books, Google, etc) and help the client choose (i.e. liaise) the best photo/s to be used as reference for lighting, cameras, colors, etc.
This vital Pre-Production stage often takes from one hour, to few days, depending on the project.
Please check my latest book HERE entitled to see the entire in-depth process of Pre-Production, Production and Post-Production.
The Project
The initial brief was to incorporate the client’s bespoke design and lighting in a completely new office space. For that, I had first "pleaded" with the client to provide me with a photo reference/s of one of their existing office design to be used as a reference.
As expected with most clients, they had several photos of some of their previous projects, which resembled this new proposed space.


From that point it was pretty straight forward:
In fact they were so cooperative that they started supplying me with physical and photo references of specific surfaces while I was also using their main photo reference to create other materials.


Once finished, the following stage was to begin matching the overall lighting based on the main photo reference.
Nevertheless, I have used the usual technique of enabling a basic non reflective override material as the basis to light the entire scene.

While lighting, I had also ensured that there was a clear definition between bright and dark areas in order to achieve Depth in the scene.
The habit of test rendering each new light added in the scene is one of key techniques to achieve the perfect depth.


The IES light pattern chosen may not be coherent with the ceiling light model. However, it was specifically chosen by the client to make the overall image more appealing and “sellable”.
Furthermore, in order to achieve soft shadows with V-Ray IES lights, I have opened and edited the numerical values of the IES web file.
Also, this new edited file was saved under a different name.

Once satisfied with the overall lighting, I have disabled the override material and began fine-tuning the materials to react realistically with lights.


The subsequent stage was to tweak the global V-Ray settings and render the final shot with key render elements.

Finally, I have used key Post-Production techniques such as “Curves”; “Levels”; “Vignetting” and many more effects to match the render closely to the main photo reference supplied.


All Post-Production effects were kept in layers with their respective masks in order to have the ultimate flexibility to edit them when faced with eminent changes from the client.


The above described process allowed me to finish the project within the allocated time and budget…with little or no production “bottlenecks”.
I hope you liked the final result as much as the client did!!
Please check the entire step-by-step process with the 3Ds Max scene included at CgtutsPlus.com.
The entire tutorial consists of a whopping 11.235 words and 238 screen captures( very in-depth indeed).
I would like to take this opportunity to give Chris Tate one big Kudos for editing and posting it in such an eloquent manner HERE!
I hope you have found this article somehow useful!


Also, please Join my my Gumroad page to download other Courses;Interior design with Project files; Watch more Videos and receive Technical Support. Finally, check my New channels below:


![]()


New Book: 3D Photorealistic Rendering: Interiors & Exteriors with V-Ray and 3ds MaxVideo Captions available (CC)
Video Captions available (CC)
Video Captions available (CC)
Video Captions available (CC)


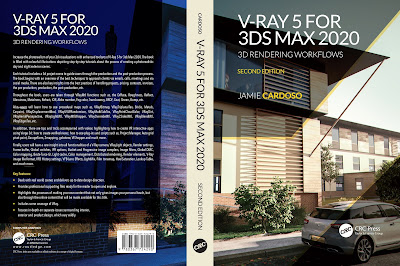
Finally, I have just published a New Book with Taylor & Francis/CRC Press, entitled,
V-Ray 5 for 3ds Max 2020: 3D Rendering Workflows
Click on the image below to find out more about my new book.
Checkout below my other Courses with High Resolution Videos, 3d Project files and Textures included.
Also, please Join my Patreon page or Gumroad page to download Courses; Project files; Watch more Videos and receive Technical Support. Finally, check my New channels below:
![]()


 |
Course 1: Exterior Daylight with V-Ray + 3ds Max + Photoshop  |
| Course 3: Exterior Night with V-Ray + 3ds Max + Photoshop |
| Course 4: Interior Daylight with V-Ray + 3ds Max + Photoshop |
 |
| Course 5: Interior Night with V-Ray + 3ds Max + Photoshop |

|


Also, please Join my Patreon page or Gumroad page to download Courses; Project files; Watch more Videos and receive Technical Support. Finally, check my New channels below:


More tips and Tricks:
Post-production techniques
Tips & tricks for architectural Visualisation: Part 1
Essential tips & tricks for VRay & mental ray
Photorealistic Rendering
Creating Customised IES lights
Realistic materials
.
like it
ReplyDeleteThanks for the feedback Alaa!!!
ReplyDeleteTa
I've been following your blog for a long time and I always thoroughly enjoy reading your thoughts on the subject of lighting as it applies to CG. There are more than just "tips" here and I appreciate it.
ReplyDeleteHi Zaix,
ReplyDeleteI really appreciate your feedback here!!!
Thanks again!
J
Update: just bought your latest book.Can't wait to get it in! ciao!
ReplyDeleteThanks Zaix!!!
ReplyDeleteTa
J
Hey Jamie,
ReplyDeleteDid you get my email or txt?
Ed
Hi Ed,
ReplyDeleteI am assuming that you’re the Art Director from Pipedreams…right?
If so, I have replied to your email a while back.
I will forward it to you again: It must have been buried with your other emails!
Cheers
Thank you for this tutorial helped me a lot
ReplyDeleteYou're welcome str9led!!!
ReplyDeleteThanks for your feedback here!
Ta
J
Very cool breakdown on your workflow. I also like your work located in Flickr. I have a quick question about your example. Looking at the photo reference, I notice a good amount of natural light coming from what seems like windows behind the partial height wall and concrete column. In your lighting setup, you only show artificial lights lighting your scene. Did the design change block or remove the natural light coming in from the right? If not, would that also contribute to your overall lighting rig?
ReplyDeleteVince
Hi vjaramillo,
ReplyDeleteThank you very much for your feedback here. I really appreciate it.
A very valid question, in fact I was wondering when anyone would ask me that!:)
Yes, in this NEW office space there are windows indeed. And they are situated further in with a wall partition.
In fact one can actually see the a similar blue skylight from the environment in the foreground left part of the image: where the environment light manages to "escape".
Again, thank you very much for your feedback here vjaramillo!!!
Ta
J
thank you for the tutorial :-)
ReplyDeleteNo problem Matkov!!!
ReplyDeleteThanks for your feedback here!
Ta
J
bought your book. great portfolio, love your work :-)
ReplyDeleteHi Matkov,
ReplyDeleteThank you very much for your feedback here!!
I am really humbled by your kind comment!
Ta
J
Hi Jamie,
ReplyDeleteThank you very much for your very nice Vray tutorial. Hoping you can author another book Realistic Architectural Visualization with 3ds Max and Vray.
Lon
Hi Lon,
ReplyDeleteI really appreciate your nice comment here!!!
Yes, I am currently working on a book covering both VRay and mental ray!
Thanks again for weighing in here!
Ta
J
Amazing jamie. thanks so much.
ReplyDelete