Monday 23 November 2009

Design interior: mental ray_office project


Hi All,


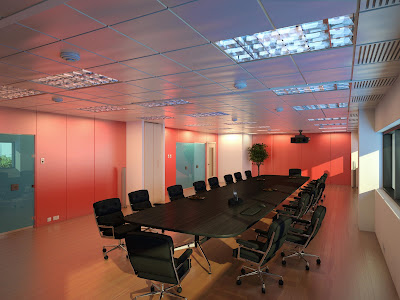
The above image is part of a project I have finished recently. It was quite challenging in a sense that the client was very particular about the direction they wanted to take with regards to lighting,colours,depth,etc.

I would normally use warm photometric lights however,in this particular project the client opted for white photometric lights instead (i.e. D65 illuminant...white) in order to help preserve the original colours of all other objects in the Max scene.

In addition, I have used similar techniques to the ones used in the chapter 06 of my latest book.Which essentially consists in starting out with a fairly dark scene even when the daylight system is already applied;followed by gradually adding artificial photometric lights and test rendering until satisfied with the overall lighting.
Often, one can easily lose control of the depth in the scene when adding numerous artificial lights and exposure controls.


The ceiling imperfections were achieved by using the mental ray's "Utility Bump Combiner(adsk)" shader in conjunction with cellular and noise procedural materials applied to its multiple toggles(i.e. Utility Bump Combiner adsk).

The render came straight from 3Ds Max using mental ray,no post effects were needed. The total amount of images delivered for this project was 6. I hope you like the final result.


It is also worth mentioning that, I am in no way discouraging users to use Photoshop and other post effects applications however,one should always try to take advantage of Max's full potential.


Cheers,


                                                         Video Captions available (CC)


                                                      Video Captions available (CC)


                                                      Video Captions available (CC)


Checkout below my other Courses with High Resolution Videos, 3d Project files and Textures included.

Course 1: Exterior Daylight with V-Ray + 3ds Max + Photoshop  

https://1.bp.blogspot.com/-9eQU0iHK3WA/XguRwIGeE0I/AAAAAAAAKgo/-eW0NMMyH-YmjyXyFcaRjPlW_G9p8NEywCLcBGAsYHQ/s1600/Living%2BRoom%2B3dBeeIT%2BCamera%2BRaw%2BFilter.JPG
   Course 2: VRay 3ds Max Interior Rendering Tutorials

Course 3: Exterior Night with V-Ray + 3ds Max + Photoshop

Course 4: Interior Daylight with V-Ray + 3ds Max + Photoshop

Course 5: Interior Night with V-Ray + 3ds Max + Photoshop


Course 7: Planning Applications for Verified Views


Course 8: 3d People + 3ds Max + VRay + Photoshop 

Also, please Join my Patreon page or Gumroad page to download Courses; Project files; Watch more Videos and receive Technical Support. Finally, check my New channels below:

https://www.patreon.com/user?u=2469908  


More tips and Tricks:

Post-production techniques

Tips & tricks for architectural Visualisation: Part 1

Essential tips & tricks for VRay & mental ray

Photorealistic Rendering

Creating Customised IES lights

Realistic materials

.

Saturday 14 November 2009

Autodesk: Increasing the paging file to override Memory issues


Often when rendering complex scenes with Max and mental ray, one’s computer may run out of memory.

This is mainly due to the fact that Max cannot free up enough memory necessary to process the full render.

There is a quick fix for this however, it is strongly recommended to ultimately add more memory to the computer(i.e.4GB/8GB+) whilst running 64bit applications for Max and windows.

The following “trick” may or may not work for 32bit applications however, it definitely works for the 64bit.

1-On start up windows, choose the control panel option.

2-In control panel, choose system.

3-In the system settings, go to advanced system settings.

4-The system properties dialog should open.

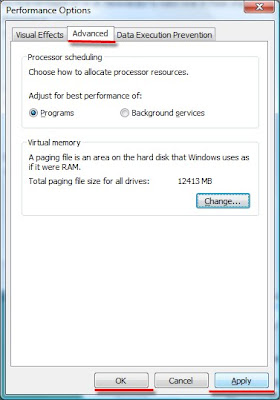
5-In the performance group, click on the settings button. The performance options dialog should open.

6-Click on the advanced tab; under the virtual memory group click on the change button. The virtual memory dialog should appear.

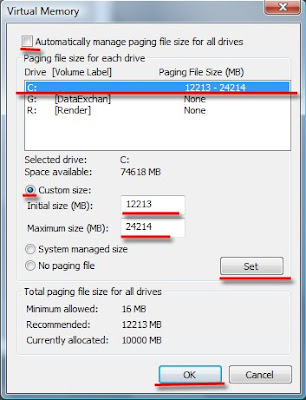
7-Uncheck the automatically manage paging file size for all drives function, to enable the paging file for each drive settings.
Choose your C drive as your volume label of choice, and check the custom size function. The initial size (mb) function should be equal to 1.5 times of your total memory (RAM) value (i.e. in my case I have 8GB, therefore 12GB).

The maximum size (mb) should be equal to at least 3 times of your total memory size(i.e. 24GB).
It is worth mentioning that some users that have huge amounts of free hard disk space(i.e. 200GB C drive space) tend to set their maximum size(mb) value to about 60GB or more.

Moreover, prior to setting the maximum size, ensure that you have at least 3 times freer disk space than the maximum size value.

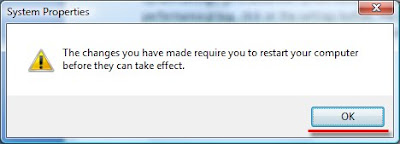
Next, click the set button to set your parameters, followed by ok. The system properties warning should pop up, click ok to close it.


8-Back on performance options, click ok, followed by clicking "apply" to close it.

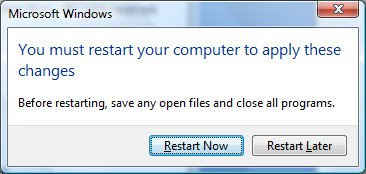
9-The windows restart warning dialog should pop up, choose the appropriate option.
The changes will only take effect once the computer is restarted. Also, it is recommended to empty one’s page file from time to time.


It is worth mentioning that, the above procedure will not speed up your renderings however, it will ensure that you never run out of memory when it is needed.
To speed up renders one has to ultimately add extra processors (i.e. 2.80 GHZ or higher) and more memory with 64bit applications (i.e. 4GB/8GB+).


Finally, in very extreme and difficult cases of memory loss, one can additionally enable the "use fast rasterizer (rapid motion blur) function, from the "rendering algorithms" parameters.
This rendering method will bypass most mental ray memory issues.

Note: Although very powerful, this rendering algorithm disables some of render elements. To override this, simply render the file output to an EXR file extension type, provided one has the material IDs/Object IDs,etc, originally enabled in 3Ds Max.

If facing difficulties extracting these EXR passes in Photoshop,After Effects,etc;simply switch your 3Ds Max back to standard mental ray rendering algorithm when computing your AO pass, and enable your rendered elements again; with cached FG at a very low res to render the final output in higher res.

For more information about tackling memory issues,please check my other posts in this blog:

mental ray_the usual suspects:Displacement and proxy errors

Decoding mental ray BSP tree


I hope you have found this post interesting.


                                                         Video Captions available (CC)


                                                      Video Captions available (CC)


                                                      Video Captions available (CC)


Finally, I have just published a New Book with Taylor & Francis/CRC Press, entitled,  

V-Ray 5 for 3ds Max 2020: 3D Rendering Workflows

 Click on the image below to find out more about my new book.


Also, please Join my my Gumroad page to download other Courses;Interior design with Project files; Watch more Videos and receive Technical Support. Finally, check my New channels below:

   https://www.patreon.com/user?u=2469908


More tips and Tricks:

Post-production techniques

Tips & tricks for architectural Visualisation: Part 1

Essential tips & tricks for VRay & mental ray

Photorealistic Rendering

Creating Customised IES lights

Realistic materials

Creating a velvet/suede material 

FoxRenderfarm

www.arroway-textures.com 

Renderpeople

Gobotree