Extracting the 360 panoramic image/map from Google street view
More often than Not, I find myself working on 3d photomontages, or Verified views with set views/images chosen and taken by different Photographers.
Needless to say that, in all accounts, I've always wished I had a panoramic image/photo of the locations extracted, to use as reflections for my 3d environment.
If you ever find yourself in a similar situation and can not retake the photo/s with specialised high definition cameras such as the ones from Insta360; then Google maps are your best quick fix.
In conjunction with the StreetView Grabber software, you can
find the location (using Google street view) where the original background
image was taken from, and automatically grab/extract a 360 view of the site.
To download the StreetView Grabber software, for Free,
simply go to the following website:
Next, scroll down the page and click on the following link
to download the software.
Once downloaded, unzip (extract) the software, and double
click on its Icon to open the dialog.
How to use Google maps street view:
To start, go to Google maps and type in the address/location where the photography was taken from.
To start, go to Google maps and type in the address/location where the photography was taken from.
Once the address/ is found( i.e. a red pin floating above
the location map) in the Google maps, simply zoom in with the mouse wheel as
close as you can, followed by clicking on the Google earth map thumbnail, on the bottom left corner.
Once the earth map appears ( photo of the location on a plan view),
simply grab the yellow silhouette man from the bottom right hand corner of the
Google earth map, and drop it on the desired location, to get the Google street
view.
It’s worth noting that, you can only drop the yellow
silhouette man on areas where there’s a black dot blinking.
These markers indicate spots where the user can take a street view from.
These markers indicate spots where the user can take a street view from.
Once the street view is up on the screen; you can pick from any of the available views displayed in the thumbnails below, if desired.
Otherwise simply
click on the Hide imagery, to minimize the thumbnails on the screen.
As you move the mouse on the Google street view, note the
transparent planes that follow it.
They indicate the perspective of the structure/object on the screen.
They indicate the perspective of the structure/object on the screen.
While the StreetView Grabber dialog is still open, select the URL of the Google street view and press Ctrl+C to copy it.
Select the StreetView Grabber dialog and click on the Add
Pano button.
The Use clipboard dialog should automatically appear. Click Yes to
add the copied URL, and close the dialog.
Before grabbing the 360 street view, you can choose the
location to save the final Output image and the file format (i.e. Output
JPEG or Output PNG.
In addition, always set the Quality to maximum, by simply moving the slider to the far right.
Also,enable the Weld Tiles and the Crop
Panorama option.
Once satisfied with the settings/parameters, simply click on
the Grab button, to capture the panoramic street view.
Once the grabbing process is finished, a dialog should notify you that the process is Done; click OK to close
it.
Also, open the grabbed panoramic image in Photoshop.
The chances are that you’ll be required to flip the
grabbed panoramic view horizontally before using it as a reflection in 3ds max.
To flip the image horizontally, simply click on the Image
main toolbar and choose the Rotate Canvas option, followed by
clicking on the Flip Canvas Horizontally.
You can also save the new flipped image under a different
name (i.e. …flipped).
It’s worth noting that, if the Photomontage/verified view
happens to be a Night shot; depending on your personal Photoshop skills, you might be able to turn the panoramic day map into a night
one (with a considerable amount of effort, one may add).
Alternatively, you can try some of the Insta360 cameras, on location.
For more information about these High definition 360
cameras, please visit:
To apply the newly saved panoramic bitmap in 3ds max, simply do
the following:
In mental ray: Please refer to this article posted earlier:
In Vray:
Start by opening the Render Setup dialog (F10).
Under V-Ray
tab, expand the V-Ray: Environment rollout parameters.
To plug the previously saved panoramic bitmap from Google
street view, simply click on the Reflection/refraction environment override
toggle.
The Material/Map browser dialog should pop up. Click on the
Bitmap procedural map to locate and load the previously saved Google street
view bitmap.
Once the bitmap is loaded; you may be required to edit
some of its bitmap parameters in order to make it fit correctly in the viewport.
To do so, open the Material Editor dialog (M) and drag the bitmap
from the Reflection/refraction environment override toggle, onto any available
material slot.
The instance copy (Map) slot dialog should appear. Choose
the “Instance” method and OK to close it.
As instances, whatever changes take place in the Bitmap parameters, will also affect the Reflection/refraction environment override toggle.
In order to control the position of the reflection map in
the 3d environment; the reflection bitmap needs to be visible in the viewport,
through the Environment Map toggle.
So the next step will be to open the Environment and effects
dialog (8), followed by dragging and dropping the reflection bitmap from the
Material Editor, onto the Environment Map toggle.
Choose the instance option again.
Next, we are going to select the camera viewport and open
the Viewport Background parameters (Alt+B).
In the Viewport Background Parameters, first enable the
Match Rendering Output function, followed by turning on the Display Background
option, and the Use Environment Background.
Click OK to close the dialog and see the reflection bitmap in the Viewport.
Click OK to close the dialog and see the reflection bitmap in the Viewport.
Back in the Material Editor, under the, Coordinates
parameters, enable the Environ function and set the Mapping type to Spherical
Environment.
You may also choose to offset its U and V coordinates, if desired.
In addition, in order to increase the amount of reflectivity seen on the glass/reflective surfaces, simply scroll down to the
Output rollout coordinates and increase its RGB Level values.
Once Satisfied with the reflection settings and its coordinates, go back to the Environment and Effects dialog clear it from
the Environment Map toggle.
To do so, simply right click on the toggle and
choose to Clear, from the pop up menu list.
It’s worth noting that, clearing the Environment Map toggle
will only affect the Environment display image, Not the reflections from the
Reflection/Refraction environment override toggle.
At this stage you can now load back in your original
background image being used for the verified view/s or Photomontage/s, in the
Environment Map toggle.
Note: In Vray,
when using photographed image/s from verified views or Photomontages as back plate renders, it’s important that the background photography renders with
its original colour and gamma; especially when matching lights and colours
directly in 3ds max.
To ensure consistency, one might need to change the image Gamma
settings to, Override 1.0.
Furthermore, you’ll be required to set your V-Ray: Color
mapping NOT to Affect background.
Finally, once satisfied with the reflections, the
environment map colours, the lighting and with the cameras; you may choose to save
the render presets for each camera (i.e. cam 1, cam2, etc).
To save render presets, simply click on the Save Preset
option.
When the Select Preset Categories dialog pops up, I often choose all of them, because it saves the render output
size, the render elements, the reflections, the environment, etc.
However, some users prefer only few specific categories.
To save different light settings and positions, choose the
Manage Scene states in addition to render presets.
Unlike render presets, scene states are NOT saved outside
3ds Max; instead, they are only stored in the 3d scene they have originated from.
So if you choose to merge your 3d scene (with presaved scene
states) into a new one Max file; the chances are, you will automatically lose all your pre-saved
scene states.
The Save button
allows users to save their parts/categories.
Note: After saving a scene state, ensure that NO new objects
or lights are added into the scene; otherwise you might be required to resave all the scene states again.
The Restore
button allows users to restore their presaved scene state/s.
Note: You need to
select your saved scene state first, before restoring it.
When selecting the Parts/categories of the scene to save,
make sure you don’t save the environment settings again (override), if already saved from the render preset.
Only save
light related parts/categories and layers.
Some users may prefer to make things less complicated (No render presets), by opting to use the Scene
states only, when saving the light properties, layers and the
environment settings.
However, they should take into consideration that, when using numerous cameras and environments; different reflections will also be required.
And currently, the Environment
Part/category from the Scene States doesn't have the option save the
V-Ray Environment settings.
For tips and scripts for Verified views, please visit this new post HERE
For tips and scripts for Verified views, please visit this new post HERE
I hope you have found this article somehow interesting.
Video Captions available (CC)
Video Captions available (CC)
Video Captions available (CC)
Video Captions available (CC)
Video Captions available (CC)
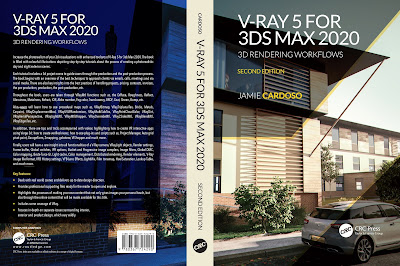
Finally, I have just published a New Book with Taylor & Francis/CRC Press, entitled,
V-Ray 5 for 3ds Max 2020: 3D Rendering Workflows
Click on the image below to find out more about my new book.
Checkout below my other Courses with High Resolution Videos, 3d Project files and Textures included.
Important Terminologies & Descriptions:
3d Rendering: In a nutshell, is the process of converting the three dimensional (3D) data seen in a 3d scene into 2D image/s (rasterized).
3D renders can be a sequence of animated objects/effects/cameras, or a single frame with a still camera and object/s.
Some of the articles, Videos and Tutorials depicted here will take you through the process of rendering.
Photorealistic Rendering: Is the Process or Art of making a typical Computer Generated Image/render (CGI) look indistinguishable from a real photo.
To achieve this, users often need to possess the skills and the"eye" to appreciate good photography, cameras, composition, lighting, shaders, materials, 3d modelling, rendering and have some post-production skills.
Some of the articles, Videos and Tutorials depicted here will help you achieve truly photorealistic renderings.
Architectural Rendering, or architectural illustration/Visualization, is the art/process of creating two-dimensional images or animations depicting the attributes of an architectural design, while using state of the art applications such as, Autocad, 3ds max, VRay, Cinema 4d, Blender, Maya, Corona, Photoshop, etc
Some of the articles, Videos and Tutorials depicted here will take you through this amazing process.
Post-Production: Is the process of creating effects or/and results after (post) the main process.
This terminology can be used to describe the results (post-production) of main processes such as 3d renderings and/or filming a scene.
The post-production often occurs in applications such as Photoshop, After Effects, Nuke, etc.
Some of the articles, Videos and Tutorials depicted here will take you through the process.
Textures: Is a term often used to describe photographed 2d images to be later used in a toggle of a shader or procedural map.
Textures can be used in the Diffuse toggle, Reflect, Glossy effects, Bump, Displacement, etc.
Some of the articles, Videos and Tutorials depicted here will take you through the process of applying textures.
Materials: Is a term often used to describe maps, textures,procedural maps or shaders, depending on the context the term is being used.
Some of the articles, Videos and Tutorials depicted here will take you through the process of applying materials.
Procedural materials: Is a term often used to describe maps with editable/proprietary parameters/functions.
Some of the articles, Videos and Tutorials depicted here will take you through the process of applying procedural materials.
Shaders: Is a term often used to describe complex materials with functions and procedural maps created for a specific purpose.
Some of the articles, Videos and Tutorials depicted here will take you through the process of applying shaders.
In addition, there is a huge online support for this software, and countless online sites with tips and tutorials.
Finally, there are readily available books, online/college courses, and its full documentation at Adobe.com
 |
| Course 1: Exterior Daylight with V-Ray + 3ds Max + Photoshop |
 |
| Course 2: Exterior Night with V-Ray + 3ds Max + Photoshop Course 3: VRay 3ds Max Interior Rendering Tutorials |
 |
| Course 4: Interior Daylight with V-Ray + 3ds Max + Photoshop |
 |
| Course 5: Interior Night with V-Ray + 3ds Max + Photoshop |
 | |||||
Course 6: Studio Lights with V-Ray + 3ds Max + Photoshop
|
3d Rendering: In a nutshell, is the process of converting the three dimensional (3D) data seen in a 3d scene into 2D image/s (rasterized).
3D renders can be a sequence of animated objects/effects/cameras, or a single frame with a still camera and object/s.
Some of the articles, Videos and Tutorials depicted here will take you through the process of rendering.
Photorealistic Rendering: Is the Process or Art of making a typical Computer Generated Image/render (CGI) look indistinguishable from a real photo.
To achieve this, users often need to possess the skills and the"eye" to appreciate good photography, cameras, composition, lighting, shaders, materials, 3d modelling, rendering and have some post-production skills.
Some of the articles, Videos and Tutorials depicted here will help you achieve truly photorealistic renderings.
Architectural Rendering, or architectural illustration/Visualization, is the art/process of creating two-dimensional images or animations depicting the attributes of an architectural design, while using state of the art applications such as, Autocad, 3ds max, VRay, Cinema 4d, Blender, Maya, Corona, Photoshop, etc
Some of the articles, Videos and Tutorials depicted here will take you through this amazing process.
Post-Production: Is the process of creating effects or/and results after (post) the main process.
This terminology can be used to describe the results (post-production) of main processes such as 3d renderings and/or filming a scene.
The post-production often occurs in applications such as Photoshop, After Effects, Nuke, etc.
Some of the articles, Videos and Tutorials depicted here will take you through the process.
Textures: Is a term often used to describe photographed 2d images to be later used in a toggle of a shader or procedural map.
Textures can be used in the Diffuse toggle, Reflect, Glossy effects, Bump, Displacement, etc.
Some of the articles, Videos and Tutorials depicted here will take you through the process of applying textures.
Materials: Is a term often used to describe maps, textures,procedural maps or shaders, depending on the context the term is being used.
Some of the articles, Videos and Tutorials depicted here will take you through the process of applying materials.
Procedural materials: Is a term often used to describe maps with editable/proprietary parameters/functions.
Some of the articles, Videos and Tutorials depicted here will take you through the process of applying procedural materials.
Shaders: Is a term often used to describe complex materials with functions and procedural maps created for a specific purpose.
Some of the articles, Videos and Tutorials depicted here will take you through the process of applying shaders.
V-Ray: Is a rendering engine that uses global illumination
algorithms, including path tracing, photon mapping, irradiance maps and
directly computed global illumination.
Furthermore, it is used as a commercial plug-in for
third-party 3D computer graphics software applications such as 3ds max, Maya, Houdini, Blender, Nuke, etc, for
visualizations and computer graphics in industries such as media,
entertainment, film and video game production, industrial design, product
design and architecture.
3ds Max: Autodesk 3ds Max, formerly 3D Studio and 3D Studio Max, is a
professional 3D computer graphics program designed to create 3D animations,
models, games and images.
In addition, it has modelling, animation and movie effects
capabilities, frequently used by video game developers, TV commercial studios
and architectural visualization studios.
3ds Max also features shaders, dynamic simulations, particle
systems, plug-ins, and much more, with its own scripting language.
Adobe Photoshop: Photoshop is a powerful raster based graphics program produced by the Adobe Corporation.
It
is widely used for a variety of photo/image editing purposes worldwide.
The program has a huge number of filters, functions, plug-ins, scripts,
etc.In addition, there is a huge online support for this software, and countless online sites with tips and tutorials.
Finally, there are readily available books, online/college courses, and its full documentation at Adobe.com
New Book: 3D Photorealistic Rendering: Interiors & Exteriors with V-Ray and 3ds Max
Post-production techniques
Essential tips & tricks for VRay & mental ray
Photorealistic Rendering
Creating Customised IES lights
Realistic materials
Creating a velvet/suede material
FoxRenderfarm
www.arroway-textures.com
Renderpeople
Gobotree
Post-production techniques
Essential tips & tricks for VRay & mental ray
Photorealistic Rendering
Creating Customised IES lights
Realistic materials
Creating a velvet/suede material
FoxRenderfarm
www.arroway-textures.com
Renderpeople
Gobotree


No comments:
Post a Comment