

The idea started years ago when I first pleaded with Matthias (then, working as a Director of product integration, at mental images) to develop a plug-in that could aid professional 3D Visualisers to integrate their 3D elements into Photomontages; verified views, and general external shots!
My desperate plea spurred him to single handily develop a ground breaking plug-in that is now known as RichDirt (now available for VRay also).
Most professional 3D Visualisers can relate to the laborious process of making a pristine/clinical external daylight render to look believable/photorealistic.
While the above mentioned is the general consensus amongst 3D professionals, there might be the odd project that may involve great buildings and designs (i.e. numerous modelling details; superior material finishes; nice metallic surfaces; glass reflections, appealing colour schemes; great compositions; etc.) that can make one’s life a bliss when creating photorealistic CG images.
Since the above mentioned projects are very few, one still has to be faced with the reality that most projects are riddled with challenges related to integrating CG elements into photographs, or even just making a full CG external daylight shot to look realistic!
One of the most popular techniques amongst CG professionals is to add very subtle surface discrepancies such as dirt, etc.
This popular technique had been borrowed/ copied from the film industry.
While Film/production companies make discrepancies very prominent in their shots, professional 3D Visualisers tend to make it as subtle as possible; as clients often expect their buildings to appear relatively New (i.e. Architects, Developers; etc.).
We are all too aware of the fact that, this perception from most clients does not correlate to reality:
The fact remains that during the construction of any building (i.e. 1, 2, or more years); surfaces are constantly exposed to adverse weather conditions and human activities (i.e. rain, wind, dust, sun rays, scratches, splotches, etc.) that will unequivocally affect the finishes/surfaces over a period of time.
While the natural building changes caused by some of the factors mentioned earlier are visible, they still look subtle and acceptable after just 2, 3 years in construction; therefore still considered/perceived to be relatively “New”.
If it was humanly possible to omit all discrepancies accumulated during the period of construction of a building, it would probably look CG (i.e. unreal).
Human eyes can inexplicably notice the absence of these natural and subtle discrepancies that we often take for granted!
The Job of a professional 3D Visualiser is to try to emulate the same type/s of discrepancy subtleties that often go “unnoticed”.
In doing so one is essentially making a CG render as realistic as any other professional architectural photograph!
This is one of the many reasons Film companies and highly specialized 3D Visualisation firms use captivating real photographs as reference, to achieve the ultimate result!
The images below depict some of my numerous 3D Visuals that involved having to manually paint extensively subtle discrepancies (i.e. dirt, etc.), in order to fully integrate the shots!
At the time, one of my biggest challenges was to be able to individually paint and “churn out” thirty different shots of each project, in a very short period of time!


RichDirt is currently the best suited Plug-in to address the technical “nightmares” highlighted earlier, especially due to its powerful/superior multiple render elements’ functionalities.
In addition to being ultra-fast to render, RichDirt also provides users with numerous options to plug/ mix with other proprietary shaders, and a variety of Max’s procedural maps such as cellular, smoke; Mix; Noise; Speckle; etc.
Furthermore, while 3D Visualisers will benefit immensely from its powerful functionalities, users from Games and Film industry may also find it utterly indispensable in their everyday projects.
RichDirt is currently designed for Max/ mental ray and V-Ray. However, since users can efficiently output its effects as multiple elements (i.e. rendered passes); it is possible to overlay the elements in post, whilst using other rendering engines (i.e. Maxwell; FPrime; etc).
The following tutorial (for mental ray) will hopefully help users understand some of its amazing key functionalities:
First ensure that the mental ray renderer is loaded.

Also, it is utterly crucial to set the display unit scale, as this function will help determine whether or not one is working in real world scale (i.e. door height: 2.13m; chair seat height: 0.4m; etc.).


Prior to beginning to apply the RichDirt, it is commendable to select few key objects in the 3Dscene, followed by isolating them; as opposed to test rendering the entire scene…which could be time consuming.
Finally, disable all lights; exposure/environment settings; reduce the rendering output size along with the general FG and global rendering settings.
This workflow will speed up the test renders toward the final desired results.


4-There are multiple ways of using RichDirt:
A-Directly onto a 3D object
B-As a rendered element/pass in post.
This exercise will focus mainly in its functionalities as a rendered element.
We will start by loading RichDirt into Max first.
RichDirt is only accessible through the main diffuse material parameters toggle, and can only be found under the “mental ray rollout” group, in the “material/ map browser” dialog.


5-To quickly fine-tune its settings and speed up the process, we are going to primarily use RichDirt “globally” as an override:
A-Open the “render setup” dialog box by clicking the F10 key, or by simply choosing it from the “rendering” tab dropdown list.
B-In the “processing tab”, enable the “material override” function.
C-Back on the “material editor” dialog, return to the main material parameters, by clicking on the “go to parent” button.
D-On the main material parameters, drag and drop the shader from the “material editor” dialog onto the” material override” toggle.
Choose the “instance (copy) method” option.


6-The RichDirt from the material editor is now linked with the material override.
Do a quick test render (i.e. Shift+Q) to see the results.

7-The test render is looking ok. However, it is looking slightly grey and reflective.
On the “main material parameters”, decrease the “reflectivity”; “glossiness” and the “glossy samples” values to 0.0.
Also, change the RichDirt colour to plain white.
Test render again to see the results.


8-The render now looks slightly better.
Due to the viewport that the render was taken from (i.e. orthographic view), the image is looking slightly faceted, and with artifacts.
To correct this, simply change the viewport to perspective/ or camera.
Also, to begin tinkering with some of its pre-sets, choose the “rich building +streaks” from the dropdown list; and test render it again.


9-With the “Perspective/camera” viewport selected, the renders look smoother and cleaner.
Most RichDirt settings are self-explanatory, especially when hovering with the mouse over most parameters and functions.

10-To quickly go through some of its core parameters, we are going to start with the “Clean” function.
Clean: This function determines the main colour of the geometry.
To change its default colour, simply left click on its colour swatch and choose the desired colour from the “color selector” dialog, as previously done.
Alternatively, users can also plug a procedural map, texture, or a proprietary shader onto its toggle!
Dirt: This function determines the main colour of the dirt areas of the geometry.
To change its default colour simply left click on its colour swatch and choose the desired colour.
Alternatively, users can also plug a procedural map, texture, or a proprietary shader onto its toggle!

The “Spread” value generally helps to feather the prominence of the dirt effect on the surface.
These values can be positive or negative, depending on the effect intended.


11-The beauty of this plug-in is that one can save out multiple variation effects as a separate rendered element (i.e. passes), to later compose in post…without any render compromises.
Personally, I like both results (i.e. value of 20.0 & -20.0) of the “spread” value.
It is also worth noting that, RichDirt rendered elements (i.e. passes) have the perfect contrast between bright and dark areas; therefore excellent to compose in post.
This process will be later explored!
Furthermore, the inner occlusion (IO) is one of the best and most unique features of this plug-in:
It essentially computes realistically the occlusion from the edges of an object. The images below depict its superior effect on surfaces.


12-The “Radius” function sets the distance of the dirt from its point of origin.
High values may turn the renders a bit dark, and make the dirt to lose its definition.
Users can also plug a procedural map, texture or a proprietary shader into its toggle.


13-The “Falloff” sets the amount of decay as the dirt expands away from its main point of origin.
This function is quite good to set the concentration of dirt on certain areas of a surface.
Users can also plug a procedural map, texture, or a proprietary shader into its toggle.


14- The “Bias” function helps to reinvigorate the appearance of dirt in a variety of directions (X; Y; Z).
Users can also plug a procedural map, texture, or a proprietary shader into its toggle.
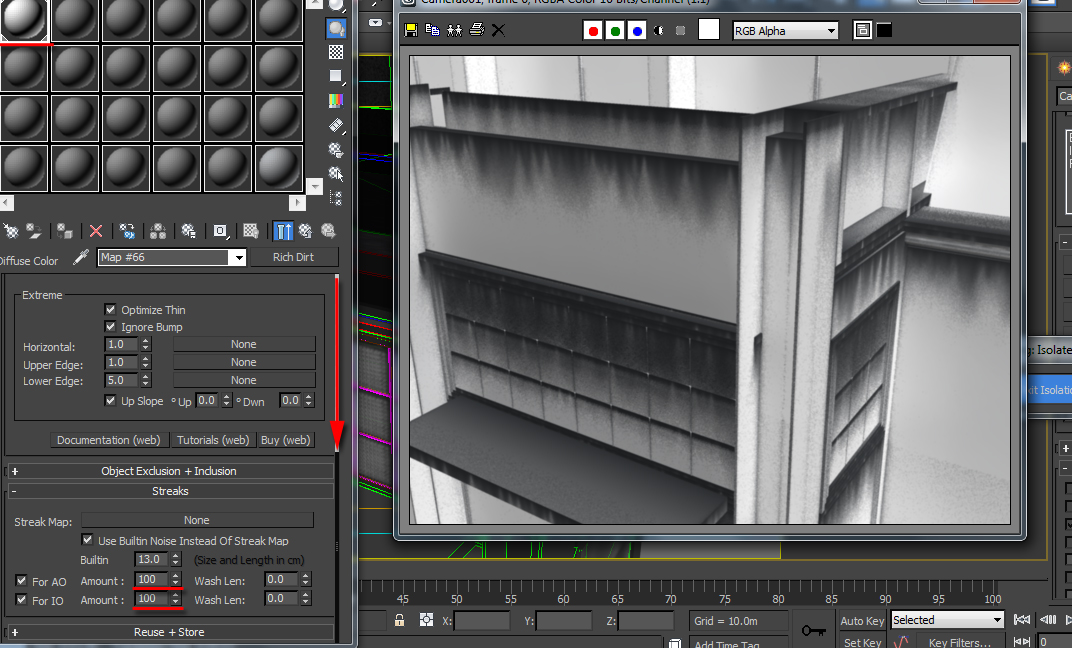
15- In the “Extreme” group, there a number of functions to help RichDirt pick up tiny details/objects in the scene.
By enabling the “optimize thin” function, the plug-in will help accentuate the dirt visibility in areas that would have been “overlooked” otherwise.
The “Horizontal” ; “Upper Edge” and “Lower Edge” function sets the direction of the accentuation.
Users can also plug a procedural map, texture, or a proprietary shader into its toggle.
The “Up Slope” and “Dwn” function sets the degrees at which the “streaks” should stop following at.
The default value of 0.0 is set for the “streaks” to follow the surfaces in all degrees.


"Lower edge" set to 5.0
16-Under the “streaks” parameters rollout, we have the “streak map ” toggle and its parameters.
A-The “Streak map” toggle allow users to plug a procedural map, texture or a proprietary shader into its toggle.
By default, this function is overridden by the “Builtin” function.
The “use builtin Noise instead of Streak map” function overrides the “Streak map” toggle.
The “Builtin” function tightens up the streaks’ appearance.


The “For AO” function enables streaks on ambient occlusion (AO); and the “For IO” enables the streaks on inner occlusion (IO).


The “Amount” values determine the visibility on the streaks on the surface.

17- After having gone through most of its relevant parameters, it is commendable for users to save out multiple pre-sets as render elements (i.e. passes) for more control over its effects in post!
Let us start by first saving out the first RichDirt settings under the name of “strong Streaks”, in a new material library.
To create a new material library, simply select the relevant material slot on the material editor.
Next, click on the “get material” button to open the “material/map browser” dialog; followed by clicking on the “material/map browser options” button, and choosing the “new material library…” option from the dropdown list.
Name the material library “RichDirt passes.mat”.


18-Now that a new material library had been created, one needs to add the RichDirt material to the library.
While in the “material/map browser “ dialog, scroll down to the “sample slots” rollout. Select the relevant sample slot, and right click on it.
On the pop up list, choose the “copy to” option, followed by selecting the “RichDirt passes.mat” material library.

19-The next phase is to rename the saved material as “strong Streaks”.
Scroll back up to the newly created material library rollout.
Select the pre-saved material; right click; choose the “rename” option from list and type in the name in the dialog box.


20-To save the most recent changes; simply select the “RichDirt passes. mat” rollout, from the “material/map browser “ dialog, and right click.
On the dropdown list, choose the “ save” option from the pop up list.

21-To add the RichDirt as a render element (i.e. pass), simply open the “render setup” dialog box(F10).
Next, click open the “render elements” tab, and hit the “add” button; followed by choosing the “mr shader element” from the dialog list.

22- Once the “mr shader element” is loaded, scroll down to its “parameters” rollout, and hit on the “shader” toggle to load up the pre-saved RichDirt material.
Pick the relevant RichDirt material, and close the dialog.

23-Once loaded, drag and drop it onto one of the material editor slots. Choose the” instance (copy) method”, to close the dialog.

24-By default the pre-saved material is under the name of “map #66 (Rich Dirt). This is mainly due to the render element toggle only accepting the RichDirt map itself, as opposed to the entire shader.
Rename it “Strong Streaks”, by typing it on the material name field.

25-To create new variations and effects of RichRirt, simply drag and drop the current slot onto the adjacent material slot, and rename it .
Next, load up a new RichDirt pre-set from the dropdown list.

26-To test render the results of the newly created pre-set; simply select the original material slot from the top left slot (i.e. render override shader); followed by dragging the newly created material slot and dropping it onto the “diffuse” toggle of the top left slot.
The newly created material is now part of the material override toggle.
It is worth test rendering to see the results of the new RichDirt settings.
Prior to test rendering, disable the render element functions, to prevent Max from automatically saving it/them in a folder directory.


27-We now have multiple RichDirt parameter variations to use as rendered elements. If not satisfied with the current results, one could alternatively tweak the parameters further by plugging /mixing some of its toggles with Max’s procedural maps; shaders; textures; etc.
Once satisfied with the results, simply put this sample slot onto the“ RichDirt passes. mat” library, and save it over again, as previously done.


28-If there’s no desire to create new RichDirt variation elements, simply enable the render elements functions again, and add the newly created material to the list of elements, as previously done.
Also, it is worth renaming (i.e. type in) this newly created element from the “selected element parameters” name field.
This is mainly for one to be able to clearly distinguish the attributes of each listed element.


29-Now that everything is set, one can exit the isolation mode; disable the material override if desired; increase the sampling quality ; reset the render output size; set the t file type to TGA; etc.
One of the great aspects of the previously discussed methodology is that, one can access this pre-saved material library from a variety of different 3d scenes, on demand.

30-It is worth noting that one can also add other render elements such as ZDepth; Object ID; mr A&D Output: Diffuse Direct Illumination; etc; if desired.
As previously mentioned, the rendered elements’ contrast between the dark a bright areas are very apparent.
This is excellent for blending in post!

31- Once everything is rendered; in Photoshop, bring in your main rendered image and your elements.
To begin overlaying document layers, select one of the rendered elements document.
Next, open the channels tab, hold down the "CtrL" key and left click on the “Alpha” channel layer to select the main layer.
There should be a selection marquee around the Alpha area. Copy (Ctrl+C) the selected layer from the main document.
Now select the main render document, and paste it (Ctrl+V) the previously copied layer onto it.

32-Once the render element is on top of the main render, and adjusted, rename it and choose a different colour, to make a clear distinction between the two layers.
To edit layers, simply select it; right click and choose the “Layer properties” from the list.


33-To begin blending the render element, simply choose the “multiply” blending mode from the dropdown list, as it worked best for this exercise.
Next, create the “add a vector mask” tool. The “add a vector mask” tool is excellent to partially or fully omit elements of any given layer.
On the “tools” dialog box, select the brush tool (B); set the opacity to 30%, and begin brushing around the undesired areas.
The “add a vector mask” tool works best with white and/or black colours, when masking with the brush tool.
The black brush colour omits areas of the document; and the white brush colour does the opposite.
It is worth noting that, in addition to using the “multiply” blending mode, one can also reduce its overall appearance by simply decreasing its layer opacity value.
Bring in the other render element/s and repeat the previous steps.


34-The 3D renders below, depict the before and after shots using RichDirt.
As previously discussed, most 3D Visualisation clients would have preferred the RichDirt effects to be more subtle.
However, for the sole purpose of this exercise the RichDirt effect/s were made very visible...for obvious reasons.


I hope you have found the article interesting.
For more in-depth information and download of this Plug-in please visit:
http://www.enrichpro.com/en/richdirt/index.html
So far, I would like to give a especial “thank you” to the following group of experts; talented individuals and companies that have taken the time to look; test and recommend this product:
Cyrille Fauvel: Worldwide ADN Sparks program Manager; Autodesk Developer Network
Dano Battista: Director @ DB3D.co.uk
Iain Banks: Senior 3D Visuliser and owner of iainbanks.com
Graham Macfarlane: Visualisation specialist and Co-owner of Elyarch Ltd
Maher Zebian: Senior 3D Visualiser @ Glass Canvas Productions
Thorsten Hartmann - Infinity Vision
I hope you have found this article somehow useful!
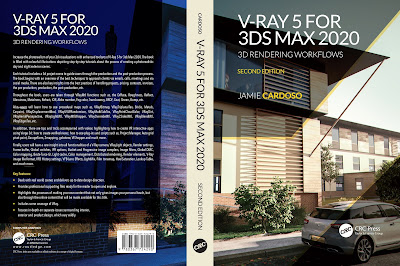


Finally, I have just published a New Book with Taylor & Francis/CRC Press, entitled,
V-Ray 5 for 3ds Max 2020: 3D Rendering Workflows
Click on the image below to find out more about my new book.
Video Captions available (CC)
Video Captions available (CC)
Video Captions available (CC)


Also, please Join my my Gumroad page to download other Courses;Interior design with Project files; Watch more Videos and receive Technical Support. Finally, check my New channels below:


![]()


Checkout below my other Courses with High Resolution Videos, 3d Project files and Textures included.
 |
Course 1: Exterior Daylight with V-Ray + 3ds Max + Photoshop  |
| Course 3: Exterior Night with V-Ray + 3ds Max + Photoshop |
| Course 4: Interior Daylight with V-Ray + 3ds Max + Photoshop |
 |
| Course 5: Interior Night with V-Ray + 3ds Max + Photoshop |


More tips and Tricks:
Post-production techniques
Tips & tricks for architectural Visualisation: Part 1
Essential tips & tricks for VRay & mental ray
Photorealistic Rendering
Creating Customised IES lights
Realistic materials