Friday 11 December 2009

Rendering: mental ray_Relative Intensity of Highlights


Often, just leaving mental ray and its shaders to work out the highlights isn’t enough.
There is a function named relative intensity of highlights. It is very useful to “boost up” highlights that are not very apparent on the surface. It can be found on the advanced rendering options parameters, under the advanced reflectivity options group.

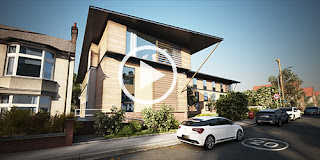
For the above image I had increased its values to about 30 however, depending on the specific scene one may be required to increase or decrease these values.By the way, this chrome material was applied to all the metal frames by the door entrance and windows.


Note: These values only affect objects that already have some sort of shine on them and somewhat being affected the by light.


Moreover, the visible area lights cause no highlights function could also be unchecked to further increase the highlights however, it is not always required.


I hope you have found this post useful.


Please check my new channels below:


                                                         Video Captions available (CC)


                                                      Video Captions available (CC)


                                                      Video Captions available (CC)


More tips and Tricks:

Post-production techniques

Tips & tricks for architectural Visualisation: Part 1

Essential tips & tricks for VRay & mental ray

Photorealistic Rendering

Creating Customised IES lights

Realistic materials

Creating a velvet/suede material 

FoxRenderfarm

www.arroway-textures.com 

Renderpeople

Gobotree

Rendering: mental ray_Adding glow to the window glass


The above image was produced whilst at GMJ Design Ltd


In our latest book, we have covered a number of ways of emulating light without the need of creating a physical light.


Production companies often adopt similar methods to reduce the rendering times and retain the overall quality.
It is worth pointing out that the usage of Ambient Occlusion(i.e. AO) as a separate pass or/and directly from Max is utterly imperative for the final shot.


The following exercise will take you through another unique methodology of achieving similar results with reduced rendering times:

Another quick way of emulating “glow”/"light" on windows, is to in fact enable the glow function on the glass panes themselves.

To do this, simply go to the main material parameters, under the "refraction" group.

1-Reduce the transparency to about 0.9 to prevent the surface from being fully transparent.

2-To add a bit of blur to the transparency, decrease the glossiness to about 0.78. Note that, these values may vary depending on one’s camera angle...and the level of transparency/blurriness intended.

3-Next,change the colour swatch from white to a warm yellow.
Also, the "fast (interpolate)" function, can be enabled for quick and fast results, as the glossiness and its samples can often slow down the renders.However,it may create artifacts.

4-Pan down to the "self illumination (glow)" parameters and enable the "self illumination (glow)" function.

5-Under the "luminance" group, change it from "unitless" to "physical units: cd/m2)". Also, pick and choose any relevant bitmap (i.e. photo) that has a prominent light source.


Note: The "unitless" function often creates artifacts on glossy reflections, therefore, to be avoided at all costs.


Depending on time in hand, one can set the glow to generate light, or not, through the FG, by checking the "illuminates the scene (when using fg)" function.
...and... “...let there be light...”!!!

The final rendered image below was achieved using this technique. I hope you like it.


I hope you have found this post interesting.


                                                         Video Captions available (CC)


                                                      Video Captions available (CC)


                                                      Video Captions available (CC)


Checkout below my other Courses with High Resolution Videos, 3d Project files and Textures included.

Course 1: Exterior Daylight with V-Ray + 3ds Max + Photoshop  


https://1.bp.blogspot.com/-9eQU0iHK3WA/XguRwIGeE0I/AAAAAAAAKgo/-eW0NMMyH-YmjyXyFcaRjPlW_G9p8NEywCLcBGAsYHQ/s1600/Living%2BRoom%2B3dBeeIT%2BCamera%2BRaw%2BFilter.JPG
   Course 2: VRay 3ds Max Interior Rendering Tutorials

Course 3: Exterior Night with V-Ray + 3ds Max + Photoshop

Course 4: Interior Daylight with V-Ray + 3ds Max + Photoshop

Course 5: Interior Night with V-Ray + 3ds Max + Photoshop


Course 6: Studio Lights with V-Ray + 3ds Max + Photoshop


Course 7: Planning Applications for Verified Views


Course 8: 3d People + 3ds Max + VRay + Photoshop 

Also, please Join my Patreon page or Gumroad page to download Courses; Project files; Watch more Videos and receive Technical Support. Finally, check my New channels below:

https://www.patreon.com/user?u=2469908  


New Book: 3D Photorealistic Rendering: Interiors & Exteriors with V-Ray and 3ds Max


More tips and Tricks:

Post-production techniques

Tips & tricks for architectural Visualisation: Part 1

Essential tips & tricks for VRay & mental ray

Photorealistic Rendering

Creating Customised IES lights

Realistic materials

Creating a velvet/suede material 

FoxRenderfarm

www.arroway-textures.com 

Renderpeople

Gobotree