

The 3d image shown above was created while at GMJ. To see my entire 3d portfolio and the architectural rendering, simply click on the above image!
While today’s fast computers may ensure rendering crashes are less and less frequent, there are still instances when processing high resolution photorealistic renders will cause computers to freeze and ultimately crash!
I have certainly experienced in numerous occasions having renders
freeze and crash when there were only few “render buckets” left to complete
the entire image!
Such inconveniences may cause major setbacks with the
final deadline and user’s workflow, especially when the renders are taking a
considerable amount of time to process.
For example, the above panoramic image was rendered at 22.000 x 11.000
pixels,while at GMJ design ltd. As one can imagine, it was a huge challenge to create and render
the above image due to its unusual output pixel size, and the manner in which it was captured (panoramic).
And yes, it crashed several times while the render was being processed!!
And yes, it crashed several times while the render was being processed!!
We had decided to render the space in a panoramic style to
save the client time and money by NOT having to create and render countless
camera angles to capture the entire proposed space.
The end product was a full panoramic image rasterized as a JPEG, which the client was then able to view and navigate through, by using a free
software called “ iMove Viewer” .
Users can also set the location and the frequency of the
renders being saved.
Below is the simple script created by David Venables:
(
Global AutosaveImg
fn dntTick =
(
Local
Autosavedir = (getdir #autoback) + "\\" +
"Rend_autosave.tif"
TIF.setType
#color16
TIF.setAlpha
#true
::AutosaveImg =
getLastRenderedImage copy:off
AutosaveImg.gamma
= 2.2
AutosaveImg.filename
= Autosavedir
Save AutosaveImg
)
Global dnetTimer = dotnetobject
"system.timers.timer" (2*60*1000)
dotnet.addEventHandler dnetTimer
"Elapsed" dntTick
callbacks.removeScripts
id:#RenderAutoSave
callbacks.addScript #preRender
"dnetTimer.start()" id:#RenderAutoSave
callbacks.addScript #postRender
"dnetTimer.stop()" id:#RenderAutoSave
)
To save this script, simply open 3Ds Max, followed by clicking on the MAXScript button from the main toolbar, and choosing the MAXScript Editor option from the dropdown list.

Its dialog should open. Next, copy and paste the above mentioned script onto the dialog’s text field.
By default, the script automatically finds the autosave path
with the (getdir #autoback) string of code; and saves the file under the name
of "Rend_autosave.tif" as
a TIF file format.

This can be changed manually. For instance, the default path could be saved in the following location: C:\Users\Public\Pictures
The relevant line of code would be replaced with the
following: “Local Autosavedir = C:\\Users\\Public\\Pictures
+ "Rend_autosave.tif" .

In addition, the script automatically sets the saving frequency to every 2 minutes: (2*60*1000).

This default timer can also be changed by simply typing in a different number you may find more adequate (i.e. replace nr 2)!
Once satisfied with everything, simply save the script by pressing
Ctrl+S.
The Save file dialog should appear. In order for this
script to automatically start as a callback everytime 3Ds Max is lauched, it must be saved as an ms file in the following location:
C:\Program
Files\Autodesk\3ds Max 2012\Scripts\Startup.

Note: If using a different version of Max, simply save the script in the adequate 3ds Max folder (i.e. 3ds Max 2013; etc).
Next, close and restart 3Ds Max. Render anything that would take longer than 2 minutes to test whether the script works or Not.
Finally, go to the designated folder/location to see the
saved image/file; or simply type in the following in the bottom left part of 3ds Max:
display (getLastRenderedImage()) ;
followed by pressing Enter.
The OK text in blue should appear below, along with
the last saved render in the frame buffer.


The beauty of this script is that it will give the user the reassurance/peace of mind that when/if the render crashes it will be saved. This will also enable the user to continue from where the render was last saved; as opposed to starting from scratch again!
Currently the script works mainly with the 3Ds Max frame
buffer, regardless of the rendering engine being deployed.
The panoramic image below was rendered using the Render_autosave script!

If there are any specific features you would like to see implemented in
this script, please contact David Venables through his LinkedIn page HERE or
via email HERE.
I hope you have found this article useful.


Video Captions available (CC)
Video Captions available (CC)
Video Captions available (CC)
Video Captions available (CC)
Video Captions available (CC)


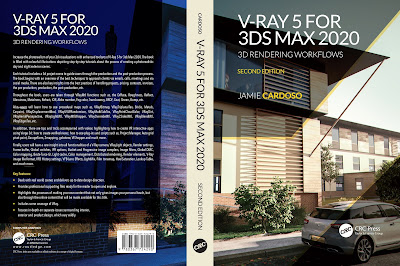
Finally, I have just published a New Book with Taylor & Francis/CRC Press, entitled,
V-Ray 5 for 3ds Max 2020: 3D Rendering Workflows
Click on the image below to find out more about my new book.
Checkout below my other Courses with High Resolution Videos, 3d Project files and Textures included.
Also, please Join my Patreon page or Gumroad page to download Courses; Project files; Watch more Videos and receive Technical Support. Finally, check my New channels below:


![]()


New Book: 3D Photorealistic Rendering: Interiors & Exteriors with V-Ray and 3ds Max
 |
| Course 1: Exterior Daylight with V-Ray + 3ds Max + Photoshop |
Course 2: Exterior Night with V-Ray + 3ds Max + Photoshop |
| Course 4: Interior Daylight with V-Ray + 3ds Max + Photoshop |
 |
| Course 5: Interior Night with V-Ray + 3ds Max + Photoshop |
 | |||||
Course 6: Studio Lights with V-Ray + 3ds Max + Photoshop
|


Also, please Join my Patreon page or Gumroad page to download Courses; Project files; Watch more Videos and receive Technical Support. Finally, check my New channels below:


New Book: 3D Photorealistic Rendering: Interiors & Exteriors with V-Ray and 3ds Max
More tips and Tricks:
Post-production techniques
Tips & tricks for architectural Visualisation: Part 1
Essential tips & tricks for VRay & mental ray
Photorealistic Rendering
Creating Customised IES lights
Realistic materials
Creating a velvet/suede material
FoxRenderfarm
www.arroway-textures.com
Renderpeople
Gobotree