

Master your post-production skills like a pro
Post-Production: Is the process of creating effects or/and results after/post the main process.
This terminology can be used to describe the results (post-production) of main processes such as 3d renderings and/or filming a scene.
The post-production often takes place in applications such as Photoshop, After Effects, Nuke, etc.
Some of the articles, Videos and Tutorials depicted here will take you through the process.
The following step-by-step tutorial will guide users through the intricacies of setting up 3ds max to render high resolution images, and prepare the render elements for post-production in Photoshop.
The subsequent stage will take users through the process of using adjustment layers and the render elements in Photoshop, to control/enhance the display of objects in the scene.
Users will also be shown how to add people in post realistically, in order to create a sense of scale, and help tell the story of the design.
Finally, users will be taken through the unique process of making an image “Pop” whilst using key adjustment layers and Photoshop filters.
Note: I would like to take this opportunity to thank Renderpeople, for being very kind, for allowing me to use their hyper realistic 3d models of people in my scene:The level of detail of their models is truly exceptional.

Setting up for Final render
First, increase the render Output Size to 3500x4379, or higher. While most post production companies often render to 6000 pixels or above, 3500 pixels is good enough for the purpose of this tutorial.
Insure the Vray Region button is turned off in the Frame buffer.

While still in the In the Render Setup dialog, open the V-Ray tab and enable the Split render channels function.
To name the final high res output file, click on the Browse toggle. The Select V-Ray G-Buffers file name dialog should open up.
Name the file as interior Daylightvray and save the file type as Targa Image (tga). The Setup toggle should bring you the Targa Image Control dialog.
Choose the Image Attributes to be 32 Bits-Per-Pixel, with Pre-Multiplied Alpha enabled.


Alternatively, you can choose the Tiff file format, with a 16-bit Color and No compression.

Also, disable the probabilistic lights function, to prevent any noise in the render.

In the Indirect illumination tab, scroll down to the V-Ray:: Irradiance map rollout and change the Current preset to Medium. For this specific scene the Medium is worked OK.
However, some interiors may require going to pre-sets such as High, or Very High.
In the Basic parameters group, increase the Interp. Samples to about 70. This value is good enough to eliminate the current artifacts seen in the test render.
It’s worth noting that, higher values may reduce the appearance of shadows in the scene. Therefore these values should be increased with caution.

Next, scroll further down to the V-Ray:: Light cache rollout parameters, and increase the Subdivs Calculation parameters to about 1500.
There are scenes where one would be required to go as high as 2000/2500.
The rule of thumb is to start with lower values and gradually increase as necessary.

To finalize the render tweaks prior to sending out the final render, we are going to add few Render Elements.
Render elements are one of the most important parts of the render, as they will help fine-tune shader settings in post, without the need to resend the renders in 3ds max.
The Elements Active and Display Elements functions can be turned on, or off, as required.
The Add toggle allows users to add elements to the Name list below.
The Merge toggle allows users to pick one or a host of elements from a different Max scene.
The Delete toggle allows users to select and delete elements from the Name list below.
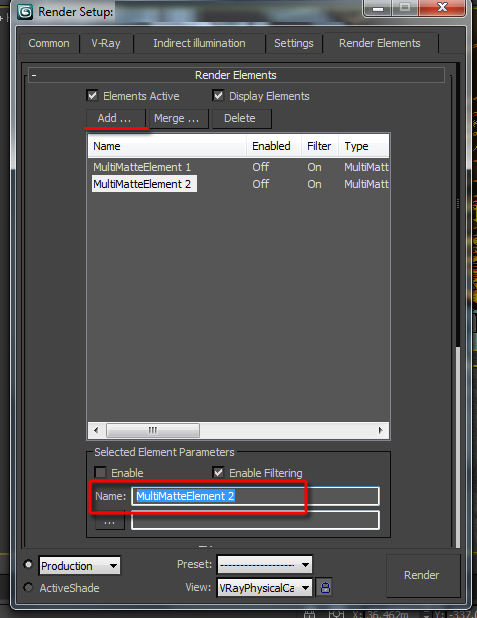
Start by opening the Render Elements tab and by clicking on the Add toggle to bring up its dialog
Choose the MultiMatteElement from its list, and OK to close the dialog.
MultiMatteElement is currently the best render element to select colors in post.
Each MultiMatteElement can take up to three different colors/channels. Each color is a true representation of R (red), G (green) and B (blue), which are very easy to pick/select in post.
The default numbers being displayed are ID numbers representing object Ids, or material IDs (when ticked on).
The numbers can be manually changed, if required.


For this exercise we’re only using obj IDs, because the Material Editor Id numbers are restricted to 15 only.
By default, the R and B colors are disabled. To enable All three colors, simply select the element from the Name list, and turn each color function on.
Since there are numerous objects in the scene with different object ID numbers, we are going to create multiple layers of MultiMatteElement .
Let’s start by renaming this element as, MultiMatteElement 1.

Create the next MultiMatteElement and rename it as, MultiMatteElement 2. It’s important to rename elements with similar name, to avoid being overridden.
Also, change these new RGB id numbers to 4, 5 and 6 and so forth.

Repeat the previous steps to create more MultiMatteElement, to represent all object ID numbers previously created.
Once all the MultiMatteElement are created, add the following elements:
VRayBumpNormals
VRayDiffuseFilter
VRayGlobalIllumination
VRayLighting
VRayLightSelect
VRayNormals
VRayRawGlobalIllumination
VRayRawLighting
VRayRawReflection
VRayRawRefraction
VRayRawShadow
VRayRawTotalLighting
VRayReflection
VRayRefraction
VRaySampleRate
VRaySelfIllumination
VRayShadows
VRaySpecular
VRayTotalLighting
VRayZDepth
ETC
More often than NOT some of the above listed elements may not work well with the base render, depending on the overall lighting.
However, the rule of thumb is to always add them, in case you may need them.

To work out the correct values for the VRayZDepth element, simply do a test render with the override material on, and with low render settings.
The best Zdepth results often yield a smooth transition from white to black.
One can achieve good results by simply tweaking with the zdepth max values. For this scene, the zdepth max value of 3.0m worked well.
However, feel free to experiment with different values, if desired.

Post-production in Photoshop
We’ll begin by opening and loading all the pre-rendered elements into a stack.
To do so, in Photoshop, click on the File from the main tool bar.
Choose the Scripts option from the drop down list, followed by selecting the Load Files into Stack function.

The Load Layers dialog should be prompted. Click on the Browse button to locate the files.
In the Open dialog, select all the rendered elements. To do so, pick the first file from the top of the list, followed by scrolling down, holding down the Shift button, and selecting the last file from the list.
Multiple files should be selected. Click OK to open them.

In the Load Layers dialog, click OK to load all the files displayed in its list.


The beauty of this Photoshop script is that, it stacks all rendered elements automatically, while retaining their original file names.
Save the current file as (Shift+Ctrl+S) psd.
Let’s start by enabling the visibility of the layer under the name of, Interior DayLightVray .RGB_color.0000.tga only, and disabling the visibility of the other layers automatically.
To do so, simply hold down the Alt key and left click on the relevant layer.

Next, open (Ctrl+O) a photo reference image file. This photo will be used to further match it with the render more closely.
Left click, hold down, drag and drop the,Interior DayLightVray .RGB_color.0000.tga layer on the bottom of the layer stack.
This action will make it easier to blend other layers on top of it.

To add some brightness and contrast to the image, click on the Create new adjustment layer button and choose the Levels function from its list.
The Levels dialog should appear. Begin dragging its middle slider to the left; and the slider from the far left towards the right.
For this exercise, the following values worked well: Left slider= 4; Middle slider=1.85; Right slider=255.
However, feel free to experiment with different values, if desired.


To give warmth to the render, add the Photo filter adjustment layer, using some of the techniques covered earlier.
In its dialog, accept the default filter (Warming Filter 85), and increase its density to 34% by dragging the slider to the right.
In its dialog, accept the default filter (Warming Filter 85), and increase its density to 34% by dragging the slider to the right.
Again, it’s worth noting that, these values worked well. However, try different values, if desired.
OK, to close the dialog.


While the photo filter made the render one step closer to the photo reference, the left areas require less of the filter, and more of the sky color.
To begin omitting parts of the photo filter, select its adjacent mask thumbnail and enable the brush tool first (B)
With the mask thumbnail selected;in the Tools side bar, ensure the Foreground color swatch is black, and the Background color swatch is white.
In Photoshop, when brushing on layer masks, the black color will omit pixels as one brushes away; and the white color will do the opposite.
To ensure you don’t omit large chunks of pixel while brushing, reduce the brush opacity slightly on the main toolbar.


To pick and edit brushes, click on the brush preset picker button from the main toolbar.
In its dialog, reduce the hardness value to 0%. This will make the brush softer and easier to control while brushing away pixels.
In its dialog, reduce the hardness value to 0%. This will make the brush softer and easier to control while brushing away pixels.
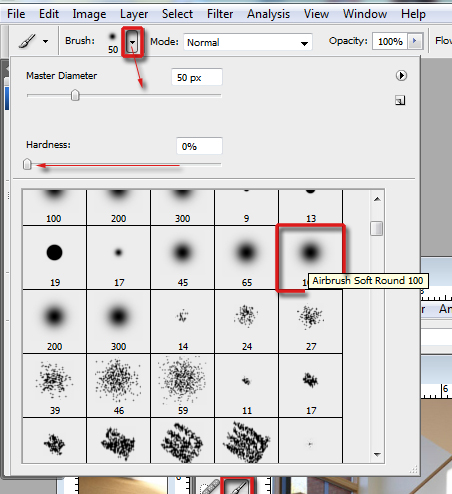
While the brush tool is enabled (B), use the key ]to increase the brush size; and the key [ to decrease it.
Also, use the zoom tool (Z) followed by (B) to brush pixels more closely.

The next step is to put these two adjustment layers in one group (folder) to begin tiding up the psd file.
To create a group folder, select the Photo filter layer first, followed by clicking on its button to create it.
By selecting the Photo Filter first, we’ve ensured the group folder was created on top of it.
Rename the group folder as, Whole.
Rename the group folder as, Whole.
The name, whole, was given due to these adjustment layers being applied to the whole image.
To rename the group folder, simply double left click on its text, type in and click Enter.

Move both adjustment layers inside this new group folder.
To do so, simply select both layers (hold down Ctrl+select one layer at time), and move/drag both layers into this new group folder.
While dragging both layers into the group folder, you should see a rectangle indicating the layers are inside, once the drag cursor is on top of it.
Once both adjustment layers are inside the group folder, click on its adjacent arrow to close it, or open it.


Create a folder mask to ensure this group folder with adjustment layers don’t affect the glass windows.
To create a mask for this group folder, we need to select the glass material first.
To do so, scroll up to where the Interior DayLightVray .MultiMatteElement_1.0000.tga layer is.
Make the layer visible by simply clicking on its visibility icon.
It’s also worth mentioning that, it is common practise to ensure all MultiMatteElement layers are positioned above all layers of the document.
The selection of MultiMatteElementcolors are more accurate when they sit above all the remaining layers.

One of the most common methods of selecting any of the three channels (RGB), is to simple open the Channels' pallet, hold down the Ctrl key and left click on any of the three channels displayed (R, G or B) to enable its selection.

Alternatively, while the DayLightVray .MultiMatteElement_1.0000 layer is still selected, click on the Select main toolbar and choose the Color Range function from the drop down menu.

The Color Range dialog should appear. In the Select group, choose the Reds from the dropdown list. All the Reds from the layer should be selected automatically.
This is one of many reasons why VRay MultiMatteElement isone of the best render elements used to select colors accurately and automatically.
As mentioned earlier, when using the Multimatte element to select objects/materials; these layers need to be at the very top of all layers, in order for the selection to be accurate.
Also, the relevant multimatte layer in question needs to be selected first.


Turn off the MultiMatteElement visibility, to see the selection in the render.
The next step is to invert the selection (Shift+Ctrl+I), followed by selecting the group folder and creating the layer mask, by clicking on its button.
The next step is to invert the selection (Shift+Ctrl+I), followed by selecting the group folder and creating the layer mask, by clicking on its button.


Use the Layer Mask in conjunction with the brush tool (B) to mask in/brush in areas affected by the mask.

Also, right click on the layer mask and choose to, disable the layer mask. This tool allows users to compare the effects of the layer mask.
To enable the Layer Mask again, simply left click on it.

The next step is to begin tweaking each material individually. The first material to start with, is the hand rail.
Use some of the previous steps to select the bluecolor range from the DayLightVray .MultiMatteElement_1.0000.tga layer.

While the selection is still on, create a new group folder and name it Handrail.
Following that, create a layer mask as previously done.
Following that, create a layer mask as previously done.
Ensure this new folder is above the layer under the name, Interior DayLightVray .RGB_color.0000.tga.

Next, select the layer named, Interior DayLightVray .RGB_color.0000.tga and create the Levels adjustment layer.

In its dialog, set its middle slider to 0.78 and its left slider to 11.
Try different values if desired.
Try different values if desired.

To ensure the Levels changes affect the handrails only, select the adjustment layer and move it into the pre-masked handrail group folder.
Use some of the steps covered earlier to move the adjustment layer; and see the before and after results.

With this masked group folder, one can now begin adding render elements such as Vrayspecular and Vrayreflection.
To do so, simply select both elements using some of steps covered earlier; followed by holding down the Alt key and moving both layers into the handrail group folder.
Release the Alt key once both layers are inside the handrail group folder.


These two rendered elements will be used to help enhance their influence on this particular object/material (handrails)
Firstly, enable the VRayReflection layer visibility and choose the Soft Light blending mode from its drop down list.
After having tried a number of different blending modes from the list, this one seemed to have worked best for this particular render element.
After having tried a number of different blending modes from the list, this one seemed to have worked best for this particular render element.
The rule of thumb is to always try different types of render elements and blending modes to see which ones work best for the final output.
It’s common for some film studios to use up to six different render elements, for each group folder.

Next, turn on the layer visibility of the VRaySpecular and choose the Screen blending mode.
This blending mode worked best. However, try a different one, if desired.
Also, ensure the VRaySpecular layer sits on top of the VRayReflection.
Again, that particular position worked best after having tried the VRayReflection layer on top first.

Note how the element effects affect the masked handrail folder only.
This unique technique allows users to control the effects of specific materials/objects without being forced to make compromises of the entire image.
This unique technique allows users to control the effects of specific materials/objects without being forced to make compromises of the entire image.
Finally, color code each render element according to their properties (i.e. VRaySepecular= Red; VRayReflection= Yellow; etc)
To color code a layer, simply right click on the layer and choose, Layer Properties option from the pop up list.
In its dialog, pick any color from its drop down list.
Most recent versions of Photoshop allow users to pick colors without having to open the Layer Properties dialog.


Use some of the techniques covered earlier to enhance other materials/objects in the image.
As previously mentioned, not every rendered element will be useful for every single material/object in the image.
It will be a case of trial and error to see which rendered elements and blending modes will work best for each image/object in the image.
Refer to the PSD under the name of, Interior DaylightVray.psd and RenderPeople.PSB, to see how each render element was used.
Note: To enable the selection of a layer mask, simply hold down the Ctrl key and left click on the mask thumbnail.

The next step is to create a glow for the ceiling lights.
Start by selecting the ceiling lights.Use some of the techniques covered earlier.

Once the selection is on, deselect the MultiMatte Elementlayer and scroll down.
Before creating a new layer, select any of the top group folders to ensure the layer is created on top of it.
Once a new layer is created, rename it as, Ceiling lights glow.


While the selection is still on, set the foreground color to an orange tone, and use the paint bucket tool (G) to fill out the selection layer.
If necessary, move the layer further up in order to be visible.

Following that, deselect the selection (Ctrl+D) and right click on the, Ceiling lights glow layer. Choose the, Convert to Smart Object option from the list.
This layer option allows users to record the parameters of filters applied. While useful, it also adds up to the PSD file size.


To begin adding the glow effect to the ceiling lights, click on the Filter main tool bar, followed by selecting Blur and choosing the Gaussian Blur option from the dropdown list.
Its dialog should appear;the radius of 21.4 worked best. However, try different values, if desired.


Use the Lighten blend mode to create the glow effect, and reduce its opacity to about 51%. Again, this blend mode and opacity value worked best. However, try different values and blend modes, if desired.

To edit the Gaussian Blur filter applied, simply expand the smart object layer, by clicking first on its side arrow, followed by clicking on its eye icon.
The same side arrow can be used to close the expanded layer pallet
Its adjacent mask thumbnail (Smart Filters) allows users to mask out areas with a brush tool.

The next step is to create diffused shadows and the vignetting effect in random areas of the image.
Create a new layer inside the group folder under the name Whole, and name it Vignetting. Ensure this layer is under the, ceiling lights glow layer.
This is to ensure the vignetting effect occurs under the above mentioned layer.
In addition create its layer mask thumbnail and change its color to grey.
Follow some of the techniques covered earlier to achieve this.

Next, ensure the layer is selected, as opposed to its mask; and select the Paint Bucket tool; from the side toolbar.
To select the Paint Bucket tool, simply left click and hold down, followed by selecting its icon.

While the vignetting layer is still selected, paint the layer by clicking the Paint Bucket tool on it.
Ensure its Foreground color is black.

Before we begin painting in the shadows, the black color needs to be masked out first.
To quickly mask out the black color, select the vignetting layer mask first, and use the Paint Bucket tool to mask out the entire layer.
As mentioned earlier, the black color on the mask hides pixels away; and the white color does the opposite.

To begin creating the vignetting effect with the layer mask, select the brush tool (B) and set the foreground color to white.
In addition, decrease the brush Opacity to about 7% and begin brushing in the black colour on areas such as the corner of the document.
With the Brush opacity decreased to 7%, one can gradually control the amount of pixels to be brushed in.

The vignetting effect can also be achieved with adjustment layers such as Levels or Curves.
Instead of using the Paint Bucket tool on a layer, simply create a Curve or a Level adjustment layer to achieve this.

It’s also common practise to tidy up/organize all the remaining layers and passes into group folders.
To do, simply use some of the previous steps.
To do, simply use some of the previous steps.
As mentioned earlier. Ensure all the multimattelayers/elements “sit”above all the other layers from the document.

Finally, save and close your final as a PSD.
To see the final results, simply open the final PSD file under the name of, Interior DaylightVray.psd
It’s quite common for PSD files to grow to sizes larger than 2GBs when implementing some of the techniques covered earlier.
When such occurs, Photoshop will generate an error and cancel the saving process. To override this artifact, simply save the PSD file as PSB instead.
This Large Document Format (*.PSB) type allows Photoshop to save files larger than 2GB; while retaining all the usual PSD document and layer properties.

If perchance you had Renderpeople (photo real 3d people) in your scene, this tutorial would have probably ended here; with your render looking more or less like the images below.


There are often instances when there isn't enough time or/and resources available to add people in post.
In such cases Renderpeople assets (photo real 3d people) can work just as well, if not better than photoshoped 2d people; especially when working with crowds or/and aerial shots.
Presently, Renderpeople have some of the most realistic 3d models in the industry.
For more information about them, please visit,: https://renderpeople.com/ref/5/
Adding 2d People in post
Adding people to visuals often help tell a story while giving a sense of scale and realism to the image.
Furthermore, the task of choosing the right type of people in the correct lighting environment, can be extremely time-consuming at times.
Having an extensive library of 2d people and background images/environments can help expedite this process immensely.
A very useful place to find 2d cut out people, silhouettes, trees, grass, background images/environments, etc is, Gobotree.com The website has a vast and diverse library.
Back in your 3ds Max scene; create boxes that are 1.65/ 1.736m in height; and 0.332m in width/length; to be later used as placeholders for human dimensions.
Place them around the scene,in areas where you plan to add people in post.

Next, click on the print screen key on your keyboard (PrtSCSysRq) and go back to Photoshop.
In Photoshop, press Ctrl+N to create a new document and Ctrl+V to paste the printed screen.
The following step is to use the crop tool (C) to crop in the yellow areas(Camera frame area) of the printed screen.
To crop, simply click and drag the crop tool in the desired area, followed by double-clicking thereafter.


Next, enable the move tool (V) and select the cropped screen grab layer. Followed by dragging & dropping it onto the, Interior DaylightVray_no people document.

Use the Ctrl+T to enable the transform tool handles.
Next, hold down the Shift tool, grab the top left side of the layer and scale it up proportionally.
Next, hold down the Shift tool, grab the top left side of the layer and scale it up proportionally.
Also, use the layer opacity to match/line up the screen grab position against the, Interior DaylightVray_no people document.

One of the most challenging parts about adding people in post is the process of selecting the correct types, with the appropriate lighting, and at the right angle.
Depending on the client and/or project you may be asked to add casual and/or smartly dressed people.
It is common practise to place people in groups/pairs and utilizing key areas of the space.
Let’s start by opening the file under the name of, group of people.psd
This file was specifically chosen because it contains people at the right angle, with the correct lighting, and dressed casually.

While the document comes with a variety of people, we’ll focus mainly on the girl standing on the far right.
Start by enabling the Polygonal Lasso tool and drawing it around the girl. To draw, simply click and move the mouse repeatedly while drawing around the entire body.
Once a full circle around her body is completed, a tiny circle should appear. Simply double click to close the circle.
A selection should be activated.


While the polygonal lasso selection is active copy the selection (Ctrl+C). Next, select the document under the name of, Interior DaylightVray_no people, and paste it (Ctrl+V)


To begin editing/scaling the pasted image, enable the Free Transform tool (Ctrl+T); followed by holding down the Shift key and moving up the top left handle.
The image should scale proportionally. Ensure that it matches with one of boxes from the screen grab.
To exit the Free Transform tool, simply double click on the centre of the image being edited.


To ensure her direct shadows are falling in the right direction, we are going to flip the image (the girl) horizontally.
To do so, while the Layer 2 (the girl) is selected, go to Edit main toolbar and choose the Transform option; followed by selecting the Flip Horizontal tool.
Also, turn off the visibility of the screen grab underneath it.

The next step is to erase the unwanted pixels around the image. Rename the Layer 2 as Girl by the window; and duplicate it.
Turn off the visibility of the original layer. It is common practise to always keep the original layer intact, for reference purposes, and as a precautionary measure.
To quickly and accurately erase pixels, we are going to use the Background Eraser tool. Enable this tool from the side toolbar and choose the sampling type to Once.
This option allows users to sample the area/color with a circle target; followed by clicking to erase a sampled area/color.
Users can also click+hold down+move the mouse to continuously erase similar sampled areas/colors.
Also, choose the Limits type as Contagious; the Tolerance at 50% and the option to Protect Foreground Color
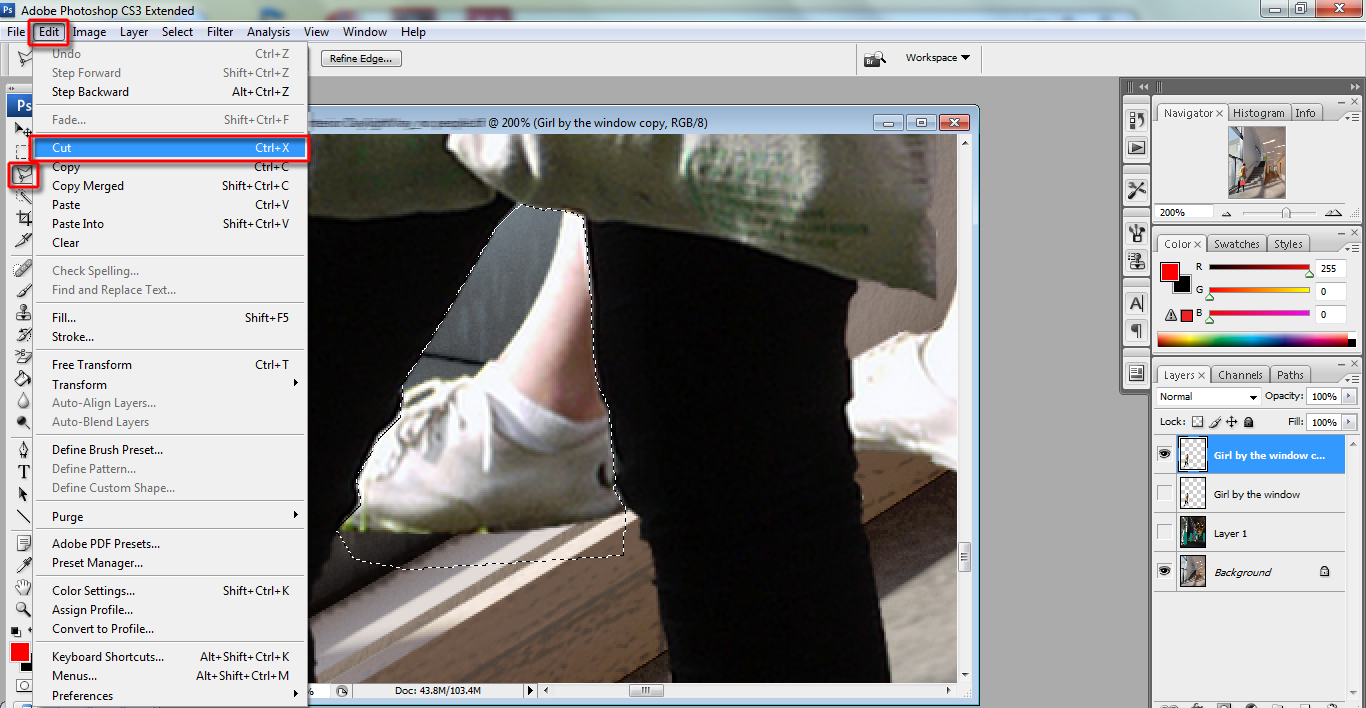
In addition, zoom in to the document and begin erasing unwanted pixels around the selected layer (Girl by the window copy)
Change different tolerance values, depending on the areas being erased.


To remove other parts of the image, use the polygonal lasso tool to select and cut (Ctrl+X) unwanted pixels
The next step is to add her shadows being cast along the corridor.
When adding shadows, one should always match its direction and blurriness with the original base render.
When adding shadows, one should always match its direction and blurriness with the original base render.
Select the Girl by the window layer, and duplicate it. Rename the layer as Girl by the window shadows and change its color to gray.
By default the duplicated layer may sit on top of the original. Select and move it underneath the original layer, as shadows of a person are often cast under them.
Use some of the techniques described earlier to achieve this.


To emulate a shadow let’s start by darkening the layer underneath, Girl by the window shadows. To do so, simply select the layer and press Ctrl+L to bring up the Levels dialog.
Move the Output Levels slider all the way to the left (to value 8 or less)to darken it; and click OK to close its dialog.

Before we begin modifying the shadow direction, convert the layer, Girl by the window shadows into a smart layer. Use some of the techniques covered earlier to do so.
As mentioned earlier, a smart object layer records some of the layer’s transformations/actions, which will later allow users to undo/edit actions.

To begin transforming the layer, press Ctrl+T to enable it; followed by moving downwards its top middle point, until it matches with the floor perspective.

While the layer is still selected, right click and choose the skew option, from the pop up list.
Begin pushing and pulling its four corner points individually to distort the layer horizontally. You may also use the middle point move the layer.
It’s worth mentioning that, the skew corner points can only used/distorted once they go from black to gray/hatched.

Next, add the motion blur filter to match the blurriness of the shadows in the base render.
Set the Angle to 0.0 and the Distance to 171 pixels.
As mentioned earlier, these values worked well. However, feel free to use different and/or filters, if desired.


To match its shadow brightness to the ones depicted in the base render, decrease its Fill value to about 69%, and add the Levels adjustment layer on top of it, using some of the techniques covered earlier.
In the Levels dialog, move the leftmost slider of the Output Levels to 54. The brightness of the image should increase substantially.
To ensure only the, Girl by the window shadow layer is affected by this Levels adjustment layer; hold down the Alt key and click on the middle line dividing/between the Levels and the Girl by the window shadow layer.
Once a small icon appears, create a clipping mask by left clicking on it to restrict its influence on the entire document.
With the levels restricted to the layer below it, an arrow pointing downwards should automatically appear next to it.

To blend areas where the shadows and the base render are overlapping, create a new layer mask,and begin masking out the relevant areas.
Use some of the steps covered earlier to achieve this.

The next step is to add someone walking upstairs. Open a file under the name of Boy Walking up.psd.
This file was specifically chosen due to having a person directly lit by sun, and walking with his back facing the camera.
Drag and drop the file into the working document and flip it horizontally using some of the techniques highlighted earlier.
Following that, place him next to where the staircase begins and close to the large window on the left side.
Also, covert the layer into a smart object and apply a slight Motion Blur to it, to give it a sense of motion.

To match the layer brightness with the rest of the image, create an adjustment layer (Levels) and add a clipping mask to it, as previously done.
In the levels dialog, move its RGB leftmost slider to 19; the middle slider to 0.88 and the rightmost slider to 193.

Next, create its shadows while using some of the steps covered earlier. However, this layer should not be converted to a smart object due to the technique required to have its shadows cast over the first two steps of the staircase.
After the shadows are transformed and blurred, the first selection should be created and the Ctrl+T enabled to rotate its direction upwards.

Following that, the second selection should be created and rotated to sit on top of the next step.

Use some of the approaches covered earlier to add more people in areas such as the corridor and walking up the stairs.
In addition, use adjustment layers such as Levels and Hue/Saturation to help integrate people and shadows.


To help “ground” the people in the scene, use the exact same technique previously implemented to create the vignetting effect, and name it diffused shadows.
Also, ensure this layer is positioned under all layers in order to have the shadows below the people.

To emulate reflections of people walking in the corridor, simply select and duplicate the relevant layer; followed by moving it down and flipping it vertically.
To flip a layer, simply go to, Edit main tool bar>Transform>Flip Vertical

To match the reflection opacity with the rest of the image, simply reduce the layer opacity to about 34%.
To match its blurriness and slight unevenness with the rest of the image; convert the layer to a smart object as previously done; add a motion blur and the ocean ripple filter to it.

To see the final result, simply open the file under the name of, Interior DaylightVraypeople.psd


To finally make the whole image “pop”, we will add some key adjustment layers:
Open the image under the name of, Interior DaylightVray .tif
To create some contrast to the image, add the Levels adjustment layer. In its RGB Input Level ,move its middle slider to about 0.34.
In the Output Levels, move its leftmost slider to 5; in order to create an atmospheric effect.
Use the layer mask to slightly brush way this effect on areas such as the wall.

To add a bit of color to the image, create another Levels adjustment and choose its Blue Channel.
In its Input Levels,move the middle slider to about 0.52.
In the Output Levels, move the left slider to 35 and the right point to about 123.

To brighten up the image and add more color, create the Curves adjustment layer.
The lower part of the curve represents the dark areas of the image; and the upper of the curve represent the brighter areas.
Choose its Blue Channel and add two point curves with the mouse target:
The first curve point in the lower part of the curve line should be (i.e. Output: 93/ Input: 94), and the point in the upper side of the curve should be (161/161).
Select the upper point curve and move it downwards slightly (142/187). Note the color changes taking place.

Next, choose the RGB channel, followed by creatingand moving two curve points: First point 92/43; second point to 192/109. Note the brightness of the image changing gradually.
Finally, use the layer mask to brush away the curves’ effects in areas such as the window on the left hand side.


I hope you have found this step-by-step tutorial somehow useful.
It's also worth noting that, this tutorial is an excerpt (a water down version) of chapter 9, from my new book (twenty chapters).
It's also worth noting that, this tutorial is an excerpt (a water down version) of chapter 9, from my new book (twenty chapters).
Video Captions available (CC)
Video Captions available (CC)
Video Captions available (CC)
Video Captions available (CC)
Video Captions available (CC)
Checkout below my other Courses with High Resolution Videos, 3d Project files and Textures included.
 |
| Course 1: Exterior Daylight with V-Ray + 3ds Max + Photoshop |
Course 2: Exterior Night with V-Ray + 3ds Max + Photoshop |
| Course 4: Interior Daylight with V-Ray + 3ds Max + Photoshop |
 |
| Course 5: Interior Night with V-Ray + 3ds Max + Photoshop |

 |
| Course 7: Planning Applications for Verified Views |
 | |
| Course 8: 3d People + 3ds Max + VRay + Photoshop |
Also, please Join my Patreon page or Gumroad page to download Courses; Project files; Watch more Videos and receive Technical Support. Finally, check my New channels below:


Important Terminologies & Descriptions:
3d Rendering: In a nutshell, is the process of converting the three dimensional (3D) data seen in a 3d scene into 2D image/s (rasterized).
3D renders can be a sequence of animated objects/effects/cameras, or a single frame with a still camera and object/s.
Some of the articles, Videos and Tutorials depicted here will take you through the process of rendering.
Photorealistic Rendering: Is the Process or Art of making a typical Computer Generated Image/render (CGI) look indistinguishable from a real photo.
To achieve this, users often need to possess the skills and the"eye" to appreciate good photography, cameras, composition, lighting, shaders, materials, 3d modelling, rendering and have some post-production skills.
Some of the articles, Videos and Tutorials depicted here will help you achieve truly photorealistic renderings.
Architectural Rendering, or architectural illustration/Visualizations, is the art/process of creating two-dimensional images or animations depicting the attributes of an architectural design, while using state of the art applications such as, Autocad, 3ds max, VRay, Cinema 4d, Blender, Maya, Corona, Photoshop, etc
Textures: Is a term often used to describe photographed 2d images to be later used in a toggle of a shader or procedural map.
Textures can be used in the Diffuse toggle, Reflect, Glossy effects, Bump, Displacement, etc.
Some of the articles, Videos and Tutorials depicted here will take you through the process of applying textures.
Materials: Is a term often used to describe maps, textures,procedural maps or shaders, depending on the context the term is being used.
Some of the articles, Videos and Tutorials depicted here will take you through the process of applying materials.
Procedural materials: Is a term often used to describe maps with editable/proprietary parameters/functions.
Some of the articles, Videos and Tutorials depicted here will take you through the process of applying procedural materials.
Shaders: Is a term often used to describe complex materials with functions and procedural maps created for a specific purpose.
Some of the articles, Videos and Tutorials depicted here will take you through the process of applying shaders.
In addition, there is a huge online support for this software, and countless online sites with tips and tutorials.
Finally, there are readily available books, online/college courses, and its full documentation at Adobe.com
Also check:
3d Rendering: In a nutshell, is the process of converting the three dimensional (3D) data seen in a 3d scene into 2D image/s (rasterized).
3D renders can be a sequence of animated objects/effects/cameras, or a single frame with a still camera and object/s.
Some of the articles, Videos and Tutorials depicted here will take you through the process of rendering.
Photorealistic Rendering: Is the Process or Art of making a typical Computer Generated Image/render (CGI) look indistinguishable from a real photo.
To achieve this, users often need to possess the skills and the"eye" to appreciate good photography, cameras, composition, lighting, shaders, materials, 3d modelling, rendering and have some post-production skills.
Some of the articles, Videos and Tutorials depicted here will help you achieve truly photorealistic renderings.
Architectural Rendering, or architectural illustration/Visualizations, is the art/process of creating two-dimensional images or animations depicting the attributes of an architectural design, while using state of the art applications such as, Autocad, 3ds max, VRay, Cinema 4d, Blender, Maya, Corona, Photoshop, etc
Textures: Is a term often used to describe photographed 2d images to be later used in a toggle of a shader or procedural map.
Textures can be used in the Diffuse toggle, Reflect, Glossy effects, Bump, Displacement, etc.
Some of the articles, Videos and Tutorials depicted here will take you through the process of applying textures.
Materials: Is a term often used to describe maps, textures,procedural maps or shaders, depending on the context the term is being used.
Some of the articles, Videos and Tutorials depicted here will take you through the process of applying materials.
Procedural materials: Is a term often used to describe maps with editable/proprietary parameters/functions.
Some of the articles, Videos and Tutorials depicted here will take you through the process of applying procedural materials.
Shaders: Is a term often used to describe complex materials with functions and procedural maps created for a specific purpose.
Some of the articles, Videos and Tutorials depicted here will take you through the process of applying shaders.
V-Ray: Is a rendering engine that uses global illumination
algorithms, including path tracing, photon mapping, irradiance maps and
directly computed global illumination.
Furthermore, it is used as a commercial plug-in for
third-party 3D computer graphics software applications such as 3ds max, Maya, Houdini, Blender, Nuke, etc, for
visualizations and computer graphics in industries such as media,
entertainment, film and video game production, industrial design, product
design and architecture.
3ds Max: Autodesk 3ds Max, formerly 3D Studio and 3D Studio Max, is a
professional 3D computer graphics program designed to create 3D animations,
models, games and images.
In addition, it has modelling, animation and movie effects
capabilities, frequently used by video game developers, TV commercial studios
and architectural visualization studios.
3ds Max also features shaders, dynamic simulations, particle
systems, plug-ins, and much more, with its own scripting language.
Adobe Photoshop: Photoshop is a powerful raster based graphics program produced by the Adobe Corporation.
It
is widely used for a variety of photo/image editing purposes worldwide.
The program has a huge number of filters, functions, plug-ins, scripts,
etc.In addition, there is a huge online support for this software, and countless online sites with tips and tutorials.
Finally, there are readily available books, online/college courses, and its full documentation at Adobe.com

Architectural Visualisation Tips & Tricks
My two cents: The book also touches in many more Photoshop techniques/subjects such as; how to link your Photoshop layers/PSD files to your 3d renders (no plug-ins required).
ReplyDeleteSo every time your renders are updated and saved in 3ds Max, your PSD files and layers will be updated automatically.
The Magic words are: Video layers in Photoshop.
Just remember Not to press the "space bar" while using video layers in Photoshop.
Wow..
ReplyDeleteHai..thanks for this great tutorial
ReplyDelete